# Welcome

<figure><img src="/files/V0HdY6LDKqUcBjI6YH3J" alt=""><figcaption></figcaption></figure>

## Creating tools and integrations to simplify your workflow.

We design tools and integrations that enhance existing assets, making workflows smoother and more efficient.

[**Explore my assets on the Unity Asset Store**](https://assetstore.unity.com/publishers/111540)

### Game Creator 2 Assets

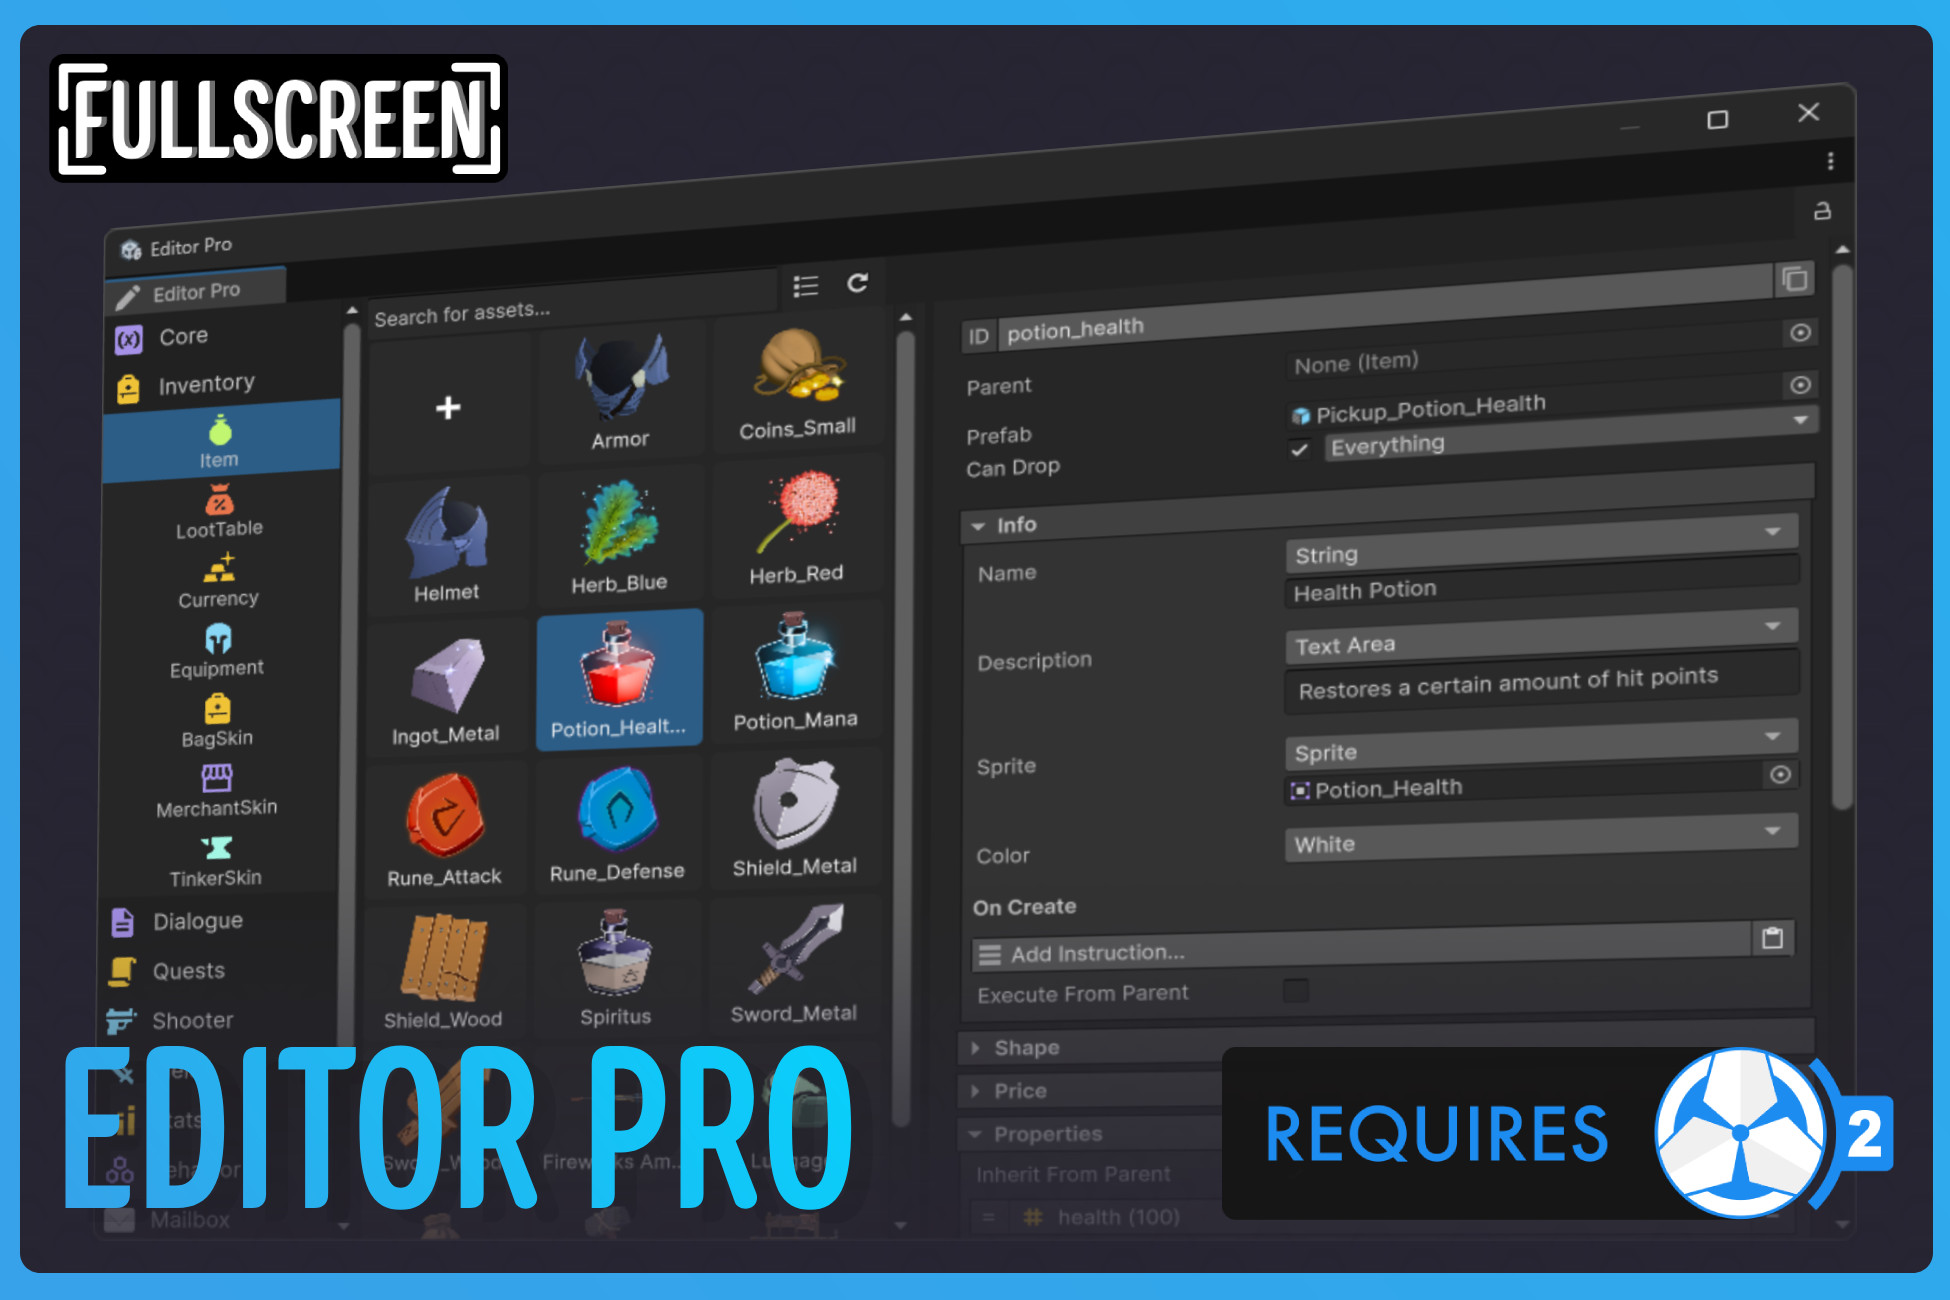
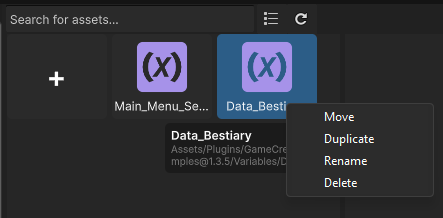
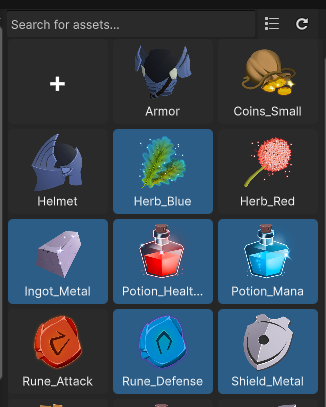
<table data-card-size="large" data-view="cards"><thead><tr><th></th><th></th><th data-hidden data-card-cover data-type="image">Cover image</th><th data-hidden></th><th data-hidden data-card-target data-type="content-ref"></th></tr></thead><tbody><tr><td><strong>Editor Pro</strong> </td><td>Editor Pro allows you to efficiently manage and organize Game Creator 2 scriptable objects. Easily search, edit, and open multiple objects at once, with icons displayed for quick identification</td><td data-object-fit="fill"><a href="/files/QzAt7m836nRcTATys6PV">/files/QzAt7m836nRcTATys6PV</a></td><td></td><td><a href="/pages/UkDDP5mkvktLjxcl6nIc">/pages/UkDDP5mkvktLjxcl6nIc</a></td></tr><tr><td><strong>LogicBlock</strong></td><td>Modular scripting for Game Creator 2. Organize reusable instruction and condition lists to simplify, optimize, and speed up your visual scripting workflow.</td><td data-object-fit="fill"><a href="/files/2xdoMXVXujME7lJPoj2N">/files/2xdoMXVXujME7lJPoj2N</a></td><td></td><td><a href="/pages/CDC7F9DOTIA0OtzD90jA">/pages/CDC7F9DOTIA0OtzD90jA</a></td></tr><tr><td><strong>Inventory Extended</strong></td><td>Modular Game Creator 2 Inventory expansion adding extended crafting, smelting, dismantling, item states, grid/list recipes, queues, and drag-drop between bags.</td><td data-object-fit="fill"><a href="/files/974LL48KJiLBBNz2tKXi">/files/974LL48KJiLBBNz2tKXi</a></td><td></td><td><a href="/pages/8rvJYO76yp07OlYXw7dP">/pages/8rvJYO76yp07OlYXw7dP</a></td></tr><tr><td><strong>Runtime Studio – Game Creator 2 Integration</strong></td><td>Runtime integration for Game Creator 2, enabling players to create and edit triggers, instructions, conditions, variables, and gameplay logic directly inside Runtime Studio at runtime.</td><td data-object-fit="fill"><a href="/files/aCykzl85XIf5vaUJQL0x">/files/aCykzl85XIf5vaUJQL0x</a></td><td></td><td><a href="/pages/9APiLNnBErpB2LeItNaE">/pages/9APiLNnBErpB2LeItNaE</a></td></tr><tr><td><strong>NodeFlow Quests</strong></td><td>Visual node-based quest graph editor for Game Creator 2 Quest 2 with minimap navigation, search tools, layouts, and improved quest organization.</td><td data-object-fit="fill"><a href="/files/ia2A03kicKcDxUaul5V9">/files/ia2A03kicKcDxUaul5V9</a></td><td></td><td><a href="/pages/Iy9V7xWq3zAZgichaOFx">/pages/Iy9V7xWq3zAZgichaOFx</a></td></tr><tr><td><strong>NodeFlow Dialogue</strong></td><td>Visual node-based dialogue graph editor for Game Creator 2 Dialogue 2 with branching conversations, jump navigation, minimap tools, search features, and improved dialogue organization.</td><td data-object-fit="fill"><a href="/files/4yqmjzW3VmTrbkqTBQEW">/files/4yqmjzW3VmTrbkqTBQEW</a></td><td></td><td><a href="/pages/ZsKQJbdOjjgtJd606zDT">/pages/ZsKQJbdOjjgtJd606zDT</a></td></tr><tr><td><strong>NodeFlow LogicBlock</strong></td><td>Visual node-based graph editor for LogicBlock in Game Creator 2 with visual instruction flow, list management, drag-and-drop reordering, minimap, search, and improved logic organization.</td><td data-object-fit="fill"><a href="/files/P6RZH3ARiLJAxqkeeNqv">/files/P6RZH3ARiLJAxqkeeNqv</a></td><td></td><td><a href="/pages/CtndPWXokyvGENzTuvhi">/pages/CtndPWXokyvGENzTuvhi</a></td></tr><tr><td><strong>NodeFlow Visual Scripting</strong></td><td>Visualize Game Creator 2 Triggers, Actions, and Conditions in a non-destructive node graph with live debugging and full flow visualization.</td><td data-object-fit="fill"><a href="/files/WlQHp2sLYuMKJNixiF2m">/files/WlQHp2sLYuMKJNixiF2m</a></td><td></td><td><a href="/pages/tHtqNMwVkx1evG4vNyJl">/pages/tHtqNMwVkx1evG4vNyJl</a></td></tr><tr><td><strong>HeroBridge</strong></td><td>HeroBridge integrates Sidekick's Modular Character system into Game Creator, letting you customize characters via visual scripting.</td><td data-object-fit="fill"><a href="/files/pxgnqKr7j0Dk5ku4JUtz">/files/pxgnqKr7j0Dk5ku4JUtz</a></td><td></td><td><a href="/pages/Yk3wrZtwfjf5P4hwcOsl">/pages/Yk3wrZtwfjf5P4hwcOsl</a></td></tr><tr><td><strong>NanoSave</strong></td><td>NanoSave is an extension of Game Creator 2's save system, providing seamless integration, enhanced metadata support, and efficient file compression for a streamlined saving experience.</td><td data-object-fit="fill"><a href="/files/BOid59KONcTraPWf9l0U">/files/BOid59KONcTraPWf9l0U</a></td><td></td><td><a href="/pages/Dc8AMolclyOfshnPKOHC">/pages/Dc8AMolclyOfshnPKOHC</a></td></tr><tr><td><strong>Persistent Instances</strong></td><td>Make instantiated GameObjects persist across saves and scene changes in Game Creator 2, allowing spawned items, enemies, and placed objects to stay exactly where players left them.</td><td data-object-fit="fill"><a href="/files/tPjYyndblJOTIWgxbAWp">/files/tPjYyndblJOTIWgxbAWp</a></td><td></td><td><a href="/pages/jOqduz5iSRxbPK6Ngkik">/pages/jOqduz5iSRxbPK6Ngkik</a></td></tr><tr><td><strong>Mailbox</strong></td><td>Mailbox – A powerful and customizable in-game mail system for Game Creator 2! Send game news, letters from NPC's, and item rewards with 40+ new triggers, conditions, properties, and instructions.</td><td data-object-fit="fill"><a href="/files/DTJwVZg64FQzV9ri49fN">/files/DTJwVZg64FQzV9ri49fN</a></td><td></td><td><a href="/pages/AteXBhX1XzlVMjMobJjl">/pages/AteXBhX1XzlVMjMobJjl</a></td></tr><tr><td><strong>COZY Stylized Weather 3 Integration</strong></td><td>Enhance your Game Creator 2 projects with an immersive weather system using COZY Stylized Weather, fully integrated with Game Creator 2 triggers, instructions, conditions, and save system.</td><td data-object-fit="fill"><a href="/files/rIPOkwYfnRRMQ8pjyTeu">/files/rIPOkwYfnRRMQ8pjyTeu</a></td><td></td><td><a href="/pages/XFdsFwlD9Sr53xlNs8td">/pages/XFdsFwlD9Sr53xlNs8td</a></td></tr><tr><td><strong>Smart Thumbnails</strong></td><td>Smart Thumbnails shows the actual sprite of Game Creator 2 assets as their Unity thumbnail, making items, weapons, quests, and stats instantly recognizable without opening them.</td><td data-object-fit="fill"><a href="/files/ODbsz5ZCyIbtqovRZgNd">/files/ODbsz5ZCyIbtqovRZgNd</a></td><td></td><td><a href="/pages/JY9bn5b9mKneCroht6Hq">/pages/JY9bn5b9mKneCroht6Hq</a></td></tr></tbody></table>

### Standalone Assets

<table data-card-size="large" data-view="cards"><thead><tr><th></th><th></th><th data-hidden data-card-cover data-type="image">Cover image</th><th data-hidden></th><th data-hidden data-card-target data-type="content-ref"></th></tr></thead><tbody><tr><td><strong>Runtime Studio</strong></td><td>Runtime Studio is a player-safe in-game level editor for Unity, letting players create, edit, save, load, and export custom levels with curated assets, undo/redo, and runtime tools.</td><td data-object-fit="fill"><a href="/files/pS76DTXiKXMqDI8koHt1">/files/pS76DTXiKXMqDI8koHt1</a></td><td></td><td><a href="/pages/9APiLNnBErpB2LeItNaE">/pages/9APiLNnBErpB2LeItNaE</a></td></tr><tr><td><strong>HeroBridge Standalone</strong></td><td>HeroBridge Standalone is a runtime character customizer for Sidekick Modular Characters. It adds flexible components and methods that let you change character parts, colors and more during runtime.</td><td data-object-fit="fill"><a href="/files/cUxMXOGWCCZPKT875E2Z">/files/cUxMXOGWCCZPKT875E2Z</a></td><td></td><td></td></tr></tbody></table>


# Roadmap

{% hint style="info" %}
**Roadmap Disclaimer:**\
This roadmap represents features I’d like to add over time, but there’s no guaranteed timeline or guarantee that every feature will make it in. Some may take significant time, and priorities will shift based on asset popularity and feedback. This is pure feature creep, so take it as a wishlist rather than a set plan.
{% endhint %}

## Runtime Editor

#### Editors & Tools

* [ ] Animator editor
* [ ] Terrain editor
* [ ] UI editor, allowing players to set up and use their own UI
* [ ] In-editor 3D modeller where players can design their own game objects
* [ ] Runtime ScriptableObjects

#### Runtime Logic & API

* [ ] Lua integration
* [ ] Component drawer maker, allowing selection of which parts of a component are exposed to the runtime editor

#### Platform & Integrations

* [ ] Steamworks integration with Workshop support
* [ ] Firebase / PlayFab integration

#### Content Import

* [ ] Import system for custom models and textures

## Inventory Extended

#### Core Systems & Improvements

* [ ] Seed-based loot generation
* [x] Simpler setup of hotbars

#### Inventory Systems

* [ ] List-based inventory
* [ ] Hybrid inventory system (Grid inventory + List-based crafting)

#### Crafting & Processing Systems

* [ ] Brewing system for potions
* [ ] Cooking system (Zelda-inspired)
* [x] Example: Dismantling workbenches and furnaces
* [x] Cancelling the queues inside list based crafting/smelting/dismantling&#x20;

#### Item Mechanics

* [x] Runes / attachment system example
* [ ] Socket UI filter
* [x] Item prefix system

#### Shops & Economy

* [x] Extended grid shop example using Price Modifier & “Can Sell” from Item State
* [ ] Extended list shop example using Price Modifier & “Can Sell” from Item State
* [ ] Trading example
* [ ] Haggling example
* [ ] Multiple gambling system examples (in-game items only; not real gambling)

## COZY Stylized Weather Integration

* [x] Make On Temperature, On Time, On Day And Time, On Year, Day and Time even more performant
* [x] Integrations with other modules like COZY: Plume, COZY: Eclipse and COZY: ReSound and COZY: Horizon
* [x] Extending the COZY: Habits integration
* [x] Improve the demo UI
* [x] Improvement to manual weather selection

## Editor Pro

* [x] Tooltip to show the folder location of a scriptable object
* [x] Grid View
* [x] Improvement to the search field and switching between grid and list view
* [x] Folder exclusion

## HeroBridge

* [ ] Allow to export custom presets.
* [x] Character Creator Example.
* [x] Allow to export the character as a prefab from the character creator (Editor only)
* [x] 100% JSON based during Runtime for overall better performance and support across platforms.
* [ ] Add a cache manager.
* [ ] More demo scene examples.
* [ ] Add support for combining the skinned mesh renderers.
* [x] Performance improvements
* [x] Add an option to disable rebuilding of skeleton (In HeroBridge Standalone)


# HeroBridge Standalone

<figure><img src="/files/aY4nlWYTxsWUXUUGztcy" alt=""><figcaption></figcaption></figure>

## HeroBridge Standalone – Runtime Character Customizer for Sidekick Characters

**HeroBridge Standalone** provides a set of components that can be attached **directly to GameObjects** to control **Sidekick Modular Characters at runtime**.

With the apply modes **On Enable**, **On Disable**, **On Button Press**, **On Invoke**, and **Unity Events** make it easy to hook character alterations into **UI**, **gameplay logic**, or **state-based systems**.

Every component is based on an **integrated, user-friendly API** that can be used to run **HeroBridge Standalone in code**.<br>

**💥 NEW RELEASE DISCOUNT!**

**Get 50% off for the first two weeks at $19.99 (regular $39.99).**

⚡ **Key Features**

✅ **Works with All Sidekick Modular Character Packs**

Compatible with all current Sidekick modular packs.

✅ **Runtime Character Control Methods:**

• **Set Part:** Modify any of the 38 modular components, such as the head, body, legs, hair, or accessories.

• **Set Preset**: Apply complete character presets including head, body, shape, and color settings.

• **Set Expression**: Control 19 facial expressions using blendshapes.

• **Cycle Part**: Cycle through parts of any type using next, previous, or random options.

• **Generate Dynamic Part Icons & Buttons**: Automatically generate dyanmic icons for all parts at runtime and create UI buttons for them.

**• Export as Prefab**: Turn your character into a prefab. The included customizer isn’t just for runtime, you can also use it as an editor tool, letting you create and save characters directly in the editor.

**…And More**

**✅ Built-in Save System**

HeroBridge Standalone includes a simple, slot-based save system for character customization data. Character parts, colors, and blendshape values can be saved and restored at runtime without relying on external save frameworks.

✅ **Efficient Runtime Performance & WebGL Support**

HeroBridge Standalone caches data such as parts, colors, and presets into JSON files for faster runtime performance and also support for WebGL builds.

**✅ Flexible Character Setup**

Designed to integrate with custom and third-party character controllers. Includes an option to enable or disable Animator rebuilding, allowing you to adapt HeroBridge Standalone to your specific setup.

**✅ Runtime API Access**

HeroBridge Standalone builds on parts of Sidekick’s Runtime API and adds its own API layer for controlling character customization at runtime.

**✅ Part Overview Window**

Includes a dedicated overview window that displays all Sidekick character parts currently installed in your project, organized into clear categories such as hips, torso, and other body sections.

✅ **Animation Patcher**

Most animations set Jaw Close blendshape to 0, making characters appear with an open mouth. The Animation Patcher tool automatically fixes this by setting Jaw Close to 1.

💡 **Example of Runtime Character Customization**

A **runtime character customizer example scene** in **HeroBridge Standalone** shows how **Sidekick Modular Characters** can be altered **during gameplay**, similar to character designers found in **role-playing and adventure games**.

The example demonstrates how **HeroBridge** can be used to create systems that allow players to:

* **Browse** clothing, accessories, and hairstyles
* **Modify** character parts
* **Change colors** for hair, eyes, and clothes
* **Use blendshapes** to alter body shape

Additionally, the sample shows how **part icon buttons are automatically generated at runtime**.

🎮 **Try It Yourself!**

You can **preview the character customizer directly in your browser** or **download the Windows build** on [Itch.io](https://fullscreenstudios.itch.io/herobridge-standalone-runtime-character-customizer-for-sidekick-character)

{% embed url="<https://docs.fullscreen.no/info/~/changes/393/standalone-assets/herobridge-standalone/setup-guide>" %}

## Available on Asset Store (Coming soon)

{% embed url="<https://assetstore.unity.com/publishers/111540>" %}

## **Package dependencies (1)**

<table data-view="cards"><thead><tr><th></th><th></th><th></th><th data-hidden data-card-cover data-type="image">Cover image</th><th data-hidden data-card-target data-type="content-ref"></th></tr></thead><tbody><tr><td>FREE Starter Pack - Sidekick Modular Characters</td><td>By <a href="https://assetstore.unity.com/publishers/5217">Synty Studios</a></td><td></td><td data-object-fit="cover"><a href="/files/DwFrfDK5LUj2Nm84Cc3d">/files/DwFrfDK5LUj2Nm84Cc3d</a></td><td><a href="https://assetstore.unity.com/packages/tools/utilities/cozy-stylized-weather-3-271742">https://assetstore.unity.com/packages/tools/utilities/cozy-stylized-weather-3-271742</a></td></tr></tbody></table>


# Setup Guide

{% hint style="warning" %}
**HeroBridge Standalone** depends on the **Sidekick Tool** and **Starter Pack**. Make sure both are installed **before** installing HeroBridge, since it generates its cache from the tool.\
If needed, you can manually trigger the cache generation by following these [instructions](#automatic-cache-export).
{% endhint %}

## Setup

1. Install [FREE Starter Pack - Sidekick Modular Characters by Synty](https://assetstore.unity.com/packages/3d/characters/free-starter-pack-sidekick-modular-characters-by-synty-336970)
2. Download and install the Sidekick Tool & Database

   > After installing the Sidekick free starter pack, a window should appear prompting you to download and install the **Sidekick Tool.**\
   > If the window doesn’t appear, you can manually open the downloader by navigating to **Synty > Sidekick Tool Downloader** in the Unity toolbar.
   >
   > You can also manually download it from [Synty's Github](https://github.com/SyntyStudios/SidekicksToolRelease/releases/) (Download & Import both Sidekicks.unitypackage and SidekicksDatabase.unitypackage)
3. Download and install HeroBridge Standalone from the package manager.
4. Cache generation will start automatically once HeroBridge Standalone and all required dependencies are installed.\
   If it does not start, [manually run the cache generation.](#manual-cache-generation)
5. *(Optional)* You can [install the example content](#installing-the-example-content) and [patch animations.](/info/game-creator-2-assets/herobridge/setup-guide/animation-patcher)

***

### Installing the Example Content

To install the example/demo content for HeroBridge Standalone:

1. In Unity, go to **`Tools > HeroBridge Standalone > Install Demo Content`**
2. Click the menu item to install the demo content into your project

**Important**

It is recommended to **copy any example content you plan to modify**, such as entire scenes, before making changes.\
If you update HeroBridge Standalone later, demo content may be reinstalled or overwritten, and copying ensures your custom changes are preserved.

#### Example Content Location

Once installed, you can find the example content here:\
\&#xNAN;**`Assets/HeroBridge Examples`**

***

## Updating HeroBridge Standalone

When a new version of HeroBridge Standalone is released, we recommend **uninstalling the previous version before importing the update**.

HeroBridge Standalone updates may **remove, rename, or move scripts and folders**. Importing a new version over an existing one can leave behind obsolete files, which may result in **duplicate classes, missing references, or compilation errors**.

HeroBridge Standalone can be uninstalled via:\
\&#xNAN;**`Tools → HeroBridge Standalone → Uninstall HeroBridge Standalone`**

**Recommended update process:**

1. Remove the existing HeroBridge Standalone from your project
2. Import the new version of HeroBridge Standalone
3. Let Unity recompile and verify everything is working as expected

***

## Automatic Cache Export

When HeroBridge Standalone is installed via the Package Manager, it automatically attempts to **generate all required cache data during initial setup**.

HeroBridge Standalone exports parts, presets, colors, body shapes, species, and expressions directly from the Sidekick database (with expressions sourced from the demo animation controller).

This cache generation is performed for **performance and WebGL compatibility**:

* HeroBridge Standalone uses **pre-generated cache data** instead of querying the database at runtime
* Prevents potential freezes or hitches caused by live database access
* Enables **WebGL support**, as SQLite databases are not compatible with WebGL builds

### Manual Cache Generation

You can manually generate or regenerate the cache at any time via:

**`Tools > HeroBridge Standalone > Generate Cache`**

***

### Sidekick Icon Cache Generation

When generating the cache, HeroBridge Standalone will also prompt you to **generate the Sidekick Icon Cache**.\
This icon cache is required for:

* Parts Overview Tool
* Sidekick Part Applier

If you choose to generate the icon cache, HeroBridge Standalone will:

* Prompt you to save any unsaved scene changes
* Load a temporary scene
* Briefly enter Play Mode to generate editor preview icons
* Exit Play Mode and restore your previous scene automatically

You can postpone this step and generate the icon cache later using the same menu:

**`Tools > HeroBridge Standalone > Generate Cache`**

***

### Sidekick Mesh Read/Write Validation

As part of the setup process, HeroBridge Standalone also **checks all Sidekick meshes to ensure Read/Write is enabled**.

HeroBridge Standalone requires **Read/Write access on all Sidekick meshes**.\
Some Sidekick meshes are known to be **incorrectly configured with Read/Write disabled by default**, which can cause features to behave incorrectly or fail entirely.

If problematic meshes are detected, HeroBridge Standalone will notify you and offer to **fix them automatically**.

You can run this check manually at any time via:

**`Tools > HeroBridge Standalone > Check Meshes`**


# Configure Characters

## Configure Characters

For each character you want to use with Sidekick and HeroBridge Standalone:

1. Select your character in the **Hierarchy**\
   \&#xNAN;*(This can be the top-level character object or another suitable parent.)*
2. Add the [**Sidekick Character**](/info/standalone-assets/herobridge-standalone/components/sidekick-character) component to the character
3. In the **Sidekick Character** component:
   * Assign your character’s **Animator** to the **Animator** field
   * Configure [**Rebuild Animator Root**](/info/standalone-assets/herobridge-standalone/components/sidekick-character#rebuild-animator-root) as needed

<details>

<summary><strong>Pink SK_BaseModel</strong></summary>

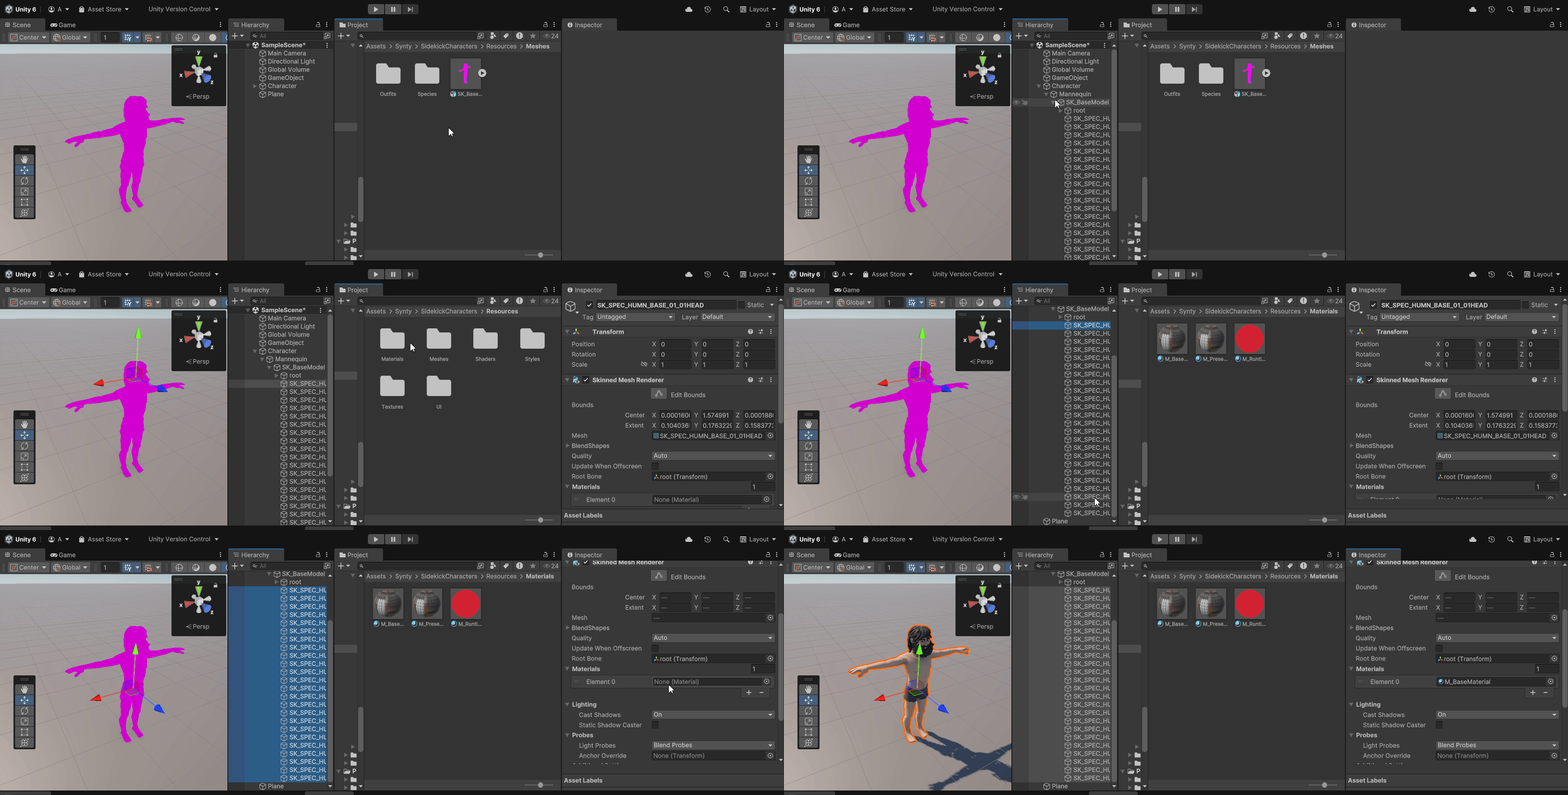
**If your new character appears pink in the Scene view**, it means the materials are missing.\
To fix this:

* Go to:

  ```
  Assets/Synty/SidekickCharacters/Resources/Materials/
  ```

Find and use the **BaseMaterial**.

In the **Hierarchy**, expand your character to locate:

```
Character > Mannequin > SK_BaseModel
```

* Inside **SK\_BaseModel**, select all the **child GameObjects.**
* Assign the **BaseMaterial** from the Materials folder to each of those **Skinned Mesh Renderer** components.

<figure><img src="/files/rvoLDnmXYVvtz11gX4Me" alt=""><figcaption></figcaption></figure>

</details>

***

### Using Characters made in the Sidekick Character Tool

Before exporting your character as a prefab, make sure to disable the following options under the **Options** tab:

* **Combine Character Meshes**
* **Combine Body Blend Shapes**

After disabling these options, export the character as a prefab.

**Enable Read/Write on Textures:**

For custom characters, you need to enable **Read/Write** on the texture created for the model:

1. In the folder where your prefab was created, open the **Textures** subfolder.
2. Select the texture.
3. In the **Inspector**, scroll to the **Texture Import Settings**.
4. Under **Advanced Options**, check the box **Read/Write Enabled**.
5. Click **Apply**.

***

## Demo Player Character

HeroBridge Standalone includes a ready-to-use demo player character you can use as a reference or starting point:

```
Assets/HeroBridge Examples/Prefabs/Player.prefab
```

This prefab is already configured and can be dropped directly into your scene.

{% content-ref url="/pages/re93dLEkHgqDVbjJPyRP" %}
[Saving Sidekick Characters](/info/game-creator-2-assets/herobridge/setup-guide/saving-sidekick-characters)
{% endcontent-ref %}


# Installing New Sidekick Modular Character Packs

## Installing New Sidekick Modular Character Packs

When adding new Sidekick Modular Character Packs to a project that already has HeroBridge Standalone installed, follow the steps below to ensure the new pack is properly recognized.

#### Regenerate Cache

After importing the new character pack, regenerate the HeroBridge Standalone cache:

**`Tools > HeroBridge Standalone > Generate Cache`**

This refreshes HeroBridge’s cache and allows it to detect newly added Sidekick Modular Character **parts, presets, colors, body shapes, species, and expressions**.


# Saving Sidekick Characters

### Saving & Loading Sidekick Characters

HeroBridge Standalone allows you to save and restore a Sidekick character’s appearance. This can be used when loading a saved game, switching scenes, or reapplying a character setup at runtime.

Saving and loading can be handled through the **Sidekick Save Load Applier** component.

***

#### Setup

1. Select any GameObject in your scene
2. Add the **Sidekick Save Load Applier** component
3. Assign the **Character GameObject** you want to save or load in the **Character** field

***

#### Apply Mode

The **Apply Mode** determines *when* the component runs:

* **On Enable** - Runs automatically when the GameObject is enabled
* **On Disable** - Runs when the GameObject is disabled
* **On Invoke** - Runs when triggered via code or events
* **On Button Press** - Runs when a **Unity UI Button** on the *same GameObject* is pressed

***

#### Actions & Save Slot

* **Action**
  * **Save** - Saves the current character parts, blendshapes and colors.
  * **Load** - Loads a previously saved character parts, blendshapes and colors.
* **Save Slot**\
  Defines which save slot is used for saving or loading the character data.

***

#### Character Identification

The **GameObject name** of the referenced character is used as the **unique ID** when saving and loading.

This means:

* Multiple characters can be saved into the **same save slot**
* Each character is identified by its **GameObject name**
* When loading, the character GameObject name must match the name used when saving

For correct behavior:

* Use **unique GameObject names** for different characters
* Ensure the name is **identical** when performing a load operation

This allows parts, colors, and blendshapes to be correctly assigned per character.


# Animation Patcher

By default, most animations have the **Jaw Close** property set to `0`.\
However, **Sidekick** and many other character models require this value to be set to `1` for the mouth to appear closed.

The **Animation Patcher** tool automatically corrects this by patching animation clips to ensure the jaw remains properly closed.

### Usage

1. **Open the Animation Patcher**\
   From the toolbar, select:\
   \&#xNAN;**`Tools > HeroBridge Standalone > Animation Patcher`**
2. **Select Animations to Patch**
   * Drag and drop a **single Animation Clip**, or
   * Select an **entire folder** containing animations to process, or
   * Click **Patch ALL** to patch all supported animations in the project
3. **Set the Property Name**\
   In the **Property Name** field, specify the key that should be modified inside the animation.
   * Default: **Jaw Close**
   * Most animations use this property name
4. **Run the Patch**

   * Click **Patch Animations** to patch the selected animations, or
   * Click **Patch ALL** to process every supported animation in the project

   The patch operation **inverts the value**. Running the patch a second time will restore the original value.


# Components


# Sidekick Character

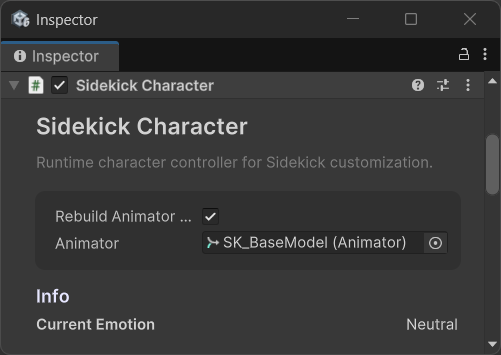
The **Sidekick Character** component marks a character as a Sidekick character and allows HeroBridge Standalone to apply parts, presets, colors, and expressions.

Add the **Sidekick Character** component to the top-level character GameObject or another appropriate parent in your character hierarchy.

**Animator**\
Assign your character’s **Animator** to this field.

**Rebuild Animator Root**\
Controls whether the animator root should be rebuilt.

<figure><img src="/files/D9s1elDvvtDDRIkvP5rb" alt=""><figcaption></figcaption></figure>

***

#### **Rebuild Animator Root**

When enabled, this uses the default Sidekick behavior and is the recommended setup if your character does not rely on controllers or systems that require the Animator reference to remain unchanged.

When disabled, HeroBridge Standalone applies changes without rebuilding the animator. This can be useful when integrating with character controllers or systems that do not support losing the existing Animator reference.

For most setups, leaving this option enabled is recommended.


# Sidekick Part Applier

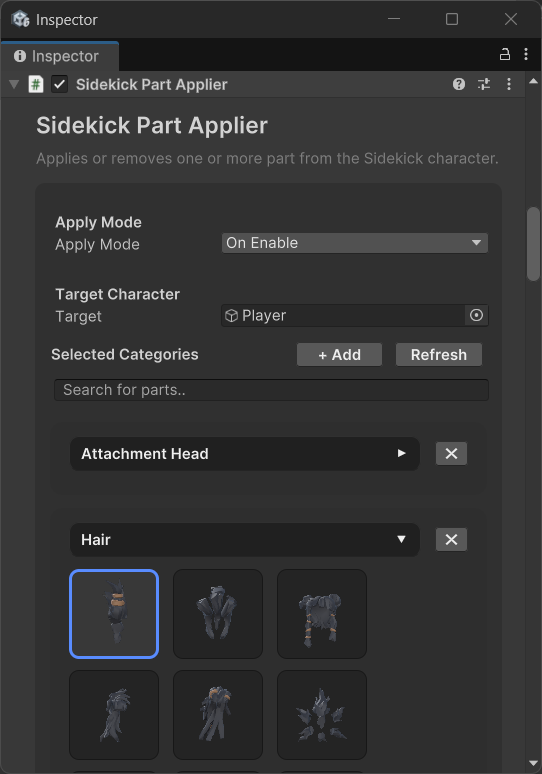
The **Sidekick Part Applier** component allows you to apply Sidekick parts to a character.

**Apply Mode** defines when the component runs:

* **On Enable** - Runs automatically when the GameObject is enabled
* **On Invoke** - Runs when triggered via code or events
* **On Button Press** - Runs when a Unity UI Button on the same GameObject is pressed

**Target**\
The target Sidekick character that parts will be applied to.

**Selected Categories**

* **Add** - Add a new part category
* **Refresh** - Reloads part icons from the cache

Each category has a **Type**, which defines the part category to modify.\
There are **38 available categories**, such as Head, Hair, Torso, Hips, Attachments, and more.

Multiple types can be added within the **same Sidekick Part Applier component**, allowing all selected parts to be applied **at the same time**.\
Only **one part per type** can be set.

Selecting “None” inside a category removes the currently equipped part for that category.\
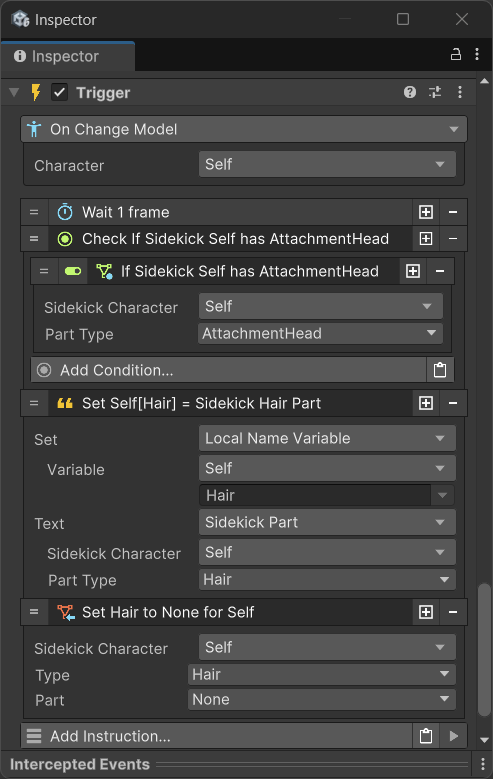
For example, setting **Hair** to *None* removes any equipped hair part.

The Part Applier also includes a **search field** to help locate parts.\
Searching is limited to the **categories you have already selected**.

<figure><img src="/files/PoYY3klDs0XGGlueM0mV" alt=""><figcaption></figcaption></figure>


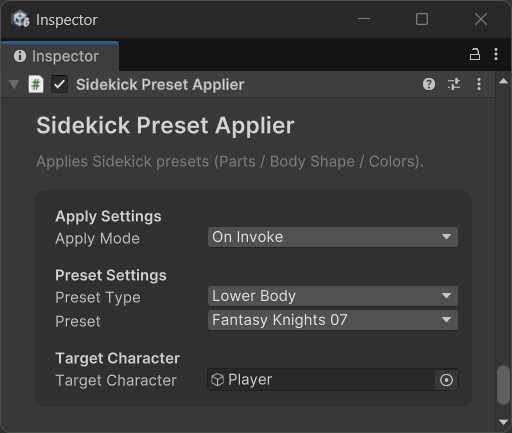
# Sidekick Preset Applier

The **Sidekick Preset Applier** component works similarly to the Sidekick Part Applier, but instead of applying individual parts, it applies **pre-made appearance presets** included with Sidekick Modular Character packs.

Presets can define combinations of **parts, body shapes, and colors**, allowing you to quickly switch between complete character looks.

**Apply Mode** defines when the component runs:

* **On Enable** - Runs automatically when the GameObject is enabled
* **On Disable** - Runs when the GameObject is disabled
* **On Invoke** - Runs when triggered via code or events
* **On Button Press** - Runs when a Unity UI Button on the same GameObject is pressed

**Target**\
The Sidekick character the preset will be applied to.

**Preset Type**\
Defines which preset category will be applied. Available types include:

* Head
* Upper Body
* Lower Body
* Body Shapes
* Colors

**Preset**\
The preset to apply from the selected category.\
All presets are defined and included within the installed Sidekick Modular Character packs.

<figure><img src="/files/Uxkq3TaU8IkeA3eWvCtp" alt=""><figcaption></figcaption></figure>


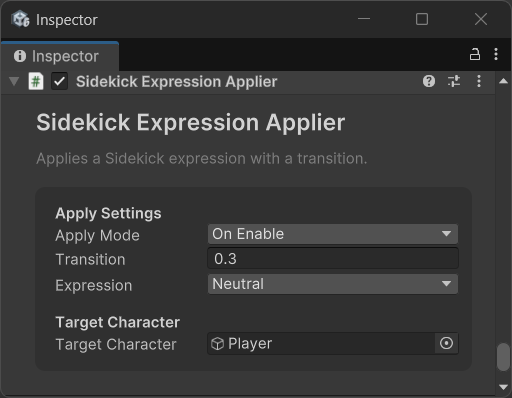
# Sidekick Expression Applier

The **Sidekick Expression Applier** component allows you to change a character’s facial expression by applying predefined facial blendshapes.

Expressions are exported during cache generation from the runtime facial demo animation controller included with the **FREE Starter Pack - Sidekick Modular Characters**.

**Apply Mode** defines when the component runs:

* **On Enable** - Runs automatically when the GameObject is enabled
* **On Disable** - Runs when the GameObject is disabled
* **On Invoke** - Runs when triggered via code or events
* **On Button Press** - Runs when a Unity UI Button on the same GameObject is pressed

**Target**\
The Sidekick character the expression will be applied to.

**Expression**\
Select which facial expression to apply.\
There are **19 available expressions**, including:

* In Pain
* Happy
* Sad
* Angry
* Surprised
* Neutral
* and more

**Transition**\
Defines how smoothly the expression changes.\
The value represents the transition duration in seconds.

<figure><img src="/files/YltzR2286nYiGzM7JML0" alt=""><figcaption></figcaption></figure>


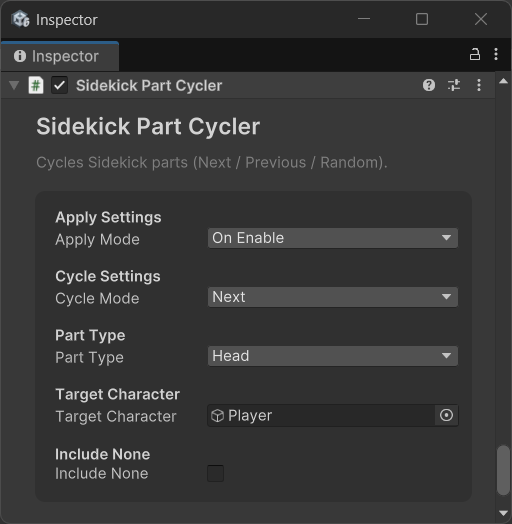
# Sidekick Cycle Part

The **Sidekick Cycle Part** component allows you to cycle through parts of a specific category on a Sidekick character. You can cycle to the **Next**, **Previous**, or a **Random** part.

If the character currently has no part equipped for the selected category, cycling starts from the first available part in the cache.

**Apply Mode** defines when the component runs:

* **On Enable** - Runs automatically when the GameObject is enabled
* **On Disable** - Runs when the GameObject is disabled
* **On Invoke** - Runs when triggered via code or events
* **On Button Press** - Runs when a Unity UI Button on the same GameObject is pressed

**Target**\
The Sidekick character whose parts will be cycled.

**Part Type**\
Defines which part category to cycle through.\
There are **38 available categories**, such as Head, Hair, Torso, Hips, Attachments, and more.

**Cycle Mode**\
Determines how parts are selected:

* **Next** - Cycles forward through available parts
* **Previous** - Cycles backward through available parts
* **Random** - Selects a random part from the available options

**Include None**\
When enabled, cycling can also apply a **None part**, effectively removing the part for that category.

For example, when cycling **Hair**, enabling *Include None* allows the character to become bald when cycling through available options.

<figure><img src="/files/HOLoSsD45ZtQISnbkMbH" alt=""><figcaption></figcaption></figure>


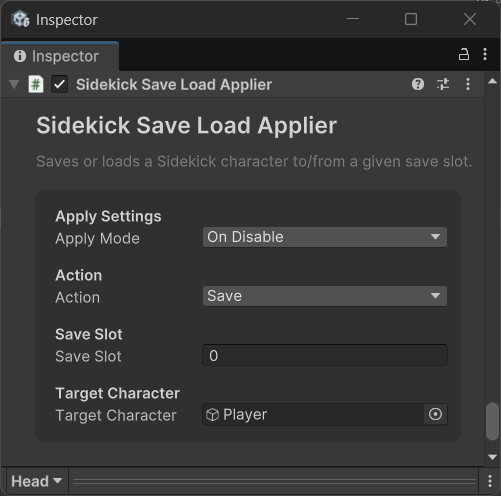
# Sidekick Save Load Applier

The **Sidekick Save Load Applier** allows you to save and restore a Sidekick character’s appearance. This can be used when saving a game, switching scenes, or reapplying a character setup at runtime.

Add the **Sidekick Save Load Applier** component to a GameObject.

**Target**\
The Sidekick character whose appearance will be saved or loaded.

**Apply Mode** defines when the component runs:

* **On Enable** - Runs automatically when the GameObject is enabled
* **On Disable** - Runs when the GameObject is disabled
* **On Invoke** - Runs when triggered via code or events
* **On Button Press** - Runs when a Unity UI Button on the same GameObject is pressed

**Action**

* **Save** - Saves the current character parts, blendshapes and colors.
* **Load** - Loads a previously saved character parts, blendshapes and colors.

**Save Slot**\
Defines which save slot is used for saving or loading character data.

The **GameObject name** of the target character is used as the unique identifier when saving and loading. This allows multiple characters to be stored in the same save slot, as long as each character has a unique GameObject name.

When loading, the character GameObject name must match the name used during saving. Using consistent and unique names ensures that parts, colors, and blendshapes are correctly restored per character.

<figure><img src="/files/dlzu4RX1z7G6oMzC6anW" alt=""><figcaption></figcaption></figure>


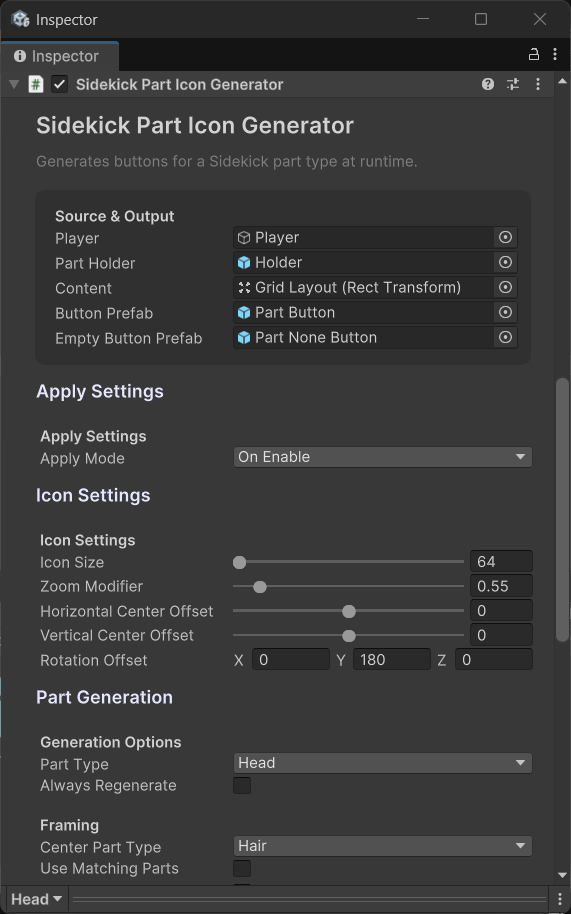
# Sidekick Part Icon Generator

The **Sidekick Part Icon Generator** component automatically generates preview icons for Sidekick parts and creates corresponding UI buttons.\
It's designed to be flexible and can be used for character customizers, equipment menus, or any UI where players select parts.

**Apply Mode** defines when the generator runs:

* **On Enable** - Runs automatically when the GameObject is enabled
* **On Disable** - Runs when the GameObject is disabled
* **On Invoke** - Runs when triggered via code or events
* **On Button Press** - Runs when a Unity UI Button on the same GameObject is pressed

**Player**\
The target character used as a reference for colors.\
The generated icons will use the same skin color, hair color, outfit colors etc

**Part Holder**\
A dummy character used to hold parts while preview icons are generated.\
It is recommended to use the example holder prefab:

```
Assets/Plugins/Fullscreen/HeroBridgeStandalone/Examples/Prefabs/Holder.prefab
```

**Content**\
The GameObject where all generated buttons will be placed.

**Button Prefab**\
The prefab instantiated for each generated part button.\
Example:

```
Assets/Plugins/Fullscreen/HeroBridgeStandalone/Examples/Prefabs/Part Button.prefab
```

**Include None Button**\
When enabled, a button for removing the part will be generated.

If enabled, the icon inside this button can display a composed preview using extra parts, for example a bald character when Hair is the main Part Type but Head and Torso are included as extra parts.

**Empty Button Prefab**\
The prefab used for the None button.\
Example:

```
Assets/Plugins/Fullscreen/HeroBridgeStandalone/Examples/Prefabs/Part None Button.prefab
```

**Part Type**\
Defines which part category to generate icons for.\
There are **38 available categories**, such as Head, Hair, Torso, Hips, Attachments, and more.

**Center Part Type**\
Defines which part category the camera should center on when generating icons.\
Useful for keeping previews consistent, for example centering on Head when generating hair icons.

**Extra Parts**\
Additional parts applied to the preview to make icons more descriptive.

**Use Matching Parts**\
When enabled, symmetrical parts are automatically applied where available.

**Icon Size**\
Defines the resolution of the generated icons.\
Lower values generate faster and use less memory, while higher values improve quality.

**Zoom Modifier**\
Adjusts the camera zoom used for the icon preview.

**Horizontal Center Offset**\
Moves the camera left or right relative to the centered part.

**Vertical Center Offset**\
Moves the camera up or down relative to the centered part.

**Rotation Offset**\
Applies a rotation to the camera, allowing previews from different angles.

**Always Regenerate**\
When enabled, icons are regenerated every time the generator runs based on the Apply Mode.\
This is useful if the character’s colors change at runtime, such as skin or hair color, but may be unnecessary or expensive depending on your setup.

**On Before Generate**\
Unity Event invoked before icon generation starts.

**On After Generate**\
Unity Event invoked after icon generation completes.

<figure><img src="/files/brAco9BfyOlhLqhB03HU" alt=""><figcaption></figcaption></figure>


# Sidekick Color Applier

{% hint style="warning" %}
**Note**\
Not all color options are currently in use by Sidekick, but they are included in the Sidekick database.\
These unused color properties are forward-compatible, meaning if Sidekick begins using them in future updates, they’ll automatically work with your existing setup.
{% endhint %}

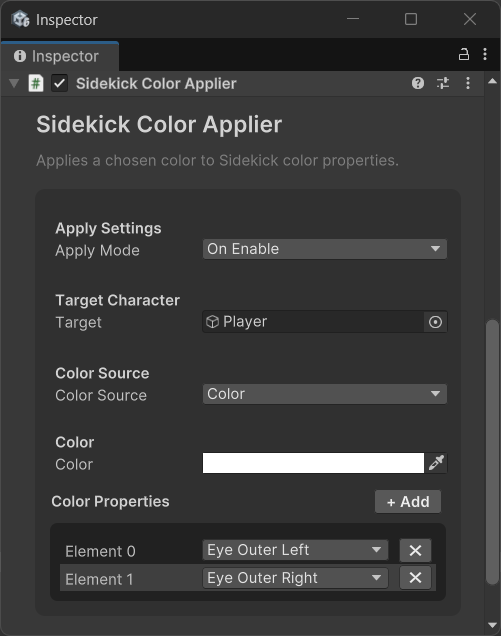
The **Sidekick Color Applier** component allows you to apply colors to a Sidekick character.

**Target**\
The Sidekick character whose colors will be modified.

**Apply Mode** defines when the component runs:

* **On Enable** - Runs automatically when the GameObject is enabled
* **On Disable** - Runs when the GameObject is disabled
* **On Invoke** - Runs when triggered via code or events
* **On Button Press** - Runs when a Unity UI Button on the same GameObject is pressed

**Color Source**\
Defines where the color value comes from.

* **Component Color** - Uses the color value defined directly in this component
* **Image Color** - Uses the color from a Unity UI Image component on the same GameObject

Using an Image as the color source is useful for character customizers where available colors are presented as UI images.

**Color Properties**\
Defines which color slots will be modified.

You can add multiple color properties and apply the **same color to several properties at once**.

Each entry has a **Color Property** field where you choose which color slot to modify, such as:

* Skin Color
* Eye Color
* Eyebrow Color
* Hair Color
* and many more

<figure><img src="/files/xfLK639d8HBnfzJzoIx8" alt=""><figcaption></figcaption></figure>


# Sidekick Body Blendshape Applier

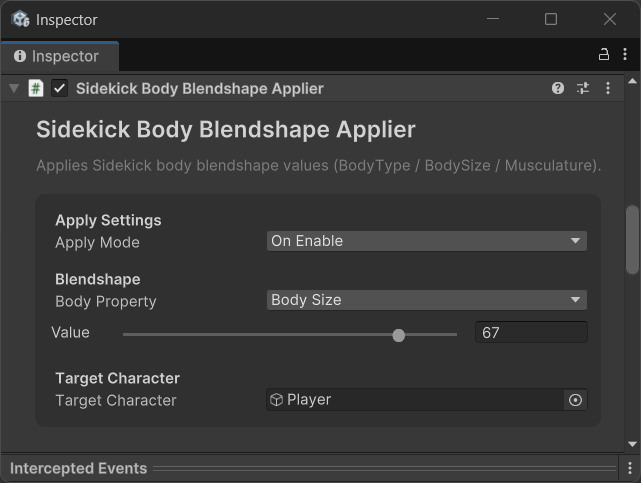
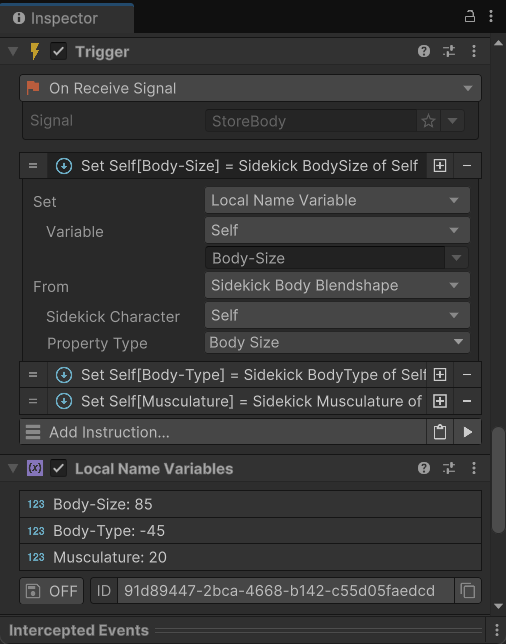
The **Sidekick Body Blendshape Applier** component allows you to modify a character’s body blendshapes, such as body type, body size, and musculature.

**Target**\
The Sidekick character whose body blendshapes will be modified.

**Apply Mode** defines when the component runs:

* **On Enable** - Runs automatically when the GameObject is enabled
* **On Disable** - Runs when the GameObject is disabled
* **On Invoke** - Runs when triggered via code or events
* **On Button Press** - Runs when a Unity UI Button on the same GameObject is pressed

**Body Property**\
Defines which body property will be modified:

* **Body Type**
* **Body Size**
* **Musculature**

**Value**\
Defines the value applied to the selected body property.

* **Body Type** and **Musculature** use a range from **0 to 100**
* **Body Size** uses a range from **-100 to 100**

<figure><img src="/files/zFl5YuwJlmFM2mkSGW9B" alt=""><figcaption></figcaption></figure>


# Sidekick Body Slider

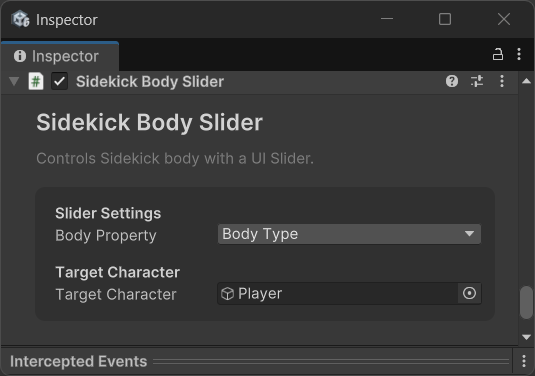
The **Sidekick Body Slider** component allows you to control a character’s body blendshapes using a Unity UI Slider.\
Moving the slider updates the selected body property in real time.

**Target**\
The Sidekick character whose body blendshapes will be modified.

**Body Property**\
Defines which body property will be controlled by the slider:

* **Body Type**
* **Body Size**
* **Musculature**

The **Sidekick Body Slider** automatically reads values from the Slider component attached to the same GameObject and applies them to the target character.

<figure><img src="/files/uRa0nBPnta40SKsAKixK" alt=""><figcaption></figcaption></figure>


# Export Sidekick Character

{% hint style="info" %}
**Editor Only**\
This component is **only available in the Unity Editor** and is not available in built games.
{% endhint %}

### Export Sidekick Character

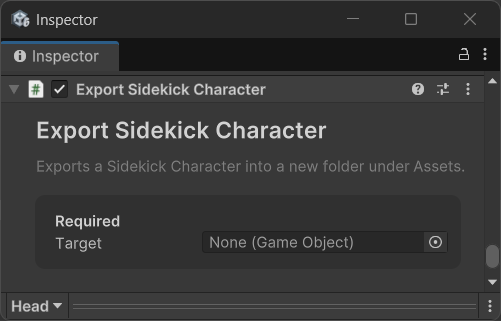
The **Export Sidekick Character** component allows you to export a Sidekick character as a standalone prefab.

Add the **Export Sidekick Character** component to a GameObject.

**Target**\
The Sidekick character that will be exported.

When the export is triggered, a window appears allowing you to enter a name for the exported character.\
After confirming, the system will:

* Create a new folder named after the character
* Generate subfolders for:
  * Materials
  * Meshes
  * Textures
* Export the character as a standalone prefab

The exported prefab contains only the generated model data and can be used independently from the original character setup.

<figure><img src="/files/OIQbJzpBFvwhWtKcrS3F" alt=""><figcaption></figcaption></figure>


# API

### HeroBridge Standalone API Reference

All examples assume you already have a reference to a `SidekickCharacter` component.

```cs
SidekickCharacter sidekick = characterGameObject.GetComponent<SidekickCharacter>();
```

***

### Configuration

```csharp
/// <summary>
/// Enables or disables rebuilding the Animator hierarchy when applying parts.
/// </summary>
/// <param name="value">
/// True to rebuild the Animator root (recommended default behavior).
/// False to confirm the Animator reference without rebuilding.
/// </param>
sidekick.SetRebuildAnimatorRoot(bool value);
```

```csharp
/// <summary>
/// Sets whether the character body should be reset before applying new parts.
/// </summary>
/// <param name="value">
/// When true, parts not included in the new setup are removed.
/// When false, existing parts that are not overridden remain.
/// </param>
sidekick.SetResetBody(bool value);
```

```csharp
/// <summary>
/// Enables or disables automatic matching of symmetrical parts.
/// </summary>
/// <param name="value">
/// When enabled, matching left/right parts are applied if available.
/// </param>
sidekick.SetUseMatchingParts(bool value);
```

```csharp
/// <summary>
/// Enables or disables including a None option when cycling parts.
/// </summary>
/// <param name="value">
/// When enabled, cycling can remove the current part.
/// </param>
sidekick.SetIncludeNone(bool value);
```

***

### Parts

```csharp
/// <summary>
/// Applies one or more Sidekick parts to the character.
/// </summary>
/// <param name="partValue">
/// A part identifier or a comma-separated list of identifiers.
/// Example:
/// "SK_HUMN_BASE_01_01HEAD_HU01"
/// "SK_HUMN_BASE_01_01HEAD_HU01,SK_HUMN_BASE_01_02HAIR_HU01"
/// </param>
sidekick.SetPart(string partValue);
```

```csharp
/// <summary>
/// Removes the currently equipped part for a specific part type.
/// </summary>
/// <param name="partType">
/// The part type name, such as "Hair", "Head", or "Torso".
/// Type names are PascalCase without spaces.
/// </param>
sidekick.RemovePart(string partType);
```

***

### Cycling Parts

```csharp
/// <summary>
/// Cycles to the next available part of the specified type.
/// </summary>
/// <param name="partType">
/// The part type to cycle, such as "Hair" or "Head".
/// </param>
sidekick.CycleNext(string partType);
```

```csharp
/// <summary>
/// Cycles to the previous available part of the specified type.
/// </summary>
/// <param name="partType">
/// The part type to cycle, such as "Hair" or "Head".
/// </param>
sidekick.CyclePrevious(string partType);
```

```csharp
/// <summary>
/// Selects a random part from the available parts of the specified type.
/// </summary>
/// <param name="partType">
/// The part type to cycle, such as "Hair" or "Head".
/// </param>
sidekick.CycleRandom(string partType);
```

***

### Presets

```csharp
/// <summary>
/// Applies a Head preset by name.
/// </summary>
/// <param name="presetName">
/// The preset name as defined in Presets.json.
/// Example: "Species Humans 01".
/// </param>
sidekick.SetPresetHead(string presetName);
```

```csharp
/// <summary>
/// Applies an Upper Body preset by name.
/// </summary>
sidekick.SetPresetUpperBody(string presetName);
```

```csharp
/// <summary>
/// Applies a Lower Body preset by name.
/// </summary>
sidekick.SetPresetLowerBody(string presetName);
```

```csharp
/// <summary>
/// Applies a Body Shape preset by name.
/// </summary>
sidekick.SetPresetBodyShape(string presetName);
```

```csharp
/// <summary>
/// Applies a Species color preset by name.
/// </summary>
sidekick.SetPresetColorSpecies(string presetName);
```

```csharp
/// <summary>
/// Applies an Outfit color preset by name.
/// </summary>
sidekick.SetPresetColorOutfits(string presetName);
```

***

### Colors

```csharp
/// <summary>
/// Sets the color value that will be applied to a Sidekick color property.
/// </summary>
/// <param name="value">
/// An HTML color string such as "#FFAA00" or "#FFAA00FF".
/// </param>
sidekick.SetColorValue(string value);
```

```csharp
/// <summary>
/// Applies the previously set color to a specific Sidekick color property.
/// </summary>
/// <param name="colorPropertyName">
/// The name of the color property, such as "Skin Color" or "Hair Color".
/// </param>
sidekick.SetColorProperty(string colorPropertyName);
```

***

### Expressions

```csharp
/// <summary>
/// Sets the transition duration used when changing facial expressions.
/// </summary>
/// <param name="value">
/// Transition duration in seconds.
/// </param>
sidekick.SetExpressionTransition(float value);
```

```csharp
/// <summary>
/// Applies a facial expression to the character.
/// </summary>
/// <param name="emotion">
/// The expression name, such as "Happy", "In Pain", or "Neutral".
/// </param>
sidekick.SetEmotion(string emotion);
```

```csharp
/// <summary>
/// Restores the current facial expression after a part or preset change.
/// </summary>
sidekick.RestoreEmotionAfterChange();
```

```csharp
/// <summary>
/// Gets the name of the currently active facial expression.
/// </summary>
/// <returns>
/// The current emotion name, or "Neutral" if none is active.
/// </returns>
string emotion = sidekick.CurrentEmotion;
```

***

### Body Blendshapes

```csharp
/// <summary>
/// Sets the Body Type blendshape value.
/// </summary>
/// <param name="value">
/// A value between 0 and 100.
/// </param>
sidekick.SetBodyType(float value);
```

```csharp
/// <summary>
/// Sets the Body Size blendshape value.
/// </summary>
/// <param name="value">
/// A value between -100 and 100.
/// </param>
sidekick.SetBodySize(float value);
```

```csharp
/// <summary>
/// Sets the Musculature blendshape value.
/// </summary>
/// <param name="value">
/// A value between 0 and 100.
/// </param>
sidekick.SetMusculature(float value);
```

***

### Saving and Loading

{% hint style="info" %}
**Note:**\
The character GameObject name is used as the unique ID when saving and loading.
{% endhint %}

```csharp
/// <summary>
/// Saves the character appearance to a save slot.
/// </summary>
/// <param name="saveslot">
/// The save slot index. The value is rounded to an integer.
/// </param>
sidekick.SaveCharacter(float saveslot);
```

```cs
/// <summary>
/// Loads the character appearance from a save slot.
/// </summary>
/// <param name="saveslot">
/// The save slot index. The value is rounded to an integer.
/// </param>
sidekick.LoadCharacter(float saveslot);
```

### Components

The following components support being triggered manually via an `Apply()` method.\
All of them require a reference to a **GameObject with a Sidekick Character component**.

* Sidekick Part Applier
* Sidekick Preset Applier
* Sidekick Expression Applier
* Sidekick Cycle Part
* Sidekick Save Load Applier
* Sidekick Part Icon Generator
* Sidekick Color Applier
* Sidekick Body Blendshape Applier

These components can be used with **Apply Mode set to On Invoke**, so you can control exactly when they execute.

#### Example: Calling Apply from code

```cs
/// <summary>
/// Applies the configured behavior of a Sidekick Applier component.
/// </summary>
SidekickBodyBlendshapeApplier applier = GetComponent<SidekickBodyBlendshapeApplier>();
applier.Apply();
```


# Troubleshooting


# Cache generation

HeroBridge Standalone relies on pre-generated cache data to display available parts, presets, colors, body shapes, species, and expressions.\
If for some reason the cache generation has failed, or if no parts appear in the parts overview tool or Part Applier, this indicates the cache wasn’t created correctly.

**Why we use cache**

When HeroBridge Standalone is installed through the **Package Manager**, HeroBridge Standalone automatically attempts to export all cache data during setup.\
This process extracts data directly from the **Sidekick database** (including expressions from the demo animation controller) and stores it for runtime access.

This cache system is used for **performance** and **compatibility** reasons:

* It prevents runtime lookups that could cause freezing or hitching when querying the Sidekick database.
* It enables **WebGL support**, since the Sidekick database system isn’t supported on WebGL, but cached data is.

**Troubleshooting steps**

1. **Open the Sidekick Character Tool**
   * If the tool opens and you don’t get errors about missing parts, the Sidekick installation is fine.
   * In this case, you can manually re-generate the HeroBridge Standalone cache.
2. [**Manually regenerate the cache**](/info/standalone-assets/herobridge-standalone/setup-guide#manual-cache-generation)
3. **If the Sidekick Character Tool reports missing parts**
   * This means your Sidekick installation is incomplete or corrupted.
   * You’ll need to completely reinstall Sidekick and HeroBridge.

**Full reinstall steps**

1. Uninstall HeroBridge Standalone:
   * Go to **`Tools → HeroBridge Standalone → Uninstall HeroBridge Standalone`**
2. Delete the **Synty** folder from your project.
3. Follow the setup guide from the beginning, ensuring the Sidekick tool works *before* reinstalling HeroBridge Standalone.


# TextMeshPro NullReferenceException

#### Error message

```cs
NullReferenceException: Object reference not set to an instance of an object
TMPro.MaterialReference..ctor (...)
```

#### What’s causing this

The **HeroBridge Standalone** example scene uses **TextMeshPro** for UI text.\
This error happens when **TextMeshPro Essential Resources** haven’t been imported into the project.

Without these resources, TextMeshPro can’t properly initialize its materials, which results in this `NullReferenceException`.

***

#### Fix: Import TextMeshPro Essential Resources

1. Open Unity’s top menu\
   **Window → TextMeshPro → Import TMP Essential Resources**
2. Let Unity finish importing the files.
3. Close the affected scene.
4. Reopen the scene.

In most cases, this resolves the error immediately.

***

#### Don’t want to use TextMeshPro?

If you prefer not to use TextMeshPro at all, you can replace the TextMeshPro components in the example scenes with **Legacy Text UI** instead.

This avoids the dependency entirely.


# Visual Scripting Missing (CS0234)

#### Error message

```cs
Assets/Synty/SidekickCharacters/Scripts/Editor/ModularCharacterWindow.cs(25,13): 
error CS0234: The type or namespace name 'VisualScripting' does not exist in the namespace 'Unity'
(are you missing an assembly reference?)
```

***

#### What’s causing this

**Sidekick** relies on **Unity Visual Scripting** package for the character creator.

***

#### Fix: Install Visual Scripting

1. Open **Window → Package Manager**
2. Set the package source to **Unity Registry**
3. Search for **Visual Scripting**
4. Install the package
5. Let Unity recompile the project

Once installed, the error should disappear automatically.


# Releases

## 1.1.1 (23th March 2026)

**Fixes**

* Fixed issues with dynamic bones being saved and restored when Rebuild Animator Root is disabled
* Fixing issue with having multiple animators on the character

## 1.1.0 (23th March 2026)

**New**&#x20;

* HeroBridge Standalone now saves and restores any GameObjects parented to the Animator GameObject or to bones in the character’s skeleton when **Rebuild Animator Root** is disabled (for example, an attached gun on the hand IK will be preserved)

## 1.0.0

First release


# Runtime Studio

<figure><img src="/files/pS76DTXiKXMqDI8koHt1" alt=""><figcaption></figcaption></figure>

## **Runtime Studio - Runtime Editor Framework**

Building an in-game editor takes months. You need to handle UI, object selection, transform gizmos, saving systems, and ensure players cannot break your game.

Runtime Studio provides a fully functional, player-safe editor out of the box, allowing players to create, edit, save, and load levels directly within the live game.

It also supports exporting and importing levels, making it easy for players to share creations through external files.

The core system is intentionally generic, offering a clean and professional interface without requiring you to rebuild your project architecture.

**Powerful Editing Workspace**

Give your players a familiar and powerful workspace.

Runtime Studio includes a UI Toolkit-based shell with Hierarchy, Project, and Inspector panels. Players can interact with scene content using action panels, a console overlay, and a smart object picker.

**Runtime Scene Editing**

Editing levels feels intuitive and familiar.

Players can build worlds using Move, Rotate, and Scale tools with transform gizmos, free camera controls, grid overlays, snapping, and live asset previews.

**Player-Side Custom Components**

You control exactly what players are allowed to edit.

Runtime Studio includes runtime inspectors for many common Unity components, allowing players to interact with gameplay systems directly inside the editor.

You can also expose custom gameplay components like Health or Spawners by integrating them into the runtime inspector, with full control over how they are presented and edited.

**Runtime Play Mode**

Test levels instantly by switching between edit and play mode.

Runtime Studio includes a built-in Play Mode that allows players to switch from editing into gameplay. Players can run their level in real time, test mechanics, and experience their creation as a game, then return back into editing to make adjustments without losing progress or context.

**Save, Load, and Share**

Player-generated content needs a reliable way to be stored and distributed.

Runtime Studio includes a complete runtime save and load system. Creations can be exported as compressed package files, allowing players to share custom levels via external distribution.

**Curated Asset Libraries**

You decide exactly what assets players can use.

The Editor Asset Library lets you group prefabs, meshes, materials, and audio. Players can browse these curated assets in the runtime Project panel with automatically generated previews.

**WebGL Support**

Run and share user-created content across platforms.

Runtime Studio supports WebGL builds, allowing your runtime editor and gameplay systems to run in browser-based environments. Level export and import is fully supported through compressed package files, enabling players to transfer creations between sessions and platforms using external file handling.

**Built-In Undo and Redo**

Mistakes happen.

Players can safely undo or redo edits, including transform changes, component edits, object duplication, and hierarchy modifications.

**Extensible Framework**\
Build and expand the editor to fit your game.

Runtime Studio is a modular, extensible framework that allows you to add custom tools, components, and workflows. Extend the runtime interface with your own systems or create new editor features through plugins or direct integrations, tailored to your project’s needs.

**Additional Features**

* Runtime NavMesh generation
* Multi-select transforms
* Shift-and-extrude placement
* Custom hotkeys and library settings
* Free camera alignment


# Setup Guide

1. Download and install Runtime Studio and any plugins you own from the package manager
2. Then you can [setup the scene](/info/standalone-assets/runtime-studio/setup-guide/scene-setup) or explore the [Demo Content](#example-location)

***

## Updating Runtime Studio

When updating Runtime Studio, we recommend uninstalling the current version and all installed plugins before installing a newer release.

### How to Uninstall

Go to the Unity toolbar:

`Tools > Fullscreen > Runtime Studio > Uninstall`

After uninstalling, you can safely install the latest versions of Runtime Editor and its plugins.

***

### Example Location

Once installed, you can find the Runtime Studio example content here:

`Assets/Plugins/Fullscreen/RuntimeStudio/Runtime/Demo`

For the Runtime Studio Game Creator 2 Integration, the example content is located here:

`Assets/Plugins/Fullscreen/RuntimeStudio/Runtime/Plugins/GameCreator2/Demo`

#### Scene Setup

The example uses two scenes:

**Demo Scene Overlay**

* Contains the Runtime Studio gameobject.
* Runtime Studio is started from this scene.
* Objects in the Overlay scene are protected and cannot be modified by the Runtime Editor.

**Demo Scene Editing**

* Contains the level content that players can edit.
* Any GameObjects placed in this scene can be modified, moved, duplicated, deleted, saved, and restored by Runtime Studio.
* This scene can be preconfigured with your own environments, prefabs, gameplay objects, and starting content.

#### Build Settings

Both the **Demo Scene Overlay** and **Demo Scene Editing** scenes must be included in your Build Settings.

This setup allows Runtime Studio to keep editor systems isolated from user-editable content while maintaining a clear separation between runtime infrastructure and player-created levels.

***

#### Optional Game Creator 2 Module Integrations

{% hint style="info" %}
Runtime Studio Game Creator 2 Integration is sold separately and is not included with Runtime Studio.
{% endhint %}

The Runtime Studio Game Creator 2 Integration includes additional integrations for supported Game Creator 2 modules.

These integrations can be found here:

`Assets/Plugins/Fullscreen/RuntimeStudio/Runtime/Plugins/GameCreator2/Packages`

Each integration is provided as a separate Unity Package (`.unitypackage`).

Install only the packages that correspond to the Game Creator 2 modules present in your project. For example, if your project uses Game Creator 2 Inventory, Stats, or Perception, you can import the matching integration package to add Runtime Studio support for those systems.

***

### What Core Includes

Runtime Studio Core includes:

* Hierarchy panel
* Project panel
* Inspector panel
* Object picker
* Type picker
* Console overlay
* Scene move/rotate/scale tools
* Transform gizmos
* Snapping and grid controls
* Save/load support
* `.rtstudio` import/export pipeline
* Runtime asset libraries
* Built-in inspectors for common Unity components


# Scene Setup

#### 1. Create the host object

In your scene that will act as an overlay, create an empty GameObject such as:

`Runtime Studio`

#### 2. Add the main component

Add this component to the host object:

`RuntimeStudioEditor`

#### 3. Set the editable scene

* Assign the `Player Editable Scene` on `RuntimeStudioEditor`
* Point it to the gameplay scene that should be edited at runtime

#### 4. Assign a free camera (optional)

You can assign a camera to the Runtime Studio host.

If no camera is assigned, Runtime Studio will use:

* the isolated edit camera, or
* `Camera.main`

#### 5. Assign settings

Assign a `RuntimeStudioSettings` asset directly in the `RuntimeStudioEditor`.

#### 6. Register scene assets in the library

Any GameObjects that exist in the **Player Editable Scene** and should be editable by players must have their meshes and materials registered in the Runtime Studio Library.

When placing custom objects in the editable scene, remember to add:

* Their Mesh assets
* Their Material assets

to the Runtime Studio Library. Otherwise, Runtime Studio may not be able to correctly restore those objects at runtime.


# Library Setup

Runtime Studio’s Project panel is driven by asset libraries. These libraries define which prefabs, materials, meshes, sprites, ScriptableObjects, and other assets are available during runtime editing.

This system also extends to all object picker fields, meaning any runtime selection for prefabs, materials, or other assignable assets is sourced directly from the configured asset libraries, ensuring full control over what players can access.

#### Create libraries

1. Open:\
   `Tools > Fullscreen > Runtime Studio > Libraries`
2. Create an `EditorAssetLibrary`
3. Add folders/groups as needed
4. Add assets you want available at runtime

Typical core-friendly assets include:

* Prefabs/GameObjects
* Materials
* Meshes
* Sprites
* ScriptableObjects

#### Assign libraries

1. Open:\
   `Tools > Fullscreen > Runtime Studio > Settings`
2. Find the `Libraries` section
3. Add your created `EditorAssetLibrary` assets


# Integrating a Component into Runtime Studio

This guide explains how to take a normal Unity component and make it fully work inside Runtime Studio.

You will learn how to:

* Make a component visible in the inspector
* Enable editing in runtime UI
* Support saving and loading
* Handle runtime isolation (muting)
* Keep data stable across sessions

***

## Step 1: Start with a Normal Component

You do not need to change your component structure.

```cs
public sealed class CharacterStats : MonoBehaviour
{
    public float Health = 100f;
    public float Attack = 10f;
    public float Defense = 5f;
}
```

At this point, Runtime Studio does nothing with it yet.

***

## Step 2: Make It Visible in Runtime Studio

To make a component appear in Runtime Studio, you create a **Component Drawer**.

Think of this as:

> “How should this component look and behave in the inspector?”

```cs
using Fullscreen.RuntimeStudio.Runtime.UI;
using Fullscreen.RuntimeStudio.Runtime.UI.ComponentDrawers;
using UnityEngine;

public sealed class CharacterStatsDrawer :
    IRuntimeComponentDrawer
{
    public Type ComponentType =>
        typeof(CharacterStats);

    public void Draw(
        ComponentDrawerContext context,
        Component component)
    {
        var stats = component as CharacterStats;
        if (stats == null) return;

        context.DrawFloat(
            "Health",
            stats.Health,
            v => stats.Health = v
        );

        context.DrawFloat(
            "Attack",
            stats.Attack,
            v => stats.Attack = v
        );

        context.DrawFloat(
            "Defense",
            stats.Defense,
            v => stats.Defense = v
        );
    }
}
```

Now the component is:

* Visible in Runtime Studio Inspector
* Editable in real time
* Integrated with selection system

***

## Step 3: Register the Drawer

```cs
builder.AddDefaultComponentDrawer(
    new CharacterStatsDrawer()
);
```

That is enough to make the component show up.

***

## Step 4: Understand What You Get for Free

Once a drawer exists, Runtime Studio automatically gives you:

#### Built-in behavior

* Undo / redo for field changes
* Inspector layout handling
* Selection refresh
* Multi-object editing support
* Value change tracking

***

## Step 5: Decide How Saving Should Work

Runtime Studio automatically saves simple components.

If your component is like this:

```cs
public float Health;
public float Attack;
public float Defense;
```

Then:

You already get save and load support automatically.

No extra code required.

***

## Step 6: When You Need Custom Save Logic

Sometimes automatic saving is not enough.

Use a **Component State Adapter** when:

* You want to save only part of the data
* You want version-safe saves
* You want custom formats (like IDs instead of references)
* You want to exclude runtime-only fields

***

### Example: Custom Save Behavior

Instead of saving everything, we control what gets stored.

```cs
public sealed class CharacterStatsAdapter :
    IComponentStateAdapter
{
    public Type ComponentType =>
        typeof(CharacterStats);

    public SerializedNode CaptureState(Component component)
    {
        var stats = component as CharacterStats;

        var node = SerializedNodeUtility.Object(
            typeof(CharacterStats)
        );

        SerializedNodeUtility.AddField(
            node,
            "health",
            SerializedNodeUtility.Float(stats.Health)
        );

        return node;
    }

    public void RestoreState(
        Component component,
        SerializedNode data)
    {
        var stats = component as CharacterStats;
        if (stats == null || data == null) return;

        stats.Health = SerializedNodeUtility.GetFloat(
            data,
            "health",
            stats.Health
        );
    }
}
```

Now you fully control what gets saved.

***

## Step 7: Handle Runtime Behavior (Important)

Some components need setup after loading or placement.

For example:

* resetting values
* rebuilding references
* initializing runtime-only systems

You do this using **Runtime Integration hooks**.

```cs
public sealed class MyIntegration :
    RuntimeIntegration
{
    public override void RebindRestoredObject(
        GameObject gameObject)
    {
        var stats =
            gameObject.GetComponent<CharacterStats>();

        if (stats != null)
        {
            stats.Health = Mathf.Max(stats.Health, 1f);
        }
    }
}
```

***

## Step 8: Understand Edit Isolation (Muted Components)

This is one of the most important concepts.

### The problem

Without isolation:

* AI keeps running
* movement continues
* timers update
* physics changes state

This breaks the runtime editing.

***

### The solution

Runtime Studio temporarily “mutes” gameplay logic during editing.

You control how this works:

```cs
public override void ApplyEditIsolation(
    Component component)
{
    if (component is CharacterStatsBehaviour behaviour)
    {
        behaviour.enabled = false;
    }
}
```


# Working with Addressables

Runtime Studio does not depend on Addressables directly. Instead, Addressables are exposed through asset libraries and resolvers.

***

### Core Idea

You connect Addressables to Runtime Studio using:

* `IRuntimeAssetLibrary`
* `IAssetReferenceResolver`

This keeps Runtime Studio decoupled from Unity systems.

***

### Creating an Addressables Library

```cs
public sealed class AddressablesLibrary :
    IRuntimeAssetLibrary
{
    public string LibraryId => "addressables";
    public string DisplayName => "Addressables";

    public IEnumerable<RuntimeAssetLibraryItem> GetItems(Type type)
    {
        foreach (var asset in MyAddressablesCache.All)
        {
            if (type == null || type.IsInstanceOfType(asset))
            {
                yield return new RuntimeAssetLibraryItem(
                    asset,
                    asset.name,
                    asset.name,
                    "Addressables",
                    LibraryId,
                    DisplayName
                );
            }
        }
    }
}
```

***

### Register Library

```cs
EditorAssetLibraryRegistry.LoadLibrary(
    new AddressablesLibrary()
);
```

***

### Resolving Saved References

Runtime Studio stores:

* asset id
* asset name
* asset type

To restore:

```cs
public Object ResolveAsset(
    Type declaredType,
    string assetTypeName,
    string assetId,
    string assetName)
{
    return MyAddressablesCache.Find(assetId)
        ?? MyAddressablesCache.FindByName(assetName);
}
```

***

### Stable IDs

Always provide stable IDs:

```cs
public bool TryGetAssetId(Object asset, out string id)
{
    id = MyAddressablesCache.GetId(asset);
    return id != null;
}
```


# Default Controls

**Default Controls**\
Common default shortcuts include:

* `F1` toggles the editor
* `` ` `` toggles the console
* `W` selects Move
* `E` selects Rotate
* `R` selects Scale
* `Delete` or `Backspace` deletes selection
* `Ctrl/Cmd + D` duplicates selection
* `F` frames selection
* `Ctrl/Cmd + Shift + F` aligns selection to view
* `Ctrl/Cmd + Z` undo
* `Ctrl/Cmd + Y` redo
* `Ctrl/Cmd + Shift + X` exits Runtime Studio play mode

**Free Cam**

* Hold `Right Mouse Button` to look around
* While looking, use `W` / `A` / `S` / `D` to move
* Use `Q` / `E` to move down / up
* Hold `Shift` to boost speed
* Use `Mouse Wheel` to increase or decrease move speed

All of these shortcuts can be fully **rebound to any key or combination you prefer inside Runtime Studio’s Settings**, so you’re not locked into the defaults.

Runtime Studio uses **Unity’s New Input System**, meaning inputs are handled through Unity’s modern, fully remappable input architecture rather than the legacy input system.


# Muting Concept

{% hint style="warning" %}

#### Technical Overview

This section explains the internal muting system used by Runtime Studio. It is intended for developers working on custom integrations or those interested in how runtime behavior is managed. Most users will not need to interact with these systems directly.
{% endhint %}

This page explains how Runtime Studio keeps gameplay logic from waking up while the user is only editing a scene.

It covers:

* the core muting model
* when muting runs
* what `OwnsBehaviourEnabledState` means
* how Runtime Studio restores runtime behavior for Runtime Studio play mode
* how the Game Creator 2 plugin mutes triggers, characters, hotspots, cameras, and related behaviors

### Why muting exists

Runtime Studio edits live runtime scenes.

That means a selected object is still a real scene object with real components. If those components keep running their gameplay logic while the user edits them, a few bad things happen:

* `OnEnable`, `Start`, and `Update` logic can fire while the user is only moving objects around
* AI, triggers, cameras, animators, and character controllers can start reacting to edit-time state
* placed prefabs can immediately wake gameplay systems
* save/load restore can briefly re-enable systems before Runtime Studio has finished rebinding them

Muting is the mechanism Runtime Studio uses to temporarily freeze those runtime behaviors during edit mode, then restore them when entering Runtime Studio play mode.

### Core idea

At a high level, Runtime Studio separates two states:

1. The authored state the object should really have
2. The temporary muted state needed while the editor is active

The authored state is what should be saved, exported, and restored for gameplay.

The muted state is only a temporary edit-time shell. Runtime Studio applies it so users can safely inspect, move, duplicate, save, load, and place objects without firing package runtime logic.

### The core muting lifecycle

The muting contract lives in `RuntimeIntegration`.

Key hooks:

* `OwnsBehaviourEnabledState(Behaviour behaviour)`
* `ApplyEditIsolation(Component component)`
* `ApplyEditModeState()`
* `RestoreEditModeState()`
* `EnterRuntimePlayMode()`
* `PrepareForSceneRestore()`
* `OnComponentRestored(Component component)`
* `RebindRestoredObject(GameObject gameObject)`
* `PreparePlacedObject(GameObject gameObject, RuntimeSceneObjectPlacementContext context)`
* `GetEditModeBehaviourStates()`

#### What each hook is for

`OwnsBehaviourEnabledState(...)`

* Tells Runtime Studio that the integration wants to manage a behavior's enabled state itself.
* This matters for packages that need to remember the authored enabled state separately from the temporary muted state.

`ApplyEditIsolation(...)`

* Called per component when Runtime Studio needs to mute runtime behavior for edit mode.
* Best for local one-component muting such as disabling a trigger, hotspot, or package-specific behavior.

`ApplyEditModeState()`

* Applies package-wide edit-mode muting across the scene.
* Best for global scans like "find all package characters and freeze them."

`RestoreEditModeState()`

* Restores the captured authored edit-time values after Runtime Studio play mode exits.
* This is the step that puts objects back into the user-authored edit shell.

`EnterRuntimePlayMode()`

* Re-enables runtime behavior for Runtime Studio play mode.
* This is where a package should turn gameplay systems back on and reinitialize them if needed.

`PrepareForSceneRestore()`

* Freezes package state before save/load restore work starts.
* Important because scene restore may replace objects and serialized state in phases.

`OnComponentRestored(...)` and `RebindRestoredObject(...)`

* Repair runtime-only links after serialized data is back.
* Useful when package internals need startup or rebinding after restore.

`PreparePlacedObject(...)`

* Runs when Runtime Studio places a prefab or preview object into the scene.
* This is the main defense against newly placed package objects waking up immediately.

`GetEditModeBehaviourStates()`

* Returns the authored enabled state Runtime Studio should preserve in save/export snapshots.
* Without this, snapshots may accidentally capture the temporary muted state instead of the real intended state.

### Important limitation: `Awake` is different

Runtime Studio can mute many runtime behaviors after it initializes, but it cannot undo an `Awake` that Unity already ran before Runtime Studio got control.

That means:

* `OnEnable`, `Start`, runtime callbacks, and many package systems can be muted
* `Awake` cannot be retroactively "un-fired"

If a third-party system must not run `Awake` until play, it needs to be authored inactive/disabled or routed through a package-specific startup path that the integration triggers later.

### What `OwnsBehaviourEnabledState` really means

This method is the handoff point between core Runtime Studio and an integration.

When an integration returns `true` for a behavior:

* the integration becomes responsible for preserving the intended enabled state
* the integration can safely force that behavior into a muted state during editing
* the integration can later restore or reinterpret the intended state for play

This is especially important for systems like:

* characters
* animators
* triggers
* custom package behaviors
* cameras

If a package only disables components without capturing authored values, save/load and repeated play sessions can drift away from what the content author intended.

### How muting interacts with save/load

Runtime Studio wants save/load to preserve the authored state, not the temporary muted state.

That is why integrations are expected to:

* capture intended enabled values
* return those values from `GetEditModeBehaviourStates()`
* re-freeze objects in `PrepareForSceneRestore()`
* repair runtime-only links in `OnComponentRestored(...)` and `RebindRestoredObject(...)`

The result is:

* edit mode stays safe
* save data stays faithful
* runtime play mode can still rebuild the true package runtime state

### How muting interacts with placed prefabs

When Runtime Studio places an object from the Project panel, hierarchy shortcuts, or a drop action, it creates the object inactive first, then calls `PreparePlacedObject(...)`.

This gives integrations a chance to:

* disable package runtime behaviors
* sanitize runtime-only objects
* prepare references
* stop `OnEnable` and `Start` chains from waking up immediately

After that, Runtime Studio restores the placed root's authored active state.

This is one of the most important safety guarantees in the system.

### Game Creator 2 muting overview

The Game Creator 2 plugin uses a dedicated `RuntimeIntegration` plus a large `RuntimeBridge` helper to implement muting and restore behavior.

The integration takes ownership of Game Creator runtime behavior by:

* reporting GC2-owned behaviors through `OwnsBehaviourEnabledState(...)`
* muting GC2 objects in `ApplyEditIsolation(...)`
* scanning the whole scene in `ApplyEditModeState()`
* restoring authored values in `RestoreEditModeState()`
* rebuilding live runtime state in `EnterRuntimePlayMode()`
* freezing and rebinding objects during restore and placement

The GC2 integration handles several categories differently:

* triggers
* characters
* animators on characters
* hotspots
* GC2 camera behaviors
* other GC2-owned behaviors under characters

### Game Creator 2 triggers

Triggers are muted in a special way.

Runtime Studio does not just disable the `Trigger` component and call it done. Instead, it keeps track of two trigger-event states:

* the real runtime event the trigger should use
* a temporary editor-muted event installed while editing

#### How trigger muting works

When Runtime Studio isolates a GC2 `Trigger`:

1. It reads the real trigger event from `m_TriggerEvent`
2. It stores that event in an internal `TriggerEventState.RuntimeEvent`
3. If the event was already initialized and active, it calls the event's `OnDisable(trigger)` lifecycle
4. It marks the trigger as muted
5. It swaps the live `m_TriggerEvent` field to an internal `EditorMutedEvent`

That `EditorMutedEvent` is just a placeholder event used to stop the real event from reacting during edit mode.

#### Why GC2 triggers are muted this way

This approach gives Runtime Studio a few benefits:

* the trigger component can stay present in the scene
* the inspector can still edit the real trigger configuration
* the real runtime event is preserved separately from the temporary edit-time event
* when Runtime Studio enters play mode, the real event can be restored and started correctly

#### Trigger state tracked by Runtime Studio

For each trigger, Runtime Studio tracks:

* `Muted`
* `MutedEvent`
* `RuntimeEvent`
* `RuntimeInitialized`
* `RuntimeEnabled`
* `RuntimeStarted`

This lets the plugin avoid double-initializing the same trigger event and correctly resume its lifecycle later.

#### What happens when entering Runtime Studio play mode

When Runtime Studio enters its own play mode, the GC2 bridge:

1. clears dead cached trigger state entries
2. restores the real trigger event back into `m_TriggerEvent`
3. reapplies trigger requirements/configuration
4. runs the trigger event lifecycle in order:
   * `OnAwake(trigger)` if needed
   * `OnEnable(trigger)` if active
   * `OnStart(trigger)` if runtime play should run start logic

This is why GC2 triggers can stay editable in Runtime Studio without firing during edit mode, but still come back alive when runtime play begins.

### Game Creator 2 characters

Characters use a broader muting model than triggers.

The GC2 integration captures a `CharacterEditState` with:

* authored controllable state
* authored player state
* authored driver kinematics state
* authored enabled state

#### What Runtime Studio does in edit mode

When a GC2 `Character` is muted for edit mode, Runtime Studio:

1. captures the authored character state if it has not already been captured
2. forces `IsControllable` to `false`
3. forces `IsPlayer` to `false`
4. forces driver kinematics updates off
5. keeps character model animators in an edit-safe state
6. disables the `Character` component itself

This prevents common edit-time problems such as:

* movement or input waking up while dragging the character
* player shortcut registration sticking to edit-time objects
* navmesh driver logic starting while the user is placing or restoring content
* character-owned GC2 systems reacting during restore

#### Why Runtime Studio stores "intended" player and controllable values

The inspector still needs to show the values the user actually authored.

So while edit mode may temporarily force:

* `IsPlayer = false`
* `IsControllable = false`

Runtime Studio separately stores the intended values in the character edit state.

That means:

* the inspector can display the intended authored values
* saves and exports preserve the authored values
* runtime play can restore the correct live behavior later

#### Character animators are handled specially

Character animators are not simply disabled in the same way as other behaviors.

Runtime Studio captures each animator's authored enabled state and keeps it in a dedicated animator state map.

During normal edit isolation:

* character animators are usually kept enabled if their authored state was enabled
* this allows pose/model preview to remain usable while editing

During scene restore:

* `CharacterSceneRestoreInProgress` is set
* animators are temporarily suppressed while rebinding and model repair happen

#### Other GC2-owned behaviors under characters

The plugin also mutes other GC2-owned behaviors attached under a character hierarchy.

That includes:

* behaviors in `GameCreator.Runtime.Characters.*`
* other `GameCreator.Runtime.*` behaviors that belong under a character
* `NavMeshAgent` when it belongs to a GC2 character

Those behaviors are captured and disabled separately so their authored enabled values can be restored later.

### Game Creator 2 hotspots

Hotspots are muted by:

* capturing their authored enabled state
* cleaning up transient hotspot runtime objects
* disabling the hotspot during edit mode

This avoids leftover tooltip, hint, and temporary hotspot objects surviving into edit mode or restore flows.

### Game Creator 2 cameras and shot cameras

GC2 camera behaviors are also muted during edit mode.

Runtime Studio:

* captures their authored enabled state
* disables them while editing
* rebinds shot types and camera transitions after restore
* reactivates them when entering Runtime Studio play mode

This prevents edit-time camera systems from competing with the scene editing camera.

### Scene restore behavior for GC2

Before a restore starts, the GC2 plugin does extra preparation:

* freezes characters into edit mode
* cleans up rig handles
* prepares hotspots for restore
* marks that a character scene restore is in progress

After objects are restored, the plugin:

* refreshes trigger events
* syncs intended character state from restored data
* repairs character runtime bindings
* rebinds shot cameras and cameras
* repairs IK and model references
* re-applies character model prefabs if needed

This is why the GC2 integration can survive save/load and import/export without the live runtime systems drifting into broken or half-active states.

### Runtime Studio play entry for GC2

When Runtime Studio enters its runtime play mode, the GC2 plugin:

1. clears pooled GC2 runtime children
2. prepares all characters for runtime play
3. restores GC2-owned behaviors to their intended enabled states
4. restores real trigger events
5. re-registers player, main camera, and main shot shortcuts
6. starts shot cameras and camera transitions

#### A useful subtlety

If a character's intended `IsPlayer` is true, Runtime Studio normalizes that character to a live runtime state for Runtime Studio play.

This prevents repeated edit/play cycles in the same Unity session from leaving the player character accidentally muted or non-functional.

### Mental model for extension authors

If you are writing your own package integration, the safest way to think about muting is:

* capture authored state once
* force a safe edit shell
* save the authored state, not the shell state
* rebuild runtime-only state after restore
* restore the authored runtime state only when entering Runtime Studio play

If your package behaves like GC2 triggers:

* keep a separate stored runtime payload
* swap in a harmless edit-time placeholder
* restore the real payload before runtime play

If your package behaves like GC2 characters:

* capture authored flags separately from the live object
* mute the runtime systems broadly
* repair runtime-only caches and bindings after restore
* normalize play-entry state explicitly


# Settings

This page explains the Unity Editor **Runtime Studio Settings** window: what it edits, where to open it, and what each category controls.

### What the Settings window is for

The Settings window edits a `RuntimeStudioSettings` asset.

That asset controls:

* which built-in Runtime Studio features are enabled
* editor hotkeys
* free-cam behavior and input
* scene overlay shaders and visuals
* icon overrides
* assigned asset libraries
* plugin/module enable state and type filters

Each `RuntimeStudioEditor` component can point at its own settings asset, so different scenes or editor hosts can use different Runtime Studio configurations.

### How to open it

Open the window from:

* `Tools > Fullscreen > Runtime Studio > Settings`

You can also:

* select a `RuntimeStudioSettings` asset and click `Open Settings Editor`
* open it from the custom inspector for a `RuntimeStudioEditor` host

### Multiple settings assets

The window supports multiple `RuntimeStudioSettings` assets in the project.

This is useful when:

* one scene needs different free-cam settings
* one runtime editor host should expose different plugins
* one game mode should use different libraries or feature gates

If multiple assets exist, the window shows:

* a warning card listing them
* an `Editing Asset` selector so you can switch between assets

### Window layout

The Settings window has:

* a left sidebar with categories
* a content panel on the right

Built-in categories are:

* `General`
* `Features`
* `Scene Overlays`
* `Input`
* `Free Cam`
* `Icons`
* `Libraries`

Below those, the sidebar also shows plugin/module categories.

### General

The `General` category covers project-level settings asset management and a few core settings.

It includes:

* which settings asset is currently being edited
* the current asset path
* `Home Scene`
* `Generate Library Previews On Startup`
* buttons to select or ping the asset

#### Home Scene

`Home Scene` is the scene Runtime Studio treats as the "quit back to game" target.

When this is set:

* the Scene Settings menu can show `Quit`
* Runtime Studio can load that scene with `LoadSceneMode.Single`

If it is empty:

* `Quit to Desktop` still exists
* project-defined "return to scene" behavior is not configured

#### Hierarchy context prefabs

The `General` page also includes **Hierarchy context prefabs**.

These let you add custom right-click Hierarchy entries that instantiate project-defined prefabs or GameObjects.

Each entry includes:

* a slash-separated menu path
* the prefab or GameObject to create

Example:

* `Visual Scripting/Characters/NPC`

### Features

The `Features` category controls the core built-in Runtime Studio features globally.

These toggles include:

* `Hierarchy Panel`
* `Project Panel`
* `Inspector Panel`
* `Console`
* `Runtime Play`
* `Scene Save / Load`
* `Package Import / Export`
* `Transform Tools`
* `Scene Overlays`

#### What these toggles affect

These are high-level gates.

They control whether Runtime Studio exposes major core systems such as:

* default panels
* save/load and `.rtstudio` package workflows
* move/rotate/scale tools
* overlay rendering and related scene controls

Use this page when you want to ship a smaller or more focused runtime editor.

### Scene Overlays

The `Scene Overlays` category controls the rendering and appearance of built-in scene overlays.

It is split into several sections.

#### Scene grid

Controls:

* grid render mode
* grid shader
* shader half extents
* major interval
* plane offset
* fade start

Use this section to choose whether the grid should use Runtime Studio's shader-driven overlay path and to tune how large and visible the grid feels.

#### Grid lines

Controls:

* minor line width
* major line width
* axis line width
* minor color
* major color
* X axis color
* Z axis color

This is where you style the look of the shader grid.

#### Transform gizmo

Controls:

* gizmo render mode
* gizmo shader

This affects the move, rotate, and scale handles.

#### Selection outline

Controls:

* selection render mode
* selection mask shader
* selection outline shader

This affects how selected objects are highlighted.

#### Collider overlay

Controls:

* collider render mode
* collider shader

This affects how collider overlays are drawn when enabled.

#### NavMesh preview

Controls:

* NavMesh preview shader

This is the shader used for the runtime-generated NavMesh overlay.

#### Reset button

The page includes:

* `Reset To Built-in Shaders`

Use this to restore the package's default shader references.

### Input

The `Input` category covers editor behavior and general Runtime Studio shortcuts.

#### Edit mode behavior

Includes:

* `Pause Time Scale When Editing`

This controls whether Runtime Studio pauses the runtime while the editor UI is open in edit mode.

#### Editor shortcuts

This section exposes Input System action slots for:

* `Toggle Editor`
* `Toggle Console`
* `Delete Selection`
* `Duplicate Selection`
* `Frame Selection`
* `Align Selection With View`
* `Extrude Selection`
* `Exit Play Mode`
* `Move Tool`
* `Rotate Tool`
* `Scale Tool`
* `Undo`
* `Redo`

If an action slot is left empty, Runtime Studio falls back to its built-in defaults at runtime.

### Free Cam

The `Free Cam` category controls the runtime scene camera behavior used while editing.

It has two sections.

#### Free cam behavior

Includes:

* `Enabled`
* `Look Requires Hold`
* `Move Only While Looking`
* `Move Speed`
* `Minimum Move Speed`
* `Maximum Move Speed`
* `Boost Multiplier`
* `Look Sensitivity`
* `Scroll Speed Step`

These settings define how the camera feels.

Important interaction:

* if `Look Requires Hold` is enabled, the player must hold the configured look-hold input to enter free-look
* if `Move Only While Looking` is enabled, movement input is only applied while the player is actively in free-look

#### Free cam actions

Includes Input System actions for:

* `Move`
* `Elevation`
* `Look`
* `Look Hold`
* `Boost`
* `Speed Adjust`

If these are left empty, Runtime Studio generates default fallback controls at runtime.

Default fallback behavior includes:

* `Right Mouse Button` to look
* mouse delta to rotate the camera
* `W` / `A` / `S` / `D` to move
* `Q` / `E` for down / up elevation
* `Shift` to boost speed
* mouse wheel to change move speed

### Icons

The `Icons` category lets you override the textures used by Runtime Studio's built-in UI.

#### Core icons

This section includes override fields for common built-in visuals such as:

* `GameObject`
* `Prefab`
* `Fallback / Script`
* `Project Fallback / ScriptableObject`
* `Transform`
* collider icons
* renderer icons
* `Rigidbody`
* `Character Controller`
* `Particle System`
* `Animation`
* `Animator`
* `Animator Controller`
* `Audio Source`
* `Camera`
* `Light`
* `Material`
* `Animation Clip`
* `Move`
* `Rotate`
* `Scale`
* `Play`
* `Stop`
* `Package / Saves`
* `Overlay Dropdown`
* `Scene Settings Dropdown`
* `Search`
* `Pick`
* `Folder`
* `Folder Opened`
* `Check`

#### Type overrides

The same page also includes:

* `Overrides`

This is the per-type icon override list.

Use it when you want a specific type to have its own icon, even if it does not map cleanly to one of the built-in semantic icon slots.

#### Reset button

The page includes:

* `Reset To Built-in Icons`

Use this to restore the package's bundled icon references.

### Libraries

The `Libraries` category controls which `EditorAssetLibrary` assets are available to Runtime Studio at runtime.

This section includes:

* `Asset Libraries`
* an `Open Library Manager` button

These assigned libraries feed the runtime Project panel and object picker.

Use this page to choose which content libraries are visible to players in the runtime editor.

### Plugin pages

Below the built-in categories, the Settings window shows pages for plugin/module settings.

These pages are built from registered `RuntimeStudioSettingsModuleDefinition` entries.

Each plugin page normally includes:

* an `Enable plugin` toggle
* optional feature toggles
* optional type-filter groups
* a `Find type` search field

#### Feature toggles

If a plugin registers feature IDs, the page shows a `Features` foldout with toggles for those items.

These are usually used to enable or disable:

* plugin panels
* scene tool buttons
* scene settings entries
* other registered plugin UI/features

#### Type filtering

Depending on what the plugin registers, the page can show foldout groups for:

* `Components`
* `Triggers`
* `Instructions`
* `Conditions`
* `Properties`

These lists let you hide specific plugin-exposed types from Runtime Studio.

This is useful when:

* a plugin exposes too many types for your project
* you only want a curated subset visible to players
* you need to disable unstable or unsupported types

#### Search and large type lists

Plugin pages include a delayed `Find type` field.

Use it to narrow large type lists quickly.

Large lists are capped in the UI:

* the window shows the first 300 matching type rows

If more types exist, the UI tells you to refine the search.

#### Dependency-blocked types

Some plugins can report dependency rules.

When that happens, the Settings window can:

* gray out a type toggle
* show a reason explaining why that type is blocked

This lets optional integrations disable unsupported types without hard-coding plugin-specific behavior into Runtime Studio core.


# RuntimeEditorPanelSettings

This page explains the `RuntimeEditorPanelSettings` asset used by Runtime Studio's UI Toolkit editor shell.

### What it is

`RuntimeEditorPanelSettings` is the runtime `PanelSettings` asset that Runtime Studio uses for its `UIDocument`.

In this package, the asset lives at:

* `Runtime/Resources/RuntimeEditorPanelSettings.asset`

At runtime, Runtime Studio loads it from the Resources key:

* `RuntimeEditorPanelSettings`

### Why it exists

Runtime Studio builds its editor UI with Unity UI Toolkit.

UI Toolkit needs a `PanelSettings` asset to define how the UI panel is rendered, scaled, themed, and layered.

Without a valid `PanelSettings` asset, the runtime editor cannot build its UI correctly.

### Where Runtime Studio uses it

When `EditorView` starts:

1. It finds or creates a `UIDocument` on the Runtime Studio host GameObject
2. It resolves which `PanelSettings` to use
3. It assigns that `PanelSettings` to the `UIDocument`
4. It then loads the Runtime Studio style sheet and builds the editor UI

### Resolution order

Runtime Studio resolves panel settings in this order:

1. If the `UIDocument` already has `panelSettings` assigned, Runtime Studio uses that
2. Otherwise it loads `Resources.Load<PanelSettings>("RuntimeEditorPanelSettings")`
3. If found, Runtime Studio instantiates a runtime copy of that asset
4. If not found, Runtime Studio logs an error

That means a manually assigned `UIDocument.panelSettings` always wins over the built-in resource asset.

### Relationship to Runtime Studio style sheets

`RuntimeEditorPanelSettings` is only one part of the UI setup.

Runtime Studio also loads:

* `RuntimeEditor.uss` from `Resources`
* the theme USS referenced by the `PanelSettings` asset

So the full UI stack is:

1. `UIDocument`
2. `PanelSettings`
3. theme USS from `PanelSettings`
4. Runtime Studio runtime USS loaded by `EditorView`

In this package, the bundled asset references:

* `themeUss`

and Runtime Studio separately adds:

* `RuntimeEditor.uss`

This means the final look is a combination of the panel theme and the Runtime Studio stylesheet.

### What the bundled asset is configured for

The packaged `RuntimeEditorPanelSettings.asset` is configured for normal screen-space runtime UI.

Notable values in the asset include:

* `m_RenderMode: 0`
* `m_ScaleMode: 1`
* `m_ReferenceResolution: 1200 x 800`
* `m_SortingOrder: 32760`
* `themeUss` assigned
* `m_DisableNoThemeWarning: 1`

#### Why those settings matter

`Reference Resolution`

* Helps define how the UI scales across resolutions

`Sorting Order`

* Keeps Runtime Studio's editor UI layered above normal gameplay UI in typical setups

`themeUss`

* Provides the base UI Toolkit theme used by the panel

`Disable No Theme Warning`

* Suppresses Unity's missing-theme warning because the asset already supplies a theme

### When you should customize it

Most projects should keep the bundled asset unless there is a specific reason to change it.

Good reasons to customize it:

* you need different UI scaling behavior
* your project needs a different target render mode
* you want a different base UI Toolkit theme
* your project has unusual multi-display or layering requirements
* you want Runtime Studio to share a custom `PanelSettings` setup with the rest of your UI Toolkit runtime UI

### Safest customization approach

The safest approach is usually:

1. duplicate the bundled `PanelSettings` asset
2. adjust the duplicate
3. assign it directly to the `UIDocument` used by your Runtime Studio host

That gives you explicit control and avoids depending on the built-in resource fallback.

If you replace the resource asset itself, be aware that every Runtime Studio host using the fallback path will pick up that new behavior.

### Using your own UIDocument panel settings

If your host GameObject already has a `UIDocument` with `panelSettings` assigned:

* Runtime Studio reuses it
* Runtime Studio does not clone the resource asset
* Runtime Studio does not destroy your assigned asset on cleanup

This is the correct path when your project wants Runtime Studio to integrate into an existing UI Toolkit setup.


# Plugins


# Game Creator 2 Integration

<figure><img src="/files/aCykzl85XIf5vaUJQL0x" alt=""><figcaption></figcaption></figure>

## **Runtime Studio - Game Creator 2 Integration**

Building a runtime level editor is only half the challenge. Players also need a way to create gameplay, events, objectives, and interactive experiences without writing code.

Runtime Studio Game Creator 2 Integration brings the full power of Game Creator 2's visual scripting ecosystem into Runtime Studio. Players can create and edit Triggers, Actions, Instructions, Conditions, Variables, and Characters directly within the game, allowing them to build complete gameplay experiences alongside their custom levels.

The integration is designed to work seamlessly with both official Game Creator 2 modules and custom Instructions downloaded from the Hub or created specifically for your project.

**Visual Scripting at Runtime**

Give your players the power to create gameplay without code.

Players can create and edit Triggers, Conditions, and Actions directly in-game using a runtime-friendly interface inspired by Game Creator 2. Add, remove, reorder, and configure Instructions and Conditions without ever leaving the game.

**Full Instruction & Conditons Support**

Build on top of the entire Game Creator 2 ecosystem.

The integration supports official Game Creator 2 Instructions and Conditions as well as Instructions and Conditions downloaded from the Game Creator 2's Hub. Custom Instructions and Conditions created for your own project can also be exposed automatically, allowing players to use the same gameplay tools available to developers.

**Runtime Variables**

Create dynamic and reactive gameplay systems.

Players can create, edit, and manage Local Variables directly at runtime. Variables can be referenced by Instructions and Conditions, making it possible to build quests, puzzles, objectives, and interactive gameplay logic entirely inside the game.

**Characters and Gameplay Objects**

Bring levels to life.

Players can place Characters, Players, and other gameplay prefabs into their levels. Combined with visual scripting support, levels become fully interactive experiences rather than static environments.

**Player-Safe Editing**

Powerful tools without sacrificing stability.

The integration only exposes systems that you choose to make available. You can enable or disable individual Instructions and Conditions directly from the plugin settings, giving you full control over what players are allowed to use and ensuring a fully curated and safe gameplay creation experience.

**Designed for Runtime Studio**

Built from the ground up to integrate with the Runtime Studio workflow.

Game Creator 2 components appear naturally within the Runtime Studio editor experience, allowing players to move seamlessly between level design and gameplay creation without learning multiple tools.

**Extensible by Design**

Support your own systems and gameplay features.

The integration was built with extensibility in mind. Custom Instructions, Conditions, and project-specific workflows can be integrated into the runtime editor, making it possible to expose unique gameplay systems to your community.


# Terrain Editor

## Runtime Studio Terrain Getting Started

This guide shows the fastest way to get the Terrain plugin working.

### 1. Install the Terrain plugin

Import both:

* Runtime Studio
* Runtime Studio Terrain Editor

The Terrain Editor requires the Runtime Studio base package.

### 2. Add Runtime Studio to a scene

1. Add `RuntimeStudioEditor` to a GameObject in your scene.
2. Assign a `RuntimeStudioSettings` asset.
3. Open the Runtime Studio Settings window and make sure the Terrain plugin is enabled.

### 3. Configure Terrain settings

Open:

`Tools > Fullscreen > Runtime Studio > Settings`

Select the **Terrain** plugin from the sidebar.

Configure the assets you want available at runtime.

#### Terrain Material

The material assigned to newly created runtime terrains.

#### Default Terrain Layer

The terrain layer automatically applied to new terrains.

Setting this allows new terrains to be painted immediately.

#### Terrain Layers

The terrain textures that players can paint.

#### Grass Details

Grass and detail textures available for painting.

#### Detail Meshes

Mesh-based terrain details available for painting.

#### Tree Prefabs

Tree prefabs available in the Trees tool.

#### Brush Textures

Optional brush masks used by terrain brushes.

You can drag individual assets, multiple assets, or entire folders into these lists.

### 4. Enter Play Mode

Terrain editing only happens while the game is running.

Press **Play**, then open Runtime Studio.

### 5. Open Terrain Mode

Click the **Terrain** button in the Runtime Studio toolbar.

When Terrain Mode opens:

* the Terrain panel appears
* the Inspector panel is hidden
* transform tools are disabled
* brush settings return to their default values

### 6. Create a terrain

There are two ways to create a terrain.

#### Terrain panel

If no editable terrain exists, click **Create Terrain**.

#### Hierarchy

Right-click inside the Runtime Studio Hierarchy and select:

`3D Object > Terrain`

Choose:

* name
* width
* height
* length
* heightmap resolution
* alphamap resolution
* detail resolution

### 7. Select a tool

The Terrain Editor includes the following tools:

* Raise
* Flatten
* Smooth
* Texture
* Details
* Trees
* Erase
* Cut Trees
* Cut Holes
* Fill Holes

Each tool has its own settings depending on the selected mode.

### 8. Adjust the brush

Most tools support the same brush settings:

* Radius
* Strength
* Falloff
* Brush Texture

Experiment with different brush sizes and strengths to achieve smoother results.

### 9. Paint textures

To paint textures:

1. Add Terrain Layers in the Terrain settings.
2. Open the **Textures** tool.
3. Select a terrain layer.
4. Paint directly onto the terrain.

### 10. Paint grass and details

To paint grass or detail meshes:

1. Add Grass Details or Detail Meshes in the Terrain settings.
2. Open the **Details** tool.
3. Select the detail to paint.
4. Adjust the density.
5. Paint onto the terrain.

Detail meshes use GPU instancing by default where supported.

### 11. Paint trees

To paint trees:

1. Add Tree Prefabs in the Terrain settings.
2. Open the **Trees** tool.
3. Select a tree.
4. Adjust the density and random scale.
5. Paint onto the terrain.

### 12. Create neighbouring terrains

Open the **Neighbours** section while a terrain is selected.

You can create new terrain tiles to the:

* North
* South
* East
* West

Neighbour terrains connect automatically, making it easy to build larger worlds.

### 13. Edit multiple terrains

Select multiple terrains in the Hierarchy to add:

* Terrain Layers
* Grass Details
* Detail Meshes
* Tree Prefabs

to all selected terrains at the same time.

### 14. Save your terrain

Terrain data is fully integrated with Runtime Studio.

Terrain edits are automatically included when using:

* Save
* Load
* Export
* Import
* Undo
* Redo

No additional setup is required.


# API

## Runtime Studio API Overview

Public API surface, grouped by purpose.

### Module Registration

* `IEditorModule`
* `IEditorModulePriority`
* `IEditorModulePrewarm`
* `EditorModules.Register(...)`
* `EditorModules.Prewarm(...)`
* `EditorModules.DiscoverLoadedModules()`
* `EditorModules.Reset()`
* `EditorModuleBuilder.AddInspectorGroup(...)`
* `EditorModuleBuilder.AddDefaultInspectorGroup(...)`
* `EditorModuleBuilder.AddHierarchyAdornment(...)`
* `EditorModuleBuilder.AddDefaultHierarchyAdornment(...)`
* `EditorModuleBuilder.AddAssetResolver(...)`
* `EditorModuleBuilder.AddDefaultAssetResolver(...)`
* `EditorModuleBuilder.AddRuntimeAssetImporter(...)`
* `EditorModuleBuilder.AddDefaultRuntimeAssetImporter(...)`
* `EditorModuleBuilder.AddRuntimeIntegration(...)`
* `EditorModuleBuilder.AddDefaultRuntimeIntegration(...)`
* `EditorModuleBuilder.AddComponentStateAdapter(...)`
* `EditorModuleBuilder.AddDefaultComponentStateAdapter(...)`
* `EditorModuleBuilder.AddTypeIconProvider(...)`
* `EditorModuleBuilder.AddDefaultTypeIconProvider(...)`
* `EditorModuleBuilder.AddComponentDrawer(...)`
* `EditorModuleBuilder.AddDefaultComponentDrawer(...)`
* `EditorModuleBuilder.AddPropertyDrawer(...)`
* `EditorModuleBuilder.AddDefaultPropertyDrawer(...)`
* `EditorModuleBuilder.AddHierarchyAction(...)`
* `EditorModuleBuilder.AddDefaultHierarchyAction(...)`
* `EditorModuleBuilder.AddSceneToolOverlayItem(...)`
* `EditorModuleBuilder.AddDefaultSceneToolOverlayItem(...)`
* `EditorModuleBuilder.AddSceneSettingsMenuItem(...)`
* `EditorModuleBuilder.AddDefaultSceneSettingsMenuItem(...)`
* `EditorModuleBuilder.AddPanel(...)`
* `EditorModuleBuilder.AddDefaultPanel(...)`
* `EditorModuleBuilder.AddSettingsModule(...)`
* `EditorModuleBuilder.AddDefaultSettingsModule(...)`

### UI and Layout

* `IEditorPanel`
* `IEditorView`
* `PanelDefinition`
* `PanelDock`
* `PanelRegistry`
* `InspectorGroupDefinition`
* `InspectorGroupHeaderContext`
* `InspectorGroupRegistry`
* `HierarchyAdornmentDefinition`
* `HierarchyAdornmentRegistry`
* `IRuntimeHierarchyContextAction`
* `HierarchyActionContext`
* `HierarchyActionRegistry`
* `SceneToolOverlayItem`
* `SceneToolOverlayPlacement`
* `SceneToolOverlayContext`
* `SceneToolOverlayRegistry`
* `SceneSettingsMenuItem`
* `SceneSettingsMenuContext`
* `SceneSettingsMenuRegistry`

### Component Drawing

* `IRuntimeComponentDrawer`
* `IRuntimeComponentDrawerMetadata`
* `ComponentDrawerContext`
* `ComponentDrawerRegistry`
* `IRuntimePropertyDrawer`
* `PropertyDrawerContext`
* `PropertyDrawerRegistry`
* `FieldInspector`

### Persistence and Undo

* `SceneSaveManager`
* `SceneSaveJson`
* `RuntimeStudioPackage`
* `RuntimeStudioFileTransfer`
* `RuntimeStudioUndo`
* `IRuntimeStudioUndoService`
* `RuntimeStudioUndoScope`
* `IComponentStateAdapter`
* `IComponentStateAdapterPriority`
* `ComponentStateAdapterRegistry`
* `SerializedNodeUtility`

### Runtime Integration

* `IRuntimeIntegration`
* `IRuntimeIntegrationPriority`
* `IRuntimePlayModeExitRestoreHandler`
* `IRuntimeComponentEnabledStateRestoreHandler`
* `RuntimeIntegration`
* `RuntimeIntegrationRegistry`
* `SceneOverlayDrawContext`
* `RuntimeSceneEditing`
* `RuntimeSceneObjectPlacementContext`
* `RuntimeSceneObjectPlacementKind`

### Asset and Import

* `IRuntimeAssetLibrary`
* `EditorAssetLibrary`
* `EditorAssetLibraryRegistry`
* `IAssetReferenceResolver`
* `AssetReferenceResolverRegistry`
* `IRuntimeAssetImporter`
* `RuntimeAssetImportRequest`
* `RuntimeImportedAsset`
* `RuntimeAssetImporterRegistry`
* `RuntimeImportedAssetLibrary`
* `RuntimeImportedAssetManager`

### Settings and Type Filtering

* `RuntimeStudioSettings`
* `RuntimeStudioSettingsRegistry`
* `RuntimeStudioSettingsModuleDefinition`
* `RuntimeStudioModuleSettings`
* `RuntimeStudioTypeFilterCategory`
* `RuntimeStudioModuleIds`
* `RuntimeStudioInfo`

### Reflection and Type Selection

* `ITypeIconProvider`
* `TypeIconRegistry`
* `TypeCatalog`
* `RuntimeTypeMetadata`
* `ReflectionUtility`

### Built-In IDs

* `BuiltInPanelIds`
* `BuiltInEditorFeatureIds`
* `BuiltInSceneSettingsMenuIds`


# User Interface

Runtime Studio provides several extension points for building custom editor UI at runtime. Most UI extensions can be discovered automatically, but registering them through an `IEditorModule` is recommended.

### UI Extension Overview

| API                              | Purpose                                                |
| -------------------------------- | ------------------------------------------------------ |
| `IEditorPanel`                   | Create custom docked or overlay panels.                |
| `SceneToolOverlayItem`           | Add buttons and controls to the Scene View overlay.    |
| `SceneSettingsMenuItem`          | Add entries to the Scene Settings menu.                |
| `IRuntimeComponentDrawer`        | Draw custom inspector UI for Unity components.         |
| `IRuntimePropertyDrawer`         | Draw custom inspector UI for nested data types.        |
| `HierarchyAdornmentDefinition`   | Show icons beside hierarchy items.                     |
| `IRuntimeHierarchyContextAction` | Add hierarchy right-click menu actions.                |
| `FieldInspector`                 | Draw runtime-safe fields inside custom drawers.        |
| `EditorStyles`                   | Create UI that matches Runtime Studio's look and feel. |

***

## Panels

Panels are UI Toolkit views displayed inside the Runtime Studio editor.

{% code expandable="true" %}

```cs
using Fullscreen.RuntimeStudio.Runtime;
using Fullscreen.RuntimeStudio.Runtime.UI;
using UnityEngine.UIElements;

public sealed class NotesPanel : IEditorPanel
{
    public NotesPanel()
    {
        Root = EditorStyles.PanelElement("NotesPanel");

        Root.Add(EditorStyles.Title("Notes"));
        
        Root.Add(new TextField());
    }

    public VisualElement Root { get; }

    public void Refresh() { }
    public void Tick() { }
    public void Dispose() { }
}
```

{% endcode %}

Register the panel:

{% code expandable="true" %}

```cs
public sealed class NotesModule : IEditorModule
{
    public void Register(EditorModuleBuilder builder)
    {
        builder.AddDefaultPanel(
            PanelDefinition.Left(
                "my-game.notes",
                "Notes",
                _ => new NotesPanel()
            )
        );
    }
}
```

{% endcode %}

#### Panel Locations

```cs
PanelDefinition.Left(...)
PanelDefinition.Right(...)
PanelDefinition.Overlay(...)
```

#### Common Options

```cs
.Ordered(100)
.HiddenByDefault()
.Widths(320f, 220f, 500f)
.Heights(400f, 250f, 700f)
.Flexible()
```

## Scene Tool Overlay Items

Scene tool overlay items appear as buttons inside the Scene View.

{% code expandable="true" %}

```cs
builder.AddDefaultSceneToolOverlayItem(
    SceneToolOverlayItem.Button(
        "my-game.spawn",
        context =>
        {
            CreateObject();
        })
    .WithTooltip("Create Object")
    .Ordered(100)
);
```

{% endcode %}

#### Common Options

{% code expandable="true" %}

```cs
.WithLabel("Spawn")
.WithTooltip("Create Object")
.Ordered(100)
.VisibleWhen(context => true)
.EnabledWhen(context => true)
.ActiveWhen(context => false)
```

{% endcode %}

#### Placement

{% code expandable="true" %}

```cs
.Placed(SceneToolOverlayPlacement.TransformTools)
.Placed(SceneToolOverlayPlacement.SceneViewActions)
```

{% endcode %}

## Scene Settings Menu Items

Add custom entries to the Scene Settings dropdown.

{% code expandable="true" %}

```cs
builder.AddDefaultSceneSettingsMenuItem(
    SceneSettingsMenuItem.Button(
        "my-game.rebuild",
        context =>
        {
            RebuildData();
        })
    .WithLabel("Rebuild Data")
);
```

{% endcode %}

Headers:

{% code expandable="true" %}

```cs
SceneSettingsMenuItem.Header(
    "my-game.header",
    "My Tools"
);
```

{% endcode %}

Submenus:

{% code expandable="true" %}

```cs
SceneSettingsMenuItem.Submenu(
    "my-game.options",
    "Options",
    context => BuildItems()
);
```

{% endcode %}

## Component Drawers

Component drawers control how a component appears in the inspector.

```cs
using System;
using Fullscreen.RuntimeStudio.Runtime.UI.ComponentDrawers;

public sealed class HealthDrawer :
    IRuntimeComponentDrawer
{
    public Type ComponentType => typeof(MyHealth);

    public void Draw(
        ComponentDrawerContext context,
        Component component)
    {
        var health = component as MyHealth;
        if (health == null) return;

        context.DrawFloat(
            "Health",
            health.Current,
            value => health.Current = value
        );

        context.DrawBool(
            "Invincible",
            health.Invincible,
            value => health.Invincible = value
        );
    }
}
```

Register it:

```cs
builder.AddDefaultComponentDrawer(
    new HealthDrawer()
);
```

#### Context Helpers

```cs
context.DrawBool(...)
context.DrawInt(...)
context.DrawFloat(...)
context.DrawVector2(...)
context.DrawVector3(...)
context.DrawText(...)
```

***

## Property Drawers

Property drawers customize how nested objects are displayed.

```cs
using Fullscreen.RuntimeStudio.Runtime.UI.PropertyDrawers;

public sealed class StatBlockDrawer :
    IRuntimePropertyDrawer
{
    public bool CanDraw(
        PropertyDrawerContext context)
    {
        return context.DeclaredType == typeof(MyStatBlock);
    }

    public void Draw(
        PropertyDrawerContext context)
    {
        var value = context.Value as MyStatBlock;

        context.FieldDrawer.DrawValue(
            context.Parent,
            "Power",
            typeof(float),
            value.Power,
            $"{context.Path}.power",
            next => value.Power = (float)next
        );
    }
}
```

Register it:

```cs
builder.AddDefaultPropertyDrawer(    new StatBlockDrawer());
```

## Hierarchy Adornments

Hierarchy adornments display small icons next to objects in the hierarchy.

{% code expandable="true" %}

```cs
builder.AddDefaultHierarchyAdornment(
    new HierarchyAdornmentDefinition
    {
        Id = "my-game.spawn",
        Tooltip = "Spawn Point",
        IsVisible = go =>
            go.GetComponent<MySpawnPoint>() != null
    }
);
```

{% endcode %}

Use them to highlight important objects or runtime data.

## Hierarchy Context Actions

Context actions appear when right-clicking objects in the hierarchy.

{% code expandable="true" %}

```cs
public sealed class CreateSpawnAction :
    IRuntimeHierarchyContextAction
{
    public int Order => 100;

    public bool Supports(
        HierarchyActionContext context)
    {
        return true;
    }

    public bool IsEnabled(
        HierarchyActionContext context)
    {
        return true;
    }

    public string GetMenuPath(
        HierarchyActionContext context)
    {
        return "Create/Spawn Point";
    }

    public void Execute(
        HierarchyActionContext context)
    {
        new GameObject("Spawn Point");
    }
}
```

{% endcode %}

Register it:

{% code expandable="true" %}

```cs
builder.AddDefaultHierarchyAction(
    new CreateSpawnAction()
);
```

{% endcode %}

## FieldInspector

`FieldInspector` provides the same field UI used by Runtime Studio's built-in inspector.

Draw a value:

```cs
context.FieldDrawer.DrawValue(
    context.Parent,
    "Speed",
    typeof(float),
    speed,
    "speed",
    value => speed = (float)value
);
```

Draw object fields:

```cs
context.FieldDrawer.DrawObjectFields(
    context.Parent,
    settings,
    "settings",
    0
);
```

Draw a type picker:

```css
context.FieldDrawer.DrawTypeSelector(
    context.Parent,
    "action",
    typeof(MyAction),
    currentType,
    selected => Create(selected),
    "Select Action"
);
```

## EditorStyles

Use `EditorStyles` when creating custom UI so your extension matches the rest of Runtime Studio.

#### Titles

```cs
parent.Add(
    EditorStyles.Title("Settings")
);
```

#### Buttons

```cs
parent.Add(    
    EditorStyles.Button(
          "Reset",    
           ResetSettings    
           )
);
```

#### Rows

```cs
var row = EditorStyles.RowElement();
```

#### Panels

```cs
var panel =    EditorStyles.PanelElement("MyPanel");
```


# Save & Load

Runtime Studio provides a full runtime-safe save system for scenes, terrain, and imported assets. It supports `.rtstudio` packages, JSON fallback, and raw GZip data.

***

### Core Concept

Runtime Studio saves everything into a single `SceneSaveFile`:

* Scene objects and transforms
* Components and their values
* Imported runtime assets
* Custom component state (via adapters)
* Asset references (via resolvers)

***

### Basic Save

```cs
using Fullscreen.RuntimeStudio.Runtime.Persistence;

public sealed class SaveExample
{
    private readonly SceneSaveManager m_SaveManager = new();

    public byte[] Save()
    {
        return m_SaveManager.ExportPackageBytes();
    }
}
```

***

### Basic Load

```cs
public void Load(byte[] data)
{
    m_SaveManager.ImportPackageBytes(data);
}
```

***

### File Import and Export

```cs
RuntimeStudioFileTransfer.TryExport(
    bytes,
    RuntimeStudioPackage.DefaultFileName,
    out var location,
    out var message
);
```

```cs
RuntimeStudioFileTransfer.TryImport(
    out var bytes,
    out var location,
    out var message
);
```

***

### Package Format

* Extension: `.rtstudio`
* Header: `RTSTUDIO1\n`
* Payload: GZip compressed JSON

Supported inputs:

* `.rtstudio`
* raw JSON
* raw GZip JSON

***

### Save Lifecycle

Save and load follow this order:

1. Prepare scene for save
2. Capture component state
3. Serialize scene data
4. Export assets and references
5. Write package

Load:

1. Read package
2. Restore scene objects
3. Restore components
4. Restore terrain
5. Rebind asset references
6. Run runtime integrations

***

### Component State Adapters

Use adapters when reflection is not enough.

```cs
using Fullscreen.RuntimeStudio.Runtime.Persistence;
using Fullscreen.RuntimeStudio.Runtime.Persistence.ComponentState;
using UnityEngine;

public sealed class HealthStateAdapter :
    IComponentStateAdapter
{
    public Type ComponentType =>
        typeof(Health);

    public SerializedNode CaptureState(Component component)
    {
        var health = component as Health;
        if (health == null) return null;

        var node = SerializedNodeUtility.Object(typeof(Health));

        SerializedNodeUtility.AddField(
            node,
            "current",
            SerializedNodeUtility.Float(health.Current)
        );

        SerializedNodeUtility.AddField(
            node,
            "max",
            SerializedNodeUtility.Float(health.Max)
        );

        SerializedNodeUtility.AddField(
            node,
            "invincible",
            SerializedNodeUtility.Bool(health.Invincible)
        );

        return node;
    }

    public void RestoreState(Component component, SerializedNode data)
    {
        var health = component as Health;
        if (health == null || data == null) return;

        health.Current = SerializedNodeUtility.GetFloat(
            data,
            "current",
            health.Current
        );

        health.Max = SerializedNodeUtility.GetFloat(
            data,
            "max",
            health.Max
        );

        health.Invincible = SerializedNodeUtility.GetBool(
            data,
            "invincible",
            health.Invincible
        );
    }
}
```

Adapters override default save behavior.

***

### Runtime Integration Hooks

{% code overflow="wrap" %}

```cs
public override void PrepareForSceneRestore() { }

public override void RebindRestoredObject(GameObject go) { }
```

{% endcode %}


# Undo & Redo

Runtime Studio provides a simple undo system for runtime editor actions.

***

### Basic Undo

```cs
RuntimeStudioUndo.RecordAction(
    "Add Health",
    () =>
    {
        gameObject.AddComponent<MyHealth>();
    }
);
```

***

### Batch Operations

```cs
using (RuntimeStudioUndo.Begin("Move Objects"))
{
    foreach (var obj in objects)
    {
        obj.transform.position += offset;
    }
}
```

***

### Alias

```cs
RuntimeStudioUndo.Run("Action", () => { });
```

***

### Undo Rules

* Always wrap scene mutations
* Always wrap hierarchy changes
* Always wrap component additions/removals
* Do not wrap pure UI updates

***

### Undo State

```cs
RuntimeStudioUndo.CanUndoRuntimeStudioUndo.CanRedoRuntimeStudioUndo.Changed
```

***

### Important Notes

* Nested scopes are merged
* Built-in inspector fields already record undo
* Custom tools must manually record undo


# Editor Pro

<figure><img src="/files/ISrHOXlOhP3zj1IyYJRb" alt=""><figcaption></figcaption></figure>

### Editor Pro – The Ultimate Asset Manager for Game Creator 2 🚀 Effortlessly Manage Your Scriptable Objects with Ease! 🚀

\
Say goodbye to endless searching and tedious navigation! Editor Pro is the essential tool for Game Creator 2 developers, designed to supercharge your productivity by organizing and editing scriptable objects in one powerful interface. Inspired by old-school asset database editors, it brings a nostalgic yet modern approach to managing your game assets efficiently.

\
✨ Key Features ✨

* Grid and List View: Switch between grid and list view for a modern customized, efficient browsing experience.
* Search for any asset and open and edit multiple at once.
* Open and mix different asset types simultaneously, like Loot Tables and Inventory Items from the Inventory 2 module.
* Manage objects effortlessly with visible icons in the grid and list.
* Quickly move, duplicate, rename, or create assets from the toolbar.
* Lock the interface to keep important assets open for seamless editing.
* Auto-Detection: Newly installed supported modules and assets automatically appear in the menu – no separate installations or setup needed! Just install and go!
* Blazing Fast Performance: Optimized for speed, Editor Pro handles finding and displaying huge amounts of assets in the grid and list view without breaking a sweat.
* Supports all Game Creator 2 modules, and also Third-Party Support for Abilities, Mailbox, Factions, State Machine 2, and COZY Stylized Weather

## Available on Asset Store

{% embed url="<https://assetstore.unity.com/packages/tools/utilities/editor-pro-game-creator-2-309028>" %}

## **Package dependencies (1)**

<table data-card-size="large" data-view="cards"><thead><tr><th></th><th></th><th data-hidden data-card-cover data-type="image">Cover image</th><th data-hidden data-card-target data-type="content-ref"></th></tr></thead><tbody><tr><td>Game Creator 2</td><td>By <a href="https://assetstore.unity.com/publishers/7791">Catsoft Works</a></td><td><a href="/files/mmD5FKIImV2RZlg2NlF7">/files/mmD5FKIImV2RZlg2NlF7</a></td><td><a href="https://assetstore.unity.com/packages/tools/game-toolkits/game-creator-2-203069">https://assetstore.unity.com/packages/tools/game-toolkits/game-creator-2-203069</a></td></tr></tbody></table>

<details>

<summary>Compatibility</summary>

**Editor Pro** is designed for **Game Creator 2** version 2.17.51 or higher

</details>


# Setup Guide

{% hint style="danger" %}
**Editor Pro** requires Game Creator 2 and can't work without it.
{% endhint %}

## Setup

1. [Setup and install Game Creator 2](https://docs.gamecreator.io/gamecreator/getting-started/installation/)
2. Download and install **Editor Pro | Game Creator 2** from the package manager

&#x20;

Then you can open the tool under Game Creator > Editor Pro in the Unity toolbar.

Optionally, you can install the example content.

{% hint style="info" %}
Editor Pro automatically adds any supported assets to the editor as soon as they are installed, making them ready for instant use.
{% endhint %}

&#x20;

**Installing the Example Content**

Open the Game Creator Install Window by going to Game Creator > Install..

Select the Editor Pro | Game Creator 2 Examples and click Install

The example content can then easily be found in the Editor Pro window. It adds one Global Name Variable asset, one Global List asset, and one Basic State Locomotion asset


# Getting started

## Toolbar

<figure><img src="/files/GsUFFb7wDPbb3qZiUzdT" alt=""><figcaption></figcaption></figure>

| Name                     | Description                                                                                                                                        |
| ------------------------ | -------------------------------------------------------------------------------------------------------------------------------------------------- |
| 🔍 Search field          | Quickly search for any assets in the open category                                                                                                 |
| 📋Change View            | Switches between grid and list view                                                                                                                |
| 🔄 Refresh               | Refreshes the editor. Useful if you just add a new icon to a asset, or if you created a new scriptable object outside Editor Pro window            |
| 🔒 Lock/Unlock inspector | Locks/unlocks the custom inspector. Allows you to open different assets at the same time, even if they are different types in different categories |

## Create a new asset by clicking on the + button&#x20;

<figure><img src="/files/opavqdYf0jVNa9rQpKcC" alt=""><figcaption></figcaption></figure>

## Left click to open an item

<figure><img src="/files/LifjAppMTVEueWmeRCgg" alt=""><figcaption></figcaption></figure>

## Right-click an item to bring up the action menu

<figure><img src="/files/DodtHCyiewJy5Byi3wLT" alt=""><figcaption></figcaption></figure>

## Ctrl + Left-click to open multiple items at the same time

<figure><img src="/files/j0XDjUMW8KGWaJtGhKQD" alt=""><figcaption></figcaption></figure>

## Lock the inspector to keep it from clearing, allowing you to open multiple assets simultaneously, even different types from other categories.

<figure><img src="/files/GwBz8oZvResiGyj71R26" alt=""><figcaption></figcaption></figure>


# Supported Assets and Types

## Game Creator 2 Core

| Scriptable Object Name    | Support Icons |
| ------------------------- | ------------- |
| Global Name Variable      | No            |
| Global List Variable      | No            |
| State Complete Locomotion | No            |
| State Basic Locomotion    | No            |
| Handle                    | No            |
| Material Sounds           | No            |
| Animation States          | No            |

## Game Creator 2 Inventory

| Scriptable Object Name | Support Icons |
| ---------------------- | ------------- |
| Item                   | Yes           |
| Loot Table             | No            |
| Currency               | No            |
| Equipment              | No            |
| Bag Skin               | No            |
| Merchant Skin          | No            |
| Tinker Skin            | No            |

## Game Creator 2 Dialogue

| Scriptable Object Name | Support Icons |
| ---------------------- | ------------- |
| Actor                  | No            |
| Dialogue Skin          | No            |
| Speech Skin            | No            |

## Game Creator 2 Quests

| Scriptable Object Name | Support Icons |
| ---------------------- | ------------- |
| Quests                 | Yes           |

## Game Creator 2 Shooter

| Scriptable Object Name | Support Icons |
| ---------------------- | ------------- |
| Shooter Weapon         | Yes           |
| Ammo                   | Yes           |
| Reload                 | Yes           |
| Sight                  | No            |
| Crosshair              | No            |

## Game Creator 2 Melee

| Scriptable Object Name | Support Icons |
| ---------------------- | ------------- |
| Melee Weapon           | Yes           |
| Shield                 | No            |
| Skill                  | Yes           |
| Combos                 | No            |
| Melee Reaction         | No            |

## Game Creator 2 Stats

| Scriptable Object Name | Support Icons |
| ---------------------- | ------------- |
| Attribute              | Yes           |
| Class                  | Yes           |
| Formula                | No            |
| Stat                   | Yes           |
| Status Effect          | Yes           |
| Table                  | No            |

## Game Creator 2 Behavior

| Scriptable Object Name | Support Icons |
| ---------------------- | ------------- |
| Action Plan            | No            |
| Behavior Tree          | No            |
| State Machine          | No            |

## Game Creator 2 Traversal

| Scriptable Object Name | Support Icons |
| ---------------------- | ------------- |
| Motion Actions         | No            |
| Motion Interactive     | No            |
| Motion Link            | No            |

## Mailbox (Fullscreen)

| Scriptable Object Name | Support Icons |
| ---------------------- | ------------- |
| Letter                 | Yes           |
| LetterTheme            | No            |

## LogicBlock (Fullscreen)

| Scriptable Object Name | Support Icons |
| ---------------------- | ------------- |
| Block                  | No            |

## **Abilities (**&#x44;aimahou Games)

| Scriptable Object Name | Support Icons |
| ---------------------- | ------------- |
| Ability                | Yes           |
| Impact                 | No            |
| Indicator              | No            |
| Projectile             | No            |

## State Machine 2 (Ninjutsu Games)

| Scriptable Object Name | Support Icons |
| ---------------------- | ------------- |
| State Machine          | No            |

## Factions (Ninjutsu Games)

| Scriptable Object Name | Support Icons |
| ---------------------- | ------------- |
| Factions               | Yes           |

## Factions (Ninjutsu Games)

| Scriptable Object Name | Support Icons |
| ---------------------- | ------------- |
| Factions               | Yes           |

## Perks (McKinleyMassacre)

| Scriptable Object Name | Support Icons |
| ---------------------- | ------------- |
| Perk                   | No            |
| PerkTree               | No            |

## COZY Stylized Weather 3

| Scriptable Object Name   | Support Icons |
| ------------------------ | ------------- |
| Ambience Profile         | No            |
| Atmosphere Profile       | No            |
| Climate Profile          | No            |
| Forecast Profile         | No            |
| Material Manager Profile | No            |
| Perennial Profile        | No            |
| Satellite Profile        | No            |
| Weather Profile          | No            |


# Troubleshooting

## Icons do not show the correct icon and just show the Game Creator 2 logo in the main menu

<figure><img src="/files/vXPpbb2nXXP8anNuvboj" alt=""><figcaption></figcaption></figure>

If no assets are found from that ScriptableObject, the Game Creator 2 logo will be used as a fallback. When you create a new asset of that type and reopen the Editor Pro window, the icon will automatically update.&#x20;

This also applies when installing a new module and its example content while Editor Pro is open.


# Releases

## 1.3.2 (26th February 2026)

**New**

* Added support for **Inventory Extended** asset types:\
  Dismantle Item\
  Grid Recipe\
  Item State\
  List Recipe\
  Smelt Item

**Fixes**

* Fixed an issue with preloading the scriptableobjects.

## 1.3.1 (12th January 2026)

**New**

* When restoring the saved editor state in List View, the view now automatically scrolls to the open ScriptableObject.

**Fixes**

* Fixed issues with creating new animation & locomotion states.

**Changes**

* Preloading of scriptableobjects is now faster at project startup.
* Editor state saving is now project-specific, rather than shared across all projects.
* The current editor state is saved on entering Play Mode and restored on exit.

## 1.3.0 (18th December 2025)

**New**

* Added support for Unity's Light Editor Theme.
* Added saving & restoring of Editor Pro's state.
* Added support for Perk & PerkTree (McKinleyMassacre)
* Unity 6.3 Support

**Changes**

* Minor improvements and refinements.

## 1.2.9 (16th September 2025)

**New**

* Added support for Inventory Extended (Fullscreen).

**Changes**

* Minor improvements and refinements.

## 1.2.8 (2nd July 2025)

**Enchantments**

* Improvements to grid view

## 1.2.7 (9th June 2025)

**New**

* Added support for LogicBlock (Fullscreen)

## 1.2.6 (19th April 2025)

**New**

* Added a folder exclusion option to Editor Pro to filter Scriptable Objects.

**Enchantments**

* Improved overall performance and responsiveness.

## 1.1.6 (11th April 2025)

**New**

* Added support for StateTraverseBase (Game Creator 2 Traversal)
* Added support for StateTraverseHorizontal (Game Creator 2 Traversal)
* Added support for StateTraverseVertical (Game Creator 2 Traversal)

## 1.1.5 (22nd March 2025)

**Fixes**

* Fixed a warning caused by the Create New asset button

## 1.1.4 (19th March 2025)

**Fixes**

* When creating a new ShooterWeapon, the animator does not get assigned

## 1.1.3 (13th March 2025)

**New**

* Sprite support for Letters (Mailbox)

**Fixes**

* COZY is no longer in the tree menu if the asset is not installed

## 1.1.2 (7th March 2025)

**New**

* Added support for Motion Actions (Game Creator 2 Traversal)
* Added support for Motion Interactive (Game Creator 2 Traversal)
* Added support for Motion Link (Game Creator 2 Traversal)

**Enhances**

* Added fallback icon for tree menu

## 1.0.2 (26 Febuary 2025)

**New**

* Added support for Material Sounds (Game Creator 2 Core)
* The delete items dialog will now display the names of the assets being deleted

**Fixes**

* The action menu now considers all selected items in list view
* Switching between grid and list view now properly resets the editor

## 1.0.1 (20th Febuary 2025)

**New**

* Added support for Animation States (Game Creator 2 Core)

## 1.0.0 (18th February 2025)

First release


# LogicBlock

<figure><img src="/files/eanqe5txbRbej2TDzgje" alt=""><figcaption></figcaption></figure>

### LogicBlock – Modular Visual Scripting Power for Game Creator 2

LogicBlock is the ultimate modular scripting extension for Game Creator 2. LogicBlock lets you organize instructions and conditions into reusable Block assets, streamlining your workflow and making complex logic easy to manage, share, and debug.

With LogicBlock, you can build a single list, like one for applying damage, and use it anywhere by assigning unique values through dynamic references.

Create once, reuse endlessly. No more duplicated instructions, buried hierarchies, or scattered scene logic.

✨ Key Features ✨\
✅ Reusable Logic Blocks - Build instruction and condition lists in one place, then trigger them anywhere with a single instruction.\
✅ Organize & Simplify - Keep your visual scripting clean and centralized. No more digging through scene hierarchies to find what’s running.\
✅ Dynamic References - Assign unique values each time you call a list inside a Block. Easily reference scene objects using drag & drop.\
✅ List Customization - Name your lists, set colors, and choose from Game Creator 2’s icon set for easy visual identification.\
✅ Instance Support – Need to run the same logic multiple times simultaneously? Toggle instancing on each instruction call to the Block’s list for parallel execution.\
✅ Play Mode Editing - Make changes during Play Mode and keep them when you exit. Perfect for fast iteration and debugging.\
✅ Instant Testing - Each list comes with a built-in Play button for quick testing.\
✅ Cross-Project Support - Share Blocks between projects and never rebuild complex logic from scratch again.\
✅ Automatic Integrations - Fully compatible with all major GC2 modules:\
Inventory, Stats, Quests, Melee, and Shooter.\
✅ Optimized Performance - Having many Conditions and Actions components with many instructions on one GameObject can slow down the editor when opening it. LogicBlock keeps your editor as fast and responsive as possible by only loading each list’s content when you expand it inside the Block.

## Available on Asset Store

{% embed url="<https://assetstore.unity.com/packages/tools/visual-scripting/logicblock-game-creator-2-319238>" %}

## **Package dependencies (1)**

<table data-card-size="large" data-view="cards"><thead><tr><th></th><th></th><th data-hidden data-card-cover data-type="files"></th><th data-hidden data-card-target data-type="content-ref"></th></tr></thead><tbody><tr><td>Game Creator 2</td><td>By <a href="https://assetstore.unity.com/publishers/7791">Catsoft Works</a></td><td><a href="/files/mmD5FKIImV2RZlg2NlF7">/files/mmD5FKIImV2RZlg2NlF7</a></td><td><a href="https://assetstore.unity.com/packages/tools/game-toolkits/game-creator-2-203069">https://assetstore.unity.com/packages/tools/game-toolkits/game-creator-2-203069</a></td></tr></tbody></table>

<details>

<summary>Compatibility</summary>

**LogicBlock** is designed for **Game Creator 2** version 2.17.51 or higher

</details>


# Setup Guide

{% hint style="danger" %}
**LogicBlock** requires Game Creator 2 and can't work without it.
{% endhint %}

## Setup

1. [Setup and install Game Creator 2](https://docs.gamecreator.io/gamecreator/getting-started/installation/)
2. Download and install **LogicBlock | Game Creator 2** from the package manager

Optionally, you can install the example content.

## **Installing the Example Content**

To install example content for LogicBlock:

1. Open the **Game Creator Install Window**:\
   `Game Creator > Install...`
2. In the list, locate **LogicBlock** and check the box for **Examples**.
3. Click **Install** to add the examples to your project.

**Example Location**

Once installed, you can find the example content here:\
`Plugins/GameCreator/Installs/LogicBlock.Examples@1.0.0/`

## **Optional Setup**

When installing **LogicBlock** via the Unity Package Manager, it will automatically detect and integrate with the following **Game Creator 2 modules** if they are present:

* Inventory
* Stats
* Quests
* Melee
* Shooter

**Automatic Integration**

* If any of these modules are already installed, LogicBlock will **automatically enable full support** for them during installation.

**Manual Integration Check**

* If you install a supported module **after** LogicBlock, you can manually trigger the integration check via the Unity toolbar:\
  `Game Creator > LogicBlock > Detect and Install Integration`

**Removing Modules**

To properly remove a module:

1. First, **uninstall LogicBlock** via the Unity toolbar:\
   `Game Creator > Uninstall > LogicBlock`
2. Then uninstall the module you no longer need.
3. After that, **reinstall LogicBlock** to restore full functionality.

## Updating LogicBlock

When a new version of LogicBlock is released, we recommend **uninstalling the old version first** to ensure a clean update.

**How to Uninstall**

Go to the Unity toolbar:\
`Game Creator > Uninstall > LogicBlock`

After uninstalling, you can safely install the latest version.


# Block Asset

## Creating new Blocks

**To create a new Block asset:**\
Right-click inside your Project folder → Create > Game Creator > LogicBlock > Block

## **Creating new Lists**

* To create a new **Instruction List**, click **Add Instruction List** inside the Block.
* To create a new **Condition List**, click **Add Condition List** inside the Block.

Each list is a self-contained set of logic that can be triggered, reused, or referenced independently, making your Blocks more modular and easier to manage.

## Recommended Block Setup

Structure your project by creating **Blocks** focused on specific areas of gameplay. This keeps your logic clean, modular, and easy to maintain.

* **Character Block**\
  Contains instructions related to the player or NPC characters, such as:\
  `Jump`, `Deal Damage`, `Pick Up Item`, `Interact`, `Activate Quests`, `Equip Weapons`, and more.
* **AI Block**\
  Handles common AI behaviors like:\
  `Targeting`, `Following`, `Patrolling`, and decision-making logic.
* **GameObject Block**\
  Focuses on world or object-related interactions, such as:\
  `Rotate Pickups`, `Moving Objects`, or control other **non-character** elements.

***

Using dedicated Blocks for each gameplay domain helps you stay organized, reduces duplication, and supports scalable, centralized logic across your project. <br>

***

References

{% hint style="info" %}
**Reference values** are dynamic and must be set via the instruction that calls the list. They are not\
saved directly into the Block asset.
{% endhint %}

References let you configure behavior for each instruction dynamically, without directly editing the list inside the Block. This keeps your logic modular, reusable, and adaptable to different contexts.

***

**Adding a Reference**

1. Open a list inside a Block.
2. Click **Add Reference**.
3. Set a name and choose the appropriate **Reference Type** (e.g., GameObject, Number, Boolean, etc.).
4. Click **Create**.

The reference will appear below the instruction list.\
You can expand it by clicking the reference entry. A **Delete** button is available inside the expanded view if you need to remove it.

***

**Using a Reference in an Instruction**

To make an instruction use a dynamic reference (e.g., setting a GameObject active):

1. Add a **GameObject Reference** to your list.
2. Add a **Set Active** instruction.
3. In the instruction’s **GameObject** field, select:\
   `LogicBlock > Block GameObject Reference`
4. You'll be prompted to specify:
   * The **Block** containing the reference.
   * The **List** inside that Block.
   * The specific **Reference** you created.

> If there's only one reference of that type, it will be auto-selected.\
> If there are multiple, click the field to choose from the available references.

<figure><img src="/files/ZEO7DaLlfAyUneiTS6gS" alt=""><figcaption></figcaption></figure>

\
Dynamic References work consistently across all supported data types:

* **Items** → use **Block Item Reference**
* **Stats** → use **Block Stat Reference**
* **Booleans, Numbers, Strings**, and other simple types have their own reference selectors available within compatible instructions.

This system ensures your instructions remain **modular and flexible**, enabling centralized logic that adapts to **input-driven variation** without modifying the instruction list itself.

## Buttons

**Play Mode Button**

Each list includes a **Play** button, available while in **Play Mode**, to instantly run the entire instruction list for quick testing.

> **Note:**\
> If the list uses **dynamic references**, those must first be set by running the instruction normally. After that, the Play button will reuse the **last valid reference values**.

**Edit Button**

Click the **Edit** button to expand customization options for the list. You can:

* Rename the list
* Assign a custom icon

The icon selector opens a window with access to Game Creator 2’s icon library and module icons, along with customizable colors. A built-in search field helps you quickly find the icon you need.

**Delete Button**

Click the **Delete** button to remove a list. A confirmation popup appears to prevent accidental deletion.

**Duplicate Button**

Click the **Duplicate** button to create an exact copy of the list.

## Organizing Lists

Each list has a drag handle allowing you to reorder lists inside a Block to keep your workflow neat and intuitive.

## Performance

LogicBlock optimizes editor performance by loading instruction and condition lists only when expanded. This&#x20;keeps the Unity editor fast and responsive, even with many lists in a Block.

## Self and Target

Inside a Block, Self and Target references behave exactly as if the instructions were placed inside the trigger&#x20;itself, preserving expected context seamlessly.

## Sharing Blocks

Blocks can be easily shared between projects by copying their asset files.

To share a Block:

* Locate the Block asset in your Unity project's folder.
* Copy and paste the asset into the same relative folder in your target project.

> **Important**\
> The receiving project must have the **same modules, custom instructions, and hub scripts** installed.\
> If any required components are missing, some instructions may fail to load correctly or be lost entirely.

This method ensures your modular logic can be reused across projects while maintaining flexibility and compatibility.


# Running Block Lists

## Executing Logic from a Block

To run logic stored inside a list inside a Block, use the appropriate instruction within a **Trigger**, **Condition**, or **Action**:

* Use **Run Instruction Block List** to execute a list of instructions.
* Use **Run Conditions Block List** to evaluate a condition list.

**1. Select the Block**

In the instruction, use the **Block** field to assign the Block asset that contains the list you want to run.\
Once selected, a dropdown will appear showing all available **Instruction** or **Condition** lists in that Block.\
Choose the list you want to execute.

**2. Set the Target (Optional)**

You can specify **who or what** the executed instructions should affect.

* By default, the **Target** is set to `Target`, following standard Game Creator 2 behavior.
* You can override this and choose a specific GameObject, `Self`, or another reference, depending on your needs.

**3. Instancing (Optional but Important)**

> **Note:** In ScriptableObjects, instancing is required and cannot be disabled.

Enable **Instance Block** if the same list will be run simultaneously from multiple sources.

This is important when, for example:

* Multiple **GameObjects** (e.g., rotating gameobjects) use the same logic at the same time.
* Several **enemies** or **triggers** execute the same list inside the Block concurrently.

> **Why it matters:**\
> Without instancing, shared lists may cause interference or unpredictable behavior when triggered in parallel.

<figure><img src="/files/JRVBOhSuWhxXlJ1NlwqQ" alt=""><figcaption></figcaption></figure>

***

## Handling Dynamic References

If the selected list contains **References**, each reference will appear as an individual field within the instruction.

* You can assign values to these fields before running the list.
* These values are passed into the Block at runtime, allowing you to customize the behavior dynamically for each call.

**Example:**\
If the list expects a **GameObject** and an **Item**, you’ll see fields for both, letting you specify which objects to use each time the instruction runs.

This enables you to reuse a single logic list throughout your game while tailoring its behavior through references on a per-call basis.

You may also leave reference fields **empty** if your logic doesn’t require them.\
In that case, any instructions depending on unassigned references will respond as designed, such as doing nothing, failing silently, or using default values, depending on their implementation.

<figure><img src="/files/yJOlRVmk1AogRD9GPwoY" alt=""><figcaption></figcaption></figure>


# One Click Convert Tool

LogicBlock 1.2.0 includes a conversion tool that allows you to convert existing Trigger or Actions logic into reusable Block Lists. This lets you move scene-based logic into Blocks without rebuilding instruction chains.

### Opening the Tool

Right-click a **Trigger** or **Actions** component and select:

**Convert to LogicBlock Instruction List**

This opens the conversion window.

### Configuring the New List

Inside the conversion window, you can:

* Select the **target Block** where the list will be created.
* Set the **list name** (defaults to the GameObject name).
* Choose an **icon and color** for easier identification.

### Reference Deduplication

The tool automatically detects duplicate reference values and merges them into a single reference.\
For example, if multiple instructions use the same number value, only one reference will be created and reused.

> GameObject references cannot be deduplicated.

### Automatic Instruction Replacement

After conversion:

* A **Run Instruction Block List** instruction is added.
* The instruction is automatically linked to the selected Block and new list.

### Reference Migration

The tool attempts to preserve existing values by:

* Assigning previous instruction values to new references.
* Updating instructions inside the Block to use those references.

### Important Notes

Converting instruction lists into ScriptableObject-based Block Lists is complex and may contain edge cases. Some instructions, values, or references may require manual adjustment after conversion.


# Attach Prop & Handle

**Handles** are not a native Game Creator 2 property type by default.\
LogicBlock adds support for Handles as a **custom property type**.

To work with Handles dynamically, LogicBlock provides a special instruction:\
**Attach Prop (LogicBlock)**  This lets you select and assign Handles at runtime through properties.

<figure><img src="/files/OH4CfwPkPvo14rpi2GeR" alt=""><figcaption></figcaption></figure>


# Runtime Editing Support

**Editing Instruction and Condition Lists during Play Mode is fully supported.**\
Any changes you make inside the lists within a Block while the game is running will be saved when exiting Play Mode. This makes **rapid debugging and iteration** incredibly efficient, no need to repeatedly enter and exit Play Mode just to tweak logic.

This feature pairs especially well with the **Play Mode Button**:\
Each list includes a **Play** button (only enabled in Play Mode) that instantly runs the entire instruction list, making it easy to test the new changes on the fly.


# Supported Property Types

## Game Creator 2 Core

| Type               |
| ------------------ |
| GameObject         |
| String             |
| Number             |
| Boolean            |
| Color              |
| Vector 3           |
| Animation Clip     |
| Audio Clip         |
| Material           |
| Sprite             |
| Texture            |
| Handle             |
| Scene              |
| Scale              |
| Rotation Direction |

## Game Creator 2 Inventory

| Type         |
| ------------ |
| Item         |
| Runtime Item |
| Loot Table   |

## Game Creator 2 Quests

| Type   |
| ------ |
| Quests |

## Game Creator 2 Shooter

| Type           |
| -------------- |
| Shooter Weapon |

## Game Creator 2 Melee

| Type         |
| ------------ |
| Melee Weapon |
| Shield       |
| Skill        |

## Game Creator 2 Stats

| Type          |
| ------------- |
| Attribute     |
| Formula       |
| Stat          |
| Status Effect |


# Troubleshooting

{% hint style="danger" %}
**Updating from 1.0.5 or earlier?** There are some breaking changes to how references work. Check the updated troubleshooting before installing → [Read more](https://docs.fullscreen.no/info/game-creator-2-assets/logicblock/pages/6YhdytcM9T30EvJTVOtq#updating-from-1.0.5-to-1.0.6)
{% endhint %}

## Restart Instructions

When creating instructions that **run over time,** such as continuously rotating a GameObject, you may want to **restart the instruction list** to create a loop.

**Important: Always Wait 1 Frame**

Before restarting the instruction list, **add a `Wait 1 Frame` instruction**.\
This brief delay allows Unity to finish processing the current frame and ensures the loop continues smoothly.

**Why This Matters**

Restarting the list without waiting a frame can trigger an **immediate infinite loop**, overwhelming Unity’s update cycle.\
This can cause the **editor or game to freeze.**

***

## **Open for Full Editing Support**

You cannot edit any of the references inside the **Run Instruction Block List** or **Run Conditions Block List** instructions **of a prefab** unless you:

* Open the prefab in **Prefab Mode**, or
* Have an instance of the prefab in the scene.

**Why This Happens**

Unity prevents deleting a prefab asset if it is open in the Inspector due to how our references logic is set up. Because of this, editing references inside these specific block list instructions directly on the prefab asset is blocked to avoid conflicts.

**What This Means**

* To edit these references, open the prefab in Prefab Mode or edit an instance of the prefab in your scene.

***

## Updating from 1.0.5 to 1.0.6 or later

There are some potentially breaking changes to how **references** are handled in this update. We’ve tried to make it as painless as possible, but because there are so many different ways to use LogicBlock, the safest way to update is:

1. **Take a backup** of your project.
2. **Uninstall** LogicBlock.
3. **Install** LogicBlock again from the Package Manager.
4. **Restart Unity** (this one’s important).

We normally avoid breaking changes like this, but this one was needed to fix an important issue where reference values could sometimes become linked.

#### What’s Changed

* **Fixed:** New references made after 1.0.6 will no longer link their values together.
* **Backwards Compatibility:** We’ve added a system to try to keep your current reference values as they are. That said, there may be edge cases where you’ll need to re-assign some.
* **Important:** The fix won’t touch old linked references from 1.0.5. This is to avoid accidentally deleting or changing your existing data.

#### Caveat

Before making new references, you **must** have inspected the GameObjects with the **Run Instruction/Condition List** instruction at least once. This triggers the backwards compatibility check and marks the old references as safe.

If you spot missing references, **try** to unload the scene and load it again (don’t save before doing this).

**Tip:** To unlink a shared reference value, simply change the property type on the last reference.


# Releases

## 1.2.1 (7th March 2026)

**Fixes**

* Fixed issue with the integration detector not running

**Improvements**

* The One Click tool now includes a bool option to skip creating references.

## 1.2.0 (17th February 2026)

**New**

* Added One Click tool to convert existing logic into Block Lists.
* References can now be changed to a different type.

\
**Improvements**

* Instancing performance improved by caching reflection data.
* References are now tracked by ID for better stability.
* LogicBlock now remembers expanded lists and references in the editor.

\
**Fixes**

* Creating a prefab no longer resets GameObject references on the original scene instance.

## 1.1.1 (5th January 2026)

**Fixes**

* Instancing of blocks did not process handle references

## 1.1.0 (18th December 2025)

**New**

* Unity 6.3 Support

**Fixes**

* The instancing of blocks has been rewritten to improve speed and fix known issues.
* Attempted fix for a rare Editor-only issue where changing scenes could return null for BlockReferenceManager (Editor-only, builds are unaffected).

**Changes**

* Running blocks from ScriptableObjects now requires them to be instanced.

## 1.0.6 (16th August)

## 1.1.0

**Fixes**

* References sometimes become "linked" and share the same values
* Deleting a prefab with a Run Instruction or Condition Block makes the prefab reappear

## 1.0.5 (14th July)

**New**

* Added integer support for number references

## 1.0.4 (11th July)

**Fixes**

* Fixed issues with adding Run Instruction List and Run Condition Block instructions in the same trigger/action.
* Fixed an issue with Melee Weapon reference, where only Shooter Weapon reference could be picked.

## 1.0.3 (2th July)

**Fixes**

* Improvements to drawers

## 1.0.2 (1th July)

**Fixes**

* Made creating a new reference UI's more flexible
* Fixed issue with Run Action Block's drawer returning a NullReferenceException when exiting Playmode

## 1.0.1 (30th June)

**Fixes**

* Fixed a mistake in the automatic integration detector
* Fixed issues in Run Action & Condition Block's Drawer, making the references visually glitch if using multiple instances of the Run Action & Condition Block instruction in the same instruction list

## 1.0.0 (27th June 2025)

First release


# HeroBridge

<figure><img src="/files/pxgnqKr7j0Dk5ku4JUtz" alt=""><figcaption></figcaption></figure>

## **HeroBridge - Sidekick Integration for Game Creator 2**

**HeroBridge** connects **Game Creator 2** with **Synty Studios Sidekick Modular Character System**, giving you full runtime control of modular characters through Game Creator’s visual scripting, no coding required.

Game Creator’s visual scripting lets you design gameplay and systems without writing code. HeroBridge builds on that power by letting you **customize, animate, and manage Sidekick characters** using a fully visual workflow.

***

### ⚡ **Key Features**

✅ **Works with All Sidekick Modular Character Packs**

Compatible with all current Sidekick modular packs.

✅ **New Visual Scripting Instructions:**

• **Set Part** - Change any of the 38 modular parts like head, torso, legs, hair, or attachments. Filter parts by pack for faster selection.

• **Set Preset** - Apply complete character presets including head, body, shape, and color settings.

• **Set Expression** - Control 19 facial expressions using blendshapes, with support for Game Creator transitions and easing for smooth animation.

• **Cycle Part** - Cycle through parts of any type using next, previous, or random options.

…And More

✅ **New Visual Scripting Conditions:**

• **If Has Part** - Checks if a character currently has a specific part equipped.

• **If Has Part Type** - Checks if the character has any part of a certain type (e.g., hair, helmet, torso).

✅ **New Visual Scripting Properties:**

• **Character Data Access** - Access or modify Sidekick character data through Game Creator’s property system.

• **Body Blendshapes -** Control body blendshapes for body type, size, and musculature.

…And More

✅ **Save System Integration**

Fully compatible with Game Creator’s Save System. Automatically saves and restores character parts, colors, and blendshapes.

✅ **Efficient Runtime Performance & WebGL Support**

HeroBridge caches data such as parts, colors, and presets into JSON files for fast runtime performance and also support for WebGL builds.

✅ **Flexible Character Compatibility**

Works with Game Creator characters, but also supports NPCs and characters without the Game Creator Character system for maximum flexibility.

✅ **Runtime API Integration**

Built on the Sidekick Runtime API, enhanced with HeroBridge logic for fast, direct communication between Sidekick and Game Creator.

✅ **Smart Right-Click Tools**

Right-click within the part field of the Set Part instruction to:

• Copy or paste part names

• Ping meshes directly in your project

• Preview parts on [SyntyDex](https://dex.syntystore.com/), automatically searching for the selected item for quick reference.

✅ **Animation Patcher**

Some animations set Jaw Close to 0, making characters appear with an open mouth. The Animation Patcher tool automatically fixes this by setting Jaw Close to 1.

### **💡Runtime Character Customizer**

HeroBridge includes a **runtime character customizer demo scene**, similar to those found in RPGs and adventure games.

With **Game Creator 2’s visual scripting**, you can easily build systems that let players:

* Cycle through hairstyles, outfits, and accessories
* Change parts by dropdown (e.g., select hairstyle, outfit, or accessory from a list)
* Change colors for eyes, hair, and clothing
* Adjust body shape using blendshapes
* Create systems where your character gains weight from eating and gets fit again through exercise

All without writing a single line of code.

🎮 **Try It Yourself!**\
You can **preview the character customizer directly in your browser** or **download the Windows build** on [Itch.io](https://fullscreenstudios.itch.io/herobridge)

{% content-ref url="/pages/2hFocTZs92JmGwNV2eDo" %}
[Setup Guide](/info/game-creator-2-assets/herobridge/setup-guide)
{% endcontent-ref %}

<table data-view="cards"><thead><tr><th></th><th></th><th></th><th data-hidden data-card-cover data-type="files"></th><th data-hidden data-card-target data-type="content-ref"></th></tr></thead><tbody><tr><td><strong>Explore All Triggers</strong></td><td>Discover the full list of triggers included.</td><td></td><td><a href="/files/UzQNCCU7Qw1PfyCHO9KX">/files/UzQNCCU7Qw1PfyCHO9KX</a></td><td><a href="/pages/14A2KokjuNNJklA0Y9CD">/pages/14A2KokjuNNJklA0Y9CD</a></td></tr><tr><td><strong>Explore All Instructions</strong></td><td>Browse the complete set of instructions included.</td><td></td><td><a href="/files/NdVNQsqwmT7xq9TU14ey">/files/NdVNQsqwmT7xq9TU14ey</a></td><td><a href="/pages/tbiYb2FlV45QBor8jbfL">/pages/tbiYb2FlV45QBor8jbfL</a></td></tr><tr><td><strong>Explore All Conditions</strong></td><td>Check out the full range of conditions available. </td><td></td><td><a href="/files/WiJdaEF2IXVLjT1EHjBT">/files/WiJdaEF2IXVLjT1EHjBT</a></td><td><a href="/pages/TIixDRw9mQLOIPwpfMQW">/pages/TIixDRw9mQLOIPwpfMQW</a></td></tr></tbody></table>

<table data-card-size="large" data-view="cards"><thead><tr><th></th><th></th><th data-hidden data-card-cover data-type="files"></th><th data-hidden data-card-target data-type="content-ref"></th></tr></thead><tbody><tr><td><strong>Explore The Included Properties</strong></td><td>Dive into the collection of properties included. </td><td><a href="/files/bYfRvpew6OBLkQmzXMSF">/files/bYfRvpew6OBLkQmzXMSF</a></td><td><a href="/pages/udIaprLCCdBTMFICZ8wl">/pages/udIaprLCCdBTMFICZ8wl</a></td></tr><tr><td>D<strong>emo Scene</strong></td><td>Explore the included demo scene to see HeroBridge in action and learn how to build a runtime character customizer.</td><td><a href="/files/lrBzid0yEQU1D5P2RDMi">/files/lrBzid0yEQU1D5P2RDMi</a></td><td><a href="/pages/8mU3kigJ8yRxnEwfJH1C">/pages/8mU3kigJ8yRxnEwfJH1C</a></td></tr></tbody></table>

## Available on Asset Store

{% embed url="<https://assetstore.unity.com/packages/tools/game-toolkits/herobridge-integration-of-sidekick-for-game-creator-2-339034>" %}

## **Package dependencies (2)**

<table data-view="cards"><thead><tr><th></th><th></th><th></th><th data-hidden data-card-cover data-type="image">Cover image</th><th data-hidden data-card-target data-type="content-ref"></th></tr></thead><tbody><tr><td><p>Game Creator 2</p><p>By <a href="https://assetstore.unity.com/publishers/7791">Catsoft Works</a></p></td><td></td><td></td><td data-object-fit="cover"><a href="/files/mmD5FKIImV2RZlg2NlF7">/files/mmD5FKIImV2RZlg2NlF7</a></td><td><a href="https://assetstore.unity.com/packages/tools/game-toolkits/game-creator-2-203069">https://assetstore.unity.com/packages/tools/game-toolkits/game-creator-2-203069</a></td></tr><tr><td>FREE Starter Pack - Sidekick Modular Characters</td><td>By <a href="https://assetstore.unity.com/publishers/5217">Synty Studios</a></td><td></td><td data-object-fit="cover"><a href="/files/DwFrfDK5LUj2Nm84Cc3d">/files/DwFrfDK5LUj2Nm84Cc3d</a></td><td><a href="https://assetstore.unity.com/packages/tools/utilities/cozy-stylized-weather-3-271742">https://assetstore.unity.com/packages/tools/utilities/cozy-stylized-weather-3-271742</a></td></tr></tbody></table>

<details>

<summary>Compatibility</summary>

The integration is designed for **Game Creator 2** version 2.18.58 or higher, and **Sidekick Tool** version 1.0.33

</details>


# Setup Guide

{% hint style="warning" %}
**HeroBridge** depends on the **Sidekick Tool** and **Starter Pack**. Make sure both are installed **before** installing HeroBridge, since it generates its cache from the tool.\
If needed, you can manually trigger the cache generation by following these [instructions](#automatic-cache-export).
{% endhint %}

## Setup

1. [Setup and install Game Creator 2](https://docs.gamecreator.io/gamecreator/getting-started/installation/)
2. Install [FREE Starter Pack - Sidekick Modular Characters by Synty](https://assetstore.unity.com/packages/3d/characters/free-starter-pack-sidekick-modular-characters-by-synty-336970)
3. Download and install the Sidekick Tool & Database

   > After installing the Sidekick free starter pack, a window should appear prompting you to download and install the **Sidekick Tool.**\
   > If the window doesn’t appear, you can manually open the downloader by navigating to **Synty > Sidekick Tool Downloader** in the Unity toolbar.
   >
   > You can also manually download it from [Synty's Github](https://github.com/SyntyStudios/SidekicksToolRelease/releases/) (Download & Import both Sidekicks.unitypackage and SidekicksDatabase.unitypackage)
4. Download and install HeroBridge Integration of Sidekick for Game Creator 2 from the package manager
5. *(Optional)* You can [install the example content](#installing-the-example-content) and [patch animations.](/info/game-creator-2-assets/herobridge/setup-guide/animation-patcher)

***

## Updating HeroBridge

When a new version of HeroBridge is released, we recommend uninstalling the old version first.

**How to Uninstall**

Go to the Unity toolbar:\
`Game Creator > Uninstall > HeroBridge`

After uninstalling, you can safely install the latest version.

***

#### Installing the Example Content

To install example content for HeroBridge:

1. Open the Game Creator Install Window:\
   `Game Creator > Install…`
2. In the list, locate **HeroBridge** and check the box for **Examples**.
3. Click **Install** to add the examples to your project.

**Important:** It is recommended to **copy any example content you plan to modify,** such as entire scenes, before making changes. This ensures that if you update HeroBridge later, any modifications you made to the demo content will not be overwritten.

***

#### Example Location

Once installed, you can find the example content here:\
`Plugins/GameCreator/Installs/HeroBridge.Examples@1.0.0/`

There are two example scenes included:

* **Dropdowns and Cycle Between Parts:** Demonstrates cycling through parts using dropdown menus.
* **Buttons Preview of Every Part:** Generates buttons with icons for every part at runtime, allowing selection via UI buttons.

  > This second scene is the one available to try on Itch.io.

***

## Automatic Cache Export

When **HeroBridge** is installed through **Package Manager**, HeroBridge automatically attempts to export all cache data during setup.\
It takes parts, presets, colors, bodyshape, species and expressions data directly from the **Sidekick database** (Expressions from demo animation controller).

This process is done for **performance reasons** and **WebGL compatibility**. Using pre-generated cache allows HeroBridge to operate without querying the database at runtime, preventing potential game freezes or hitches caused by live data retrieval. It also ensures **WebGL support**, as **SQLite databases are not compatible with WebGL builds**.

If needed, you can manually generate and view cache status anytime in the Settings window:

`Game Creator > Settings > HeroBridge`


# Configure Characters

## Configure Characters

For each Game Creator Character you want to use Sidekick on:

1. **Select the character** in the Hierarchy.
2. In the **Animation** section of the **Character Component**, drag and drop the **SK\_BaseModel** into the **3D Model** field:\
   `Assets/Synty/SidekickCharacters/Resources/Meshes/SK_BaseModel.fbx`

<details>

<summary><strong>Pink SK_BaseModel in Sidekick Tool version 1.0.34</strong></summary>

**If your new character appears pink in the Scene view**, it means the materials are missing.\
To fix this:

* Go to:

  ```
  Assets/Synty/SidekickCharacters/Resources/Materials/
  ```

Find and use the **BaseMaterial**.

In the **Hierarchy**, expand your character to locate:

```
Character > Mannequin > SK_BaseModel
```

* Inside **SK\_BaseModel**, select all the **child GameObjects.**
* Assign the **BaseMaterial** from the Materials folder to each of those **Skinned Mesh Renderer** components.

<figure><img src="/files/rvoLDnmXYVvtz11gX4Me" alt=""><figcaption></figcaption></figure>

</details>

### Using Characters made in Sidekick Character Tool

If you don’t want to use the default **SK\_BaseModel,** you can use your own characters created with the **Sidekick Character Creator Tool**. Before exporting your character as a prefab, make sure to disable the following options under the **Options** tab:

* **Combine Character Meshes**
* **Combine Body Blend Shapes**

After disabling these options, export the character as a prefab.

**Enable Read/Write on Textures:**

For custom characters, you need to enable **Read/Write** on the texture created for the model:

1. In the folder where your prefab was created, open the **Textures** subfolder.
2. Select the texture.
3. In the **Inspector**, scroll to the **Texture Import Settings**.
4. Under **Advanced Options**, check the box **Read/Write Enabled**.
5. Click **Apply**.

After enabling Read/Write on the texture, you can then **drag your custom prefab into the 3D Model field** in the Animation section, just like the default SK\_BaseModel.

### Using Non–Game Creator 2 Characters

If you don’t need or want to use the **Game Creator 2 Character Component**, you can still use **HeroBridge** with these characters.\
This is often useful for **stationary NPCs** or **characters controlled by other controller systems**.

However, it’s **very important** that the **GameObject** you assign in any **“Sidekick Character”** fields is the **parent GameObject** of the one containing the **Animator** component.\
This setup ensures that HeroBridge can correctly access and manipulate the character’s parts.

> ⚠️ **Note:**\
> Compatibility with custom character controllers is **not guaranteed** and may require additional setup or scripting adjustments.

{% content-ref url="/pages/re93dLEkHgqDVbjJPyRP" %}
[Saving Sidekick Characters](/info/game-creator-2-assets/herobridge/setup-guide/saving-sidekick-characters)
{% endcontent-ref %}


# Installing New Sidekick Modular Character Packs

## Installing New Sidekick Modular Character Packs

When adding new **Sidekick Modular Character Packs to an project with HeroBridge already installed**, follow the steps below to ensure the new pack is properly recognized.

### Step 1 - Regenerate Cache

After importing the new character pack, go to:

`Game Creator > Settings > HeroBridge`

Under **Cache Management**, click **Regenerate Cache**.\
This refreshes HeroBridge’s cache and allows it to detect new Sidekick Modular Character parts, presets, colors and expressions.

### &#x20;Step 2 - (Optional) Add Pack Definitions

{% hint style="info" %}
💡 **Tip:**\
You can include **multiple prefixes** under one pack by separating them with a forward slash `/`.\
For example:

`SK_GOBL_FIGT/SK_GOBL_BASE`

This lets HeroBridge group all related assets under the same pack name.
{% endhint %}

If HeroBridge hasn’t yet been updated to support Filter By Pack for the new pack yet, you can manually add its definition:

1. Open **HeroBridge Settings**.
2. Click **Add Entry**.
3. Set the **Prefix** to the first three underscore-separated parts of the new meshes in the pack.
   * Example: `SK_HUMN_BASE`
4. Set the **Name** to the readable name of the pack.
   * Example: `Human - Base`

<figure><img src="/files/xloD01tWL2MT8aPUKWFD" alt=""><figcaption></figcaption></figure>


# Saving Sidekick Characters

## Saving Sidekick Characters

HeroBridge allows you to **save a Sidekick character’s appearance** so it can be restored later, for example, when loading a saved game or switching scenes.

To save a Sidekick character, use the **Remember Component** from Game Creator.

***

### **Setup**

1. Select the **GameObject** that has the **Character Component** for your Sidekick character.
2. Add a **Remember Component.**
3. Click **Add Memory** and select: `Sidekick > Sidekick Character`

{% hint style="info" %}
💡 **Tip:**\
If your player exists in its own scene, you can move parts, bodyshape, and color across scenes by giving the **player character the same Remember ID** in each scene.\
When the new scene loads, the character’s appearance will automatically be restored. (Using additive scenes is still the recommended approach for more complex setups.)
{% endhint %}

***

#### **Memory Options**

When adding a Sidekick Character memory, you’ll see three **bool options** that are **enabled by default**:

* **Save Parts** – Stores the currently equipped parts (Head, Hair, Torso, etc.).
* **Save Blendshapes** – Stores the character’s body blendshapes (Body Type, Body Size, Musculature).
* **Save Color** – Stores all color values (skin, hair, eyes, accessories, etc.).

<figure><img src="/files/h5gIoFteqykCGmXSS5EZ" alt="" width="375"><figcaption></figcaption></figure>


# Animation Patcher

By default, most animations have the **Jaw Close** property set to `0`.\
However, **Sidekick** and many other character models require this value to be set to `1` for the mouth to appear closed.

The **Animation Patcher** tool automatically corrects this by patching animation clips to ensure the jaw remains properly closed.

#### Usage

1. **Open the Animation Patcher**\
   From the toolbar, select `Tools > HeroBridge > Animation Patcher`
2. **Select Animations to Patch**
   * Drag and drop a single **Animation Clip**, **or**
   * Select an entire **folder** containing animations to process.
3. **Set the Property Name**\
   In the **Property Name** field, specify the key that should be modified inside the animation.
   * The default name is **Jaw Close**.
   * Most animations use this property name.
4. **Run the Patch**\
   Click **Patch Animations** to automatically adjust the jaw property.

#### Patching Game Creator 2 Animations

If you wish to patch Game Creator 2’s built-in animations, most of them can be found inside the **Locomotion** folders.\
Simply select these folders in the **Animation Patcher** window and apply the patch.


# Demo Scene

HeroBridge includes **one demo scene** designed to demonstrate how to create a runtime character customizer using **HeroBridge** and **Synty Studios Sidekick Modular Character System**.

#### **Location**

After installing the example content, the demo scene can be found at:\
\&#xNAN;**`Assets/Plugins/GameCreator/Installs/HeroBridge.Examples@1.0.0/Scenes/Customize Character`**

#### **Overview**

This is the official **demo scene from HeroBridge – Sidekick Integration for Game Creator 2**, showcasing the **runtime character customizer** in action.

It demonstrates how **HeroBridge** seamlessly connects **Game Creator 2** with **Sidekick**, enabling full modular character customization entirely through **visual scripting**, with **no coding required**.

#### **Built With**

The entire demo scene is built using **Game Creator 2’s visual scripting system**, powered by the new **HeroBridge instructions and properties** to manage modular parts, materials, and blendshapes at runtime.

#### **What You Can Do**

In this demo, you can:

* **Cycle** through modular parts such as **hair, outfits, and accessories**
* **Change** part **colors** in real time
* **Adjust** the **body shape** using blendshapes

#### **Try It Online**

You can preview the **Customize Character** demo scene on **itch.io** before purchasing HeroBridge.\
This allows you to explore how HeroBridge integrates with Sidekick and Game Creator 2 directly in your browser.

{% hint style="warning" %}
The **“Play Demo Scene”** button shown in the **online showcase** launches the **Game Creator 2 Traversal 2 demo scene**.\
This scene is **not included** in the HeroBridge package, it’s simply used online to **test out the character you customized** and **see it in action** within a gameplay environment.
{% endhint %}

{% embed url="<https://fullscreenstudios.itch.io/herobridge>" %}


# Triggers


# On Dropdown Value Changed

The **On Dropdown Value Changed** trigger activates whenever the selected option in a **TextMeshPro Dropdown** changes.\
This makes it perfect for creating a character customizer.

#### Inside the Trigger

**Game Object**\
A reference to the **TextMeshPro Dropdown** you want to monitor.\
When the player changes the dropdown’s value (for example, selecting a new hairstyle), this trigger will fire and execute any linked instruction

***

#### Example Use Case

You can use **On Dropdown Value Changed** to make your character customizer.\
For example:

* Attach this trigger to an **Dropdown**.
* When the player selects a new option, the trigger fires and runs a **Set Text** instruction that uses the **Set Part (String Property)** to apply the selected part to the Sidekick Character.

<figure><img src="/files/S7LDxrM6G32tsUhrGZZ6" alt="" width="375"><figcaption></figcaption></figure>


# On Button Hold

The **On Button Hold** trigger activates **repeatedly** while a **TextMeshPro Button** is being held down.

#### Inside the Trigger

**Game Object**\
A reference to the **GameObject** containing the **Button** component.

By default, this is set to **Self**, meaning the trigger will monitor a button on the same GameObject it’s attached to.

**Delay**\
Time in seconds between each execution while the button is held down.

For example, setting a **Delay** of `0.2` will execute the instructions every 0.2 seconds as long as the button remains pressed.


# Instructions


# Set Part

{% hint style="info" %}
💡 **Tip:**

If the character is a **Game Creator 2 character**, you can use the **On Model Change** trigger to detect when a part has been changed.
{% endhint %}

To set a part on your character, use the **Set Part** instruction.\
This instruction can be used in various contexts, for example, inside a **Trigger**, a **Button** for a custom character customizer, or even inside an **Item** to apply armor or equipment.

### Inside the Instruction

#### Sidekick Character

This is the character you want to apply the part to.

#### Type

The Type field defines which category of part you want to modify.\
There are **38 categories** available, such as:

* Head
* Hair
* Torso
* Hips
* Attachments
* …and more.

#### Filter by Pack

You can optionally use the **Filter by Pack** dropdown to limit the list of available parts to a specific **Sidekick Modular Character pack**.\
This makes it easier to locate and assign parts from a particular pack, especially when multiple packs are installed.

***

### **Example Use Case**

You can create a **character customizer** using UI buttons that call the **Set Part** instruction.\
Each button can be configured with a different **part** from your Sidekick pack, allowing players to easily switch hairstyles, armor, or accessories during customization.

<figure><img src="/files/xpVFHbChx0tOI9HzusSy" alt="" width="375"><figcaption></figcaption></figure>


# Set Preset

{% hint style="info" %}
💡 **Tip:**

If the character is a **Game Creator 2 character**, you can use the **On Model Change** trigger to detect when a preset has been changed.
{% endhint %}

The **Set Preset** instruction works similarly to **Set Part**, but instead of individual parts, it lets you apply **pre-made appearance presets** included with the **Sidekick Modular Character packs**.\
Presets can define combinations of parts, body shapes, and color themes, allowing you to switch between character looks quickly.

### Inside the Instruction

#### Sidekick Character

This is the character you want to apply the preset to.

#### Type

The **Type** field determines which preset category to apply.\
You can set presets for:

* Head
* Upper Body
* Lower Body
* Bodyshapes
* Colors

These presets are defined and included within each **Sidekick Modular Character pack**.

#### Filter by Group

Use **Filter by Group** to narrow down the available presets by **theme or category**, such as *Fantasy*, *Pirates*, *Modern*, or other style groups.\
This makes it easy to locate specific preset collections when working with multiple themed packs.

***

### **Example Use Case**

You can equip a full **Upper Body preset** when the player equips an armor item.

**Option 1: Inside the Item (Recommended)**

The most efficient way is to add the **Set Preset** instruction directly inside the **On Equip** section of the armor item itself.

This ensures that when the player equips the item, the preset is immediately applied, for example, switching the character’s **Upper Body preset** to “Fantasy Knight” to match the armor’s design.

This approach is simple, clean, and doesn’t require additional setup or conditions.

**Option 2: Using a Trigger**

Alternatively, you can use a **Trigger** with the **On Equip** event to apply the preset.\
In this case, you should use **conditions** to check which item was equipped to ensure it matches the one you want to apply a preset for.

<figure><img src="/files/qqGoKaIldht3oA1n1K72" alt="" width="373"><figcaption></figcaption></figure>


# Set Expression

The **Set Expression** instruction allows you to change the **facial blendshape** of a character.

For example, you can make your character look **in pain** when taking damage by triggering this instruction on an **Attribute Change** trigger, or make them look **happy** during dialogue.

***Expressions** are exported during **cache generation** from the **runtime facial demo animation controller** included in the **FREE Starter Pack - S***~~***i***~~***dekick Modular Characters** asset*

### Inside the Instruction

#### Sidekick Character

The character to apply the facial expression to.

#### Expression

Select which facial expression to apply.\
There are **over 19 expressions** available, including:

* In Pain
* Happy
* Sad
* Angry
* Surprised
* Neutral\
  …and more

#### Transition

Defines how smoothly the expression changes.\
Enter a **transition duration** (in seconds).

If the **Transition** value is greater than **0**, additional options appear:

* **Easing:** Choose how the blendshape transitions (e.g., Linear, Ease In, Ease Out).
* **Time Mode:** Select whether to use **Game Time** or **Unscaled Time** for the transition.
* **Wait to Complete:** When enabled, the instruction **waits until the transition finishes** before continuing to the next instruction in your sequence.

***

### **Example Use Case**

You can make your character look **in pain** when taking damage using an **On Attribute Change** trigger.

For example:

1. Create a **Trigger** with **On Attribute Change (HP)** as the event.
2. Inside the trigger, add the **Set Expression** instruction.
3. Assign your **Sidekick Character** and choose the **“In Pain”** expression.
4. (Optional) Add a short **Transition** time (like 1.2s) for a smoother, natural reaction.

Now, whenever the character loses HP, their facial expression will change to show pain.

<figure><img src="/files/hiHghmR0Ej8f5aUCfjph" alt="" width="375"><figcaption></figcaption></figure>


# Cycle Part

The **Cycle Part** instruction allows you to cycle through parts of a specific category on a Sidekick Character,  moving to the **Next**, **Previous**, or a **Random** part.\
If the character currently has no part equipped in that category, it automatically starts with the first available part from the catalog cache.

#### Inside the Instruction

**Sidekick Character**\
The character whose parts you want to cycle.

**Type**\
Select the category of the part you want to cycle through.\
There are **38 categories** available, such as:

* Head
* Hair
* Torso
* Hips
* Attachments
* …and more.

**Direction**\
Choose the cycling direction:

* **Next** - Cycles forward through the available parts.
* **Previous** - Cycles backward through the available parts.
* **Random** - Selects a random part from the available options.

**Filter by Pack**\
By default set to **Any**.\
Allows you to limit the cycling to parts from a specific **Sidekick Modular Character Pack** (e.g., only cycle through parts in the “Human Base” pack).

**Include None**\
When enabled, if the character is currently wearing the **last part** in the catalog, cycling **Next** will remove the part (set it to none).\
Cycling **Next** again will equip the **first** part in the catalog cache.

***

#### Example Use Case

You can create a **character customizer** where players can cycle through hairstyles or outfits.\
For example, add a **UI Button** that runs the **Cycle Part (Next)** instruction whenever it’s clicked.\
Each press of the button will move to the next available hair style, letting players easily preview different looks before confirming their choice.

<figure><img src="/files/uG4bNtOYEoYEHFAnirRL" alt="" width="375"><figcaption></figcaption></figure>


# Generate Sidekick Part Icons and Buttons

The **Generate Sidekick Part Icons and Buttons** instruction automatically generates preview icons for parts of a specific category on a Sidekick Character and creates corresponding UI buttons. These buttons can be used in menus to select parts, including an optional "None" button for removing parts.

***

#### **Inside the Instruction**

**Part Type**\
Select the category of the part you want to generate previews for.\
There are 38 categories available, such as:

* Head
* Hair
* Torso
* Hips
* Attachments\
  … and more.

**Button Prefab**\
The prefab of the button that will be instantiated for each part.

* Inside this prefab, there should be a child named **Icon**.
* The generated preview for each part will be applied to this icon.

**Empty Button Prefab** *(Optional)*\
If you provide a prefab for an empty button, this will be generated last and used for removing parts (setting the part to none).

* If extra parts are included, the icon inside this button will display them (for example, a bald character if Hair is the main Part Type but Torso and Head are in Extra Parts).
* If this is left empty, no "None" button will be generated.

**Buttons Parent**\
The parent GameObject where all generated buttons will be placed in the hierarchy.

**Center Part Type**\
Select the category of the part to center the camera on for consistent icon previews.

* Example: When generating hair icons, you may want to center on the Head to ensure the hair is positioned correctly in the icon.

**Extra Parts** *(Optional)*\
Add any additional parts to include in the preview icons.

* Useful for adding facial features, body parts, or accessories to make the icon more descriptive.
* Part names must match the catalog format, e.g., `SK_HUMN_BASE_01_01HEAD_HU01`.
* To find part names: use the **Set Part** instruction part's dropdown (Right-click copy and paste) or reference Synty’s Dex.

**Use Matching Parts**\
When enabled, automatically applies symmetrical elements.

* Example: If a left eyebrow is applied, the corresponding right eyebrow will also be applied if available.

**Icon Resolution**\
Sets the resolution of the generated preview icon.

* Lower resolutions generate faster and use less RAM but reduce quality.
* Find a balance depending on icon size in the UI.

**Rotation Offset**\
Apply a rotation to the camera for the preview.

* Allows taking snapshots from the front, side, or back.

**Vertical Offset**\
Move the camera up or down relative to the centered part.

* Helps position parts correctly within the icon frame.

**Horizontal Offset**\
Move the camera left or right relative to the centered part.

**Zoom Modifier**\
Adjust the camera zoom to make parts appear closer or further away in the icon.


# Export to Prefab

{% hint style="info" %}
💡 **Tip:**

This instruction is an **editor-only tool**. It cannot be used in a built game.\
Use it inside the Unity Editor to quickly turn your Sidekick character into a ready-to-use prefab, perfect for building libraries of NPCs or enemies.
{% endhint %}

To export your character as a prefab, use the **Export to Prefab** instruction.

When executed, a window appears where you can enter the **name** for your exported character.\
After confirming, the system will:

* Create a **new folder** named after the character
* Generate subfolders for:
  * **Materials**
  * **Meshes**
  * **Textures**
* Export the **model only** as a standalone prefab

### **Inside the Instruction**

#### **Sidekick Character**

This is the character you want to export as a prefab.


# Populate Dropdown

The **Populate Dropdown** instruction automatically fills a **TextMeshPro Dropdown** with all available parts of a chosen type from the cache's catalog.

#### Inside the Instruction

**Dropdown**\
A reference to the **TextMeshPro Dropdown** you want to populate with part options.

**Sidekick Character**\
The character whose current parts will be checked.\
If a matching part is found, it will be set as the currently selected dropdown option.\
If no match is found and **Include None** is enabled, the dropdown will default to the **None** option.

**Type**\
Choose which **part category** to populate the dropdown with.\
There are **38 categories** available, such as:

* Head
* Hair
* Torso
* Hips
* Attachments
* …and more.

**Filter by Pack**\
By default set to **Any**.\
Allows you to limit the dropdown to parts from a specific **Sidekick Modular Character Pack** (for example, only show parts from the “Human Base” pack).

**Include None**\
When enabled, adds a **None** option to the dropdown.\
Selecting this option in the dropdown will remove that part type from the character.

***

#### Example Use Case

You can use **Populate Dropdown** to create **character customizer** interface.\
For example, attach this instruction to an **On Enable Trigger** on your dropdown.\
When the UI opens (e.g., at the start of the game or in a customization menu), the dropdown automatically fills with all available hairstyles, heads, or other parts for your chosen character.

<figure><img src="/files/QH2cuHMgPjiB7ofDxdtJ" alt="" width="375"><figcaption></figcaption></figure>


# Change Height With Easing

The **Change Height With Easing** instruction allows you to smoothly adjust the **height** of a **UI element** over time using easing.\
This is perfect for creating dynamic UI effects, such as expanding or collapsing panels.

#### Inside the Instruction

**Rect Transform**\
The **Rect Transform** component whose height will be modified.

**Height**\
The **target height value** that the Rect Transform will reach by the end of the transition.

**Duration**\
The **time in seconds** it takes to smoothly change from the current height to the target height.

**Easing**\
Specifies the **easing curve** used for the transition, controlling how the height change accelerates and decelerates.\
You can choose from easing types such as **Linear**, **Ease In**, **Ease Out**, or **Ease In-Out** for different animation styles.


# Conditions


# Has Part

The **Has Part** condition checks if a character currently has a **specific part** equipped, not just the general category.

This is ideal for applying logic based on **exact parts** the character is wearing, such as triggering stat bonuses, abilities, or effects tied to specific equipment.

### Inside the Condition

#### Sidekick Character

The character you want to check.\
Supports both **Game Creator 2** and **non–Game Creator 2 characters**.

#### Part Type

Select the **category** of the part you want to check for.\
There are **38 different categories**, such as:

* Head
* Hair
* Torso
* Hips
* Attachments\
  …and more.

#### Part Name

The **name** of the part to verify if the character currently has equipped.

#### Filter by Pack

Filters the available parts dropdown to only show parts from a specific **Sidekick Modular Character Pack**.\
Makes it easier to find the correct part when working with multiple packs.

***

### Example Use Case

When a character **equips a new part**, you can use this condition to check if it’s a specific one, for example, the **Fantasy Knight Armor**.\
If the character is wearing that part, you could **add +100 Defense** to them for equipping that armor.

<figure><img src="/files/4VusRec0PX7OnjkNr1zT" alt="" width="375"><figcaption></figcaption></figure>


# Has Part Type

The **Has Part Type** condition checks if a character currently has **any part equipped** of a specific **part category**.

This is useful for applying logic based on whether a character has something equipped. For example, determining if they are wearing any kind of **helmet** or **hair piece**.

### Inside the Condition

#### Sidekick Character

The character you want to check.\
Supports both **Game Creator 2** and **non–Game Creator 2 characters**.

#### Part Type

Select the **category** of part to check for.\
There are **38 different categories**, including:

* Head
* Hair
* Torso
* Hips
* Attachments\
  …and more.

This condition returns **true** if the character has *any* part equipped in the selected type.

***

### Example Use Case

When equipping a **helmet**, you can use the **Has Part Type** condition to check if the character has any **Hair** parts equipped.\
If true, you can remove the hair part to prevent **clipping through the helmet**.

<figure><img src="/files/V9MafrJyA2V9bebbUye0" alt="" width="375"><figcaption></figcaption></figure>


# Properties

{% hint style="info" %}
**Set vs Get**

**Set** is used to apply or update a value or part on a Sidekick character, such as setting a part, restoring an outfit, or body blendshapes, while **Get** retrieves the current value or part from a character, enabling it to be stored, compared, or used in logic and conditions.
{% endhint %}

### Understanding Game Creator 2 Properties

In **Game Creator 2**, **properties** are the **fields inside instructions**, conditions, and actions that define what value an instruction works with.\
They’re not standalone instructions, instead, they’re **input fields** that support dynamic values.

Each property type matches the kind of data it represents:

* **String Properties (like Get Part, Set Part etc)** work with instructions like **Set Text.**
* **Number properties (Like Set or Get body blendshapes)** work with **Set Number.**
* **Color Properties** (like **Get Individual Color** or **Set Individual Color**) work with **Set Color** instructions

**HeroBridge** adds its own **Sidekick-specific properties** (like **Get Part**, **Set Part**, and **Get All Parts**) that integrate seamlessly into this system.\
This allows you to connect Sidekick’s modular character data directly into **Game Creator 2’s visual scripting**.

{% content-ref url="/pages/WY52u8tWbYYlpcX4kX60" %}
[Set](/info/game-creator-2-assets/herobridge/properties/set)
{% endcontent-ref %}

{% content-ref url="/pages/DRYyTFpHMLlXzC09jQEF" %}
[Get](/info/game-creator-2-assets/herobridge/properties/get)
{% endcontent-ref %}


# Set


# Set Part

{% hint style="info" %}
💡 **Tip:**\
You can set multiple parts at once by separating them with a comma (**`,`**).\
For example:\
`SK_HUMN_BASE_01_01HEAD_HU01,SK_HUMN_BASE_01_02HAIR_HU01`
{% endhint %}

The **Set Part** property works like **Get Part**, but instead of retrieving a part, it’s used to **apply parts** to a **Sidekick Character**.\
You can use this property anywhere properties are supported, for example, in the **Set Text** instruction.

### Inside the Property

#### Sidekick Character

The character you want to apply the parts to.

#### Reset Body

When enabled, this option **resets the character’s body** before applying the new parts.\
This ensures that any parts not included in the stored parts are properly removed.

If disabled, existing parts that aren’t overridden will remain on the character.

#### **Use Matching Part**

When enabled, this option attempts to find and apply **matching parts** for symmetrical elements.\
For example, if you apply an eyebrow part to the left side, it will automatically search for and apply the **corresponding right eyebrow** if available.

***

### Example Use Cases

If you previously saved the **Hair** part when equipping a helmet, you can later use **Set Part** to **restore the saved hair part** when the helmet is unequipped.

<figure><img src="/files/CxLYXTHTuKk7nWwzgoan" alt="" width="370"><figcaption></figcaption></figure>


# Set Body Blendshape

{% hint style="warning" %}
⚠️ **Note:**\
Values should generally be between **-100 and 100**.\
Sidekick own presets are designed within this range, setting them outside it can cause body parts to no longer fit together properly.
{% endhint %}

The **Set Body Blendshape** property allows you to modify a Sidekick Character’s body attributes, such as body type, size, or musculature.\
You can use this in any instruction that supports **number properties**, such as **Set Number, or Add Number.**

### Inside the Property

**Sidekick Character**\
The character to apply the body blendshape value to.

**Property Type**\
Select which blendshape to modify:

* **Body Type**
* **Body Size**
* **Musculature**

***

### Example Use Case

There are many creative ways to use **Set Body Blendshape** in gameplay:

* **Body Size:** Gradually increase the body size every time the character eats food, and decrease it when exercising.
* **Musculature:** Increase musculature when exercising, while also increasing stamina with **Stats 2**. Decrease it over time if the character hasn’t exercised.
* **Body Type:** Adjust masculine or feminine appearance with a **slider** in a character creation menu.

<figure><img src="/files/02u6tScCfvLc8aaFgXYh" alt="" width="538"><figcaption></figcaption></figure>


# Set Color

{% hint style="warning" %}
⚠️ **Note:**\
Not all color options are currently in use by Sidekick, but they are included in the Sidekick database.\
These unused color properties are forward-compatible, meaning if Sidekick begins using them in future updates, they’ll automatically work with your existing setup.
{% endhint %}

The **Set Color** property applies a specific color to a Sidekick Character.\
It can be used in any instruction that supports **Color properties**, such as **Set Color**.

### **Inside the Property**

* **Sidekick Character**\
  The character to apply the color to.
* **Color Property**\
  Choose which color slot to modify, for example:
  * Skin Color
  * Eye Color
  * Eyebrow Color
  * Hair Color\
    …and many more.

***

### **Example Use Case**

You can use **Set Individual Color** to create a **character customizer** that lets players change features like **eye color**, **eyebrow color**, or **skin tone** directly in-game.

<figure><img src="/files/yvhlBBAmao1ES5IWWdzV" alt="" width="368"><figcaption></figcaption></figure>


# Set All Colors

The **Set All Colors** property sets the all of the colors from a **Sidekick Character** from a string.\
You can use this property in any instruction that supports **string properties**, such as **Set Text**.

### **Inside the Property**

**Sidekick Character**\
The character to retrieve the colors from.

***

### **Example Use Case**

If you need your character to temporarily wear a special outfit with different colors, you can use **Get All Colors** to store the original colors in a **Local Variable (String)** before applying the new one.\
Later, you can restore it using **Set All Colors** to bring the character’s appearance back to normal.


# Get


# Get All Parts

The **Get All Parts** property retrieves **all currently equipped parts** from a **Sidekick Character**.

You can use this in any instruction that supports **string properties**, such as **Set Text**.

### Inside the Property

#### Sidekick Character

The character to retrieve all equipped parts from.

***

### Example Use Case

Use **Get All Parts** to **store every equipped part** on a character in a **Local Variable**.\
This is useful when:

* Saving an **entire outfit** to reapply later, or
* Running a **mission or cutscene** that requires the character to wear specific clothing.

After the mission or sequence, you can **restore all previously stored parts** to return the character to their original look.

<figure><img src="/files/ZVcNKZTYfD1pfj7WeIvU" alt="" width="370"><figcaption></figcaption></figure>


# Get Part

The **Get Part** property retrieves a **specific part** from a **Sidekick Character**.\
You can use this in any instruction that supports **string properties**, such as **Set Text.**

### Inside the Property

#### Sidekick Character

The character to retrieve the part from.

#### Part Type

Select the **category** of the part to retrieve.\
There are **38 available types**, such as:

* Head
* Hair
* Torso
* Hips
* Attachments\
  …and more.

***

### Example Use Case

When equipping a **helmet**, you might want to **remove the hair part** to avoid clipping.\
Before doing so, use **Get Part** to store the current **Hair** part into a **Local Variable** on the character.\
Then, when unequipping the helmet later, you can **retrieve the stored hair part** from the local variable and reapply it using **Set Part**.

<figure><img src="/files/gOJ6OqEvXGeqHj8vzJ8B" alt="" width="370"><figcaption></figcaption></figure>


# Get Body Blendshape

The **Get Body Blendshape** property retrieves a specific blendshape value from a Sidekick Character.\
You can use this in any instruction that supports **number properties**, such as **Set Number**.

### Inside the Property

**Sidekick Character**\
The character to retrieve the body blendshape value from.

**Property Type**\
Select which blendshape to get:

* **Body Type**
* **Body Size**
* **Musculature**

***

### Example Use Case

Use **Get Body Blendshape** to store the character’s body values inside **Local Variables**, or to copy them from another character.\
This is useful if you want to temporarily modify a character’s body shape and later restore it, or synchronize appearances between multiple characters.

<figure><img src="/files/GDhZOurJAHDKJMVyG01g" alt="" width="380"><figcaption></figcaption></figure>


# Get All Colors

The **Get All Colors** property retrieves the all of the colors from a **Sidekick Character** as a string.\
This makes it easy to store or transfer the character’s full color setup without manually saving each individual color.\
You can use this property in any instruction that supports **string properties**, such as **Set Text**.

### **Inside the Property**

**Sidekick Character**\
The character to retrieve the colors from.

***

### **Example Use Case**

If you need your character to temporarily wear a special outfit with different colors, you can use **Get All Colors** to store the original colors in a **Local Variable (String)** before applying the new one.\
Later, you can restore it using **Set All Colors** to bring the character’s appearance back to normal.


# Get Color

{% hint style="warning" %}
⚠️ **Note:**\
Not all color options are currently in use by Sidekick, but they are included in the Sidekick database.\
These unused color properties are forward-compatible, meaning if Sidekick begins using them in future updates, they’ll automatically work with your existing setup.
{% endhint %}

The **Get Color** property retrieves a specific color from a Sidekick Character.\
You can use this in any instruction that supports **Color properties**, such as **Set Color**.

### **Inside the Property**

* **Sidekick Character**\
  The character to retrieve the color from.
* **Color Property**\
  Select which color to get.\
  There are over **200 available color options**, such as:
  * Skin Color
  * Left Ear Color
  * Right Ear Color
  * Eye Color
  * Eyebrow Color\
    …and many more.

***

### **Example Use Case**

You can store a character’s **eye color** or **hair color** in **Local Variables.** Later, you can reapply these saved colors using **Set Individual Color**.

<figure><img src="/files/eq79dXe98skWmomdRBdb" alt="" width="381"><figcaption></figcaption></figure>


# Get Selected Dropdown Option

The **Get Selected Dropdown Option** property retrieves the currently selected option from a **TextMeshPro Dropdown**.\
This can be used in any instruction that supports **string properties**, such as **Set Text** instruction.

#### Inside the Property

**Dropdown**\
A reference to the **TextMeshPro Dropdown** you want to read the current selection from.\
The property returns the text value of the option currently chosen in the dropdown.


# Troubleshooting

##


# Cache generation

HeroBridge relies on pre-generated cache data to display available parts, presets, colors, body shapes, species, and expressions inside Game Creator 2 instructions (like **Set Part**).\
If for some reason the cache generation has failed, or if no parts appear in dropdown menus, this indicates the cache wasn’t created correctly.

**Why we use cache**

When HeroBridge is installed through the **Package Manager**, HeroBridge automatically attempts to export all cache data during setup.\
This process extracts data directly from the **Sidekick database** (including expressions from the demo animation controller) and stores it for runtime access.

This cache system is used for **performance** and **compatibility** reasons:

* It prevents runtime lookups that could cause freezing or hitching when querying the Sidekick database.
* It enables **WebGL support**, since the Sidekick database system isn’t supported on WebGL, but cached data is.

**Troubleshooting steps**

1. **Open the Sidekick Character Tool**
   * If the tool opens and you don’t get errors about missing parts, the Sidekick installation is fine.
   * In this case, you can manually re-generate the HeroBridge cache.
2. **Manually regenerate the cache**
   * Go to the Unity toolbar:\
     **Game Creator > Settings > HeroBridge**
   * Inside the settings window, click **Regenerate Cache**.
   * You can also view the current cache status here to confirm successful generation.
3. **If the Sidekick Character Tool reports missing parts**
   * This means your Sidekick installation is incomplete or corrupted.
   * You’ll need to completely reinstall Sidekick and HeroBridge.

**Full reinstall steps**

1. Uninstall HeroBridge:
   * Go to **Game Creator > Uninstall > HeroBridge**
2. Delete the **Synty** folder from your project.
3. Follow the setup guide from the beginning, ensuring the Sidekick tool works *before* reinstalling HeroBridge:

   **Setup checklist:**

   1. Install **Game Creator 2**
   2. Install **FREE Starter Pack – Sidekick Modular Characters** by Synty
   3. Download and install the **Sidekick Tool**
      * After installing the Starter Pack, a popup will prompt you to install the Sidekick Tool.
      * If it doesn’t appear, manually open it via:\
        **Synty > Sidekick Tool Downloader**
      * Or download it directly from:\
        <https://github.com/SyntyStudios/SidekicksToolRelease/releases/latest/download/Sidekicks.unitypackage>


# Character States

**HeroBridge** relies on **Game Creator 2’s Change Model** method when updating a character’s appearance.\
Because of this, there is a known limitation:

After a model change, **any States the character was in are lost** and **not re-applied** to the new model instance.\
To maintain consistent behavior, you’ll need to **re-enter the character’s States** after the model change.

This limitation is inherent to how **Game Creator 2** handles model changes and occurs **anytime the Change Model instruction is used**, regardless of where it’s called from.

{% hint style="info" %}
💡 **Tip:**

A workaround for this limitation is to **store the character’s current state** in **local variables.**

For example, you can create boolean variables such as:

* `StateIsRunning`
* `StateIsWalking`
* `StateIsIdle`

After the model change, use these stored variables to **reapply the appropriate states** to the character.
{% endhint %}


# NullReferenceException (Shooter 2)

If you encounter a **NullReferenceException** similar to the following after changing a part, preset, color, or bodyshape of your character:

**Error:**\
NullReferenceException (GameCreator.Runtime.Shooter.RigShooterHuman.UpdateFK)

#### Cause

**HeroBridge** works with **Sidekick’s Runtime API**, and under the hood it also relies on **Game Creator 2’s API,** specifically the **Change Model** method.\
Whenever you modify a **part**, **color**, **preset**, or **bodyshape**, HeroBridge triggers a model change using Game Creator’s Change Model method.

However, in **Shooter 2**, changing the character’s model while a weapon is equipped cause the **RigShooterHuman** system to lose its references, resulting in the NullReferenceException error.

{% hint style="info" %}
💡 **Tip:**

A workaround for this issue is to **store the currently equipped weapon and prop** in **local variables** on the character.

Then, use the **On Model Change** trigger to:

1. **Unequip** the weapon and prop.
2. **Wait one frame** (for the model change to complete).
3. **Re-equip** the weapon and prop using the stored local variables.

This ensures that the **Shooter 2 rig** properly reinitializes and restores all references after the model update.
{% endhint %}

A **bug report has been submitted** regarding this issue so it can be addressed in a future update of **Game Creator 2.**


# Releases

## 1.0.3 (8th January 2026)

**Changes**

* The cache generator will now attempt to manually locate the parts path if it detects invalid paths in the Sidekicks Database.

## 1.0.2 (20th December 2025)

**Changes**

* Minor improvements to Animation Patcher

## 1.0.1 (12th December 2025)

**Enchantments**

* Improved Animation Patcher
* Unity 6.3 Support

## 1.0.0 (11th December 2025)

First release


# Inventory Extended

<figure><img src="/files/974LL48KJiLBBNz2tKXi" alt=""><figcaption></figcaption></figure>

**Inventory Extended** is a modular extension for **Game Creator 2 Inventory** that adds advanced crafting, smelting, dismantling, item states, drag & drop between grid bags, and recipes with item property requirements.

All examples are built using **Visual Scripting**, making them modular and easy to modify

**Item States**

Create state variants for any item and change how it looks and behaves without duplicating it.

A state can modify:

* Title
* Description
* Sprite & text color
* Pickup and use audio
* And more

Example: Turn a **Normal Sword** into a **Broken Sword** by adding a state that checks the swords durability, instead of replacing the item.

**Advanced Smelting & Dismantling**

Define exactly what happens when an item is processed.

* Configurable processing time
* Different smelt/dismantle states based on conditions or item properties (quality, durability, etc.)
* Multiple outputs per state
* Random output amount ranges (1–3, etc.)
* Individual drop chances per output
* Optional properties added to output items

**List & Grid Recipes**

Two new crafting recipe systems are included.

**List-Based Recipes**

* Configurable processing time
* Multiple inputs and outputs
* Crafting conditions
* Item property requirements (e.g., Quality > High)

**Grid-Based Recipes**

* Layout-based crafting
* Position-sensitive recipes
* Recipe book example
* Item property requirements

Outputs can optionally receive item properties.

**Queue-Based Processing Example**

Craft, smelt, or dismantle multiple items in sequence.

* Add multiple items to the queue
* Automatic sequential processing
* View active and upcoming items

**Fuel-Driven Processing Example**

Processing can require fuel or any resource system.

* Consumes fuel over time
* Pauses when fuel runs out
* Easy to adapt for power or energy mechanics

**List-Based Examples**

* List Crafting (craftable checks & required resources)
* List Furnace (smeltable items with output chances)
* List Dismantle (dismantle results with chances)

Includes duration support and quantity slider.

**Grid-Based Examples**

* Grid Inventory (2x2 crafting, equipment slots, sorting, recipe book)
* Grid Chest (drag & drop, sorting, quick transfer)
* Grid Craft (3x3 workbench crafting)
* Grid Dismantle
* Grid Furnace

**World Space Station UI**

* Displays active processing above stations
* Item preview
* Remaining amount
* Time left

**Hotbar Example**

* First inventory slots act as a configurable hotbar
* Equip and use items
* Includes an extended drop instruction:\
  Dropped items retain all their properties (durability, quality, etc.)\
  Items without a 3D model are placed inside small bag when dropped<br>

**Pouch System Example**

* Store items inside pouch items
* Hover to preview contents

**Durability Example**

Built using visual scripting and easily adaptable for:

* Weapon or tool durability
* Pouch capacity
* Item spoilage
* Any value-based mechanic

**Component Slot Item Filter**

Control what can be placed in specific inventory slots.

* Filter by item type
* Define allowed or disallowed items
* Create output-only slots
* Suitable for equipment or crafting output slots

**Seamless Integration**

* No core file modification
* No patching required
* Built entirely as an extension

**Visual Scripting Expansion**

Expands Inventory 2 with Visual Scripting Instructions, Conditions, and Properties:<br>

**Instructions (30+)**\
Craft List Recipe, Smelt Item, Dismantle Item, Drop Runtime Item (Enchanted), Preview Bag, Use Item, and more

**Conditions (10+)**\
Can Dismantle Runtime Item, Can Smelt Runtime Item, Can Craft Grid Recipe, Is Runtime Item Allowed By Filter, and more

**Properties (70+)**

Get GameObject Bag From Cell, Get GameObject UI Hovered, Get String From Runtime Item State (Title/Description), and more

🎮 **Try It Yourself!**

You can **preview the Extended Inventory** and the included Examples **directly in your browser** or **download the Windows build** on Itch.io


---

[Next Page](/info/llms-full.txt/1)